What is Ingress in Home Assistant
Why This Is the Preferred Method in Docker
| Feature | Panel Iframe (Ingress-like) | Web Dashboard |
|---|---|---|
| Sidebar integration | ✅ Yes | ❌ No |
| Secure (no public access) | ✅ Internal Docker only | ❌ Often public/external |
| Works in mobile app | ✅ Yes | ❌ No |
| Port management | ✅ None needed | ❌ Manual |
| Setup complexity | ✅ Minimal | ❌ Medium |
1. Unified Authentication and Security
- Ingress: Home Assistant handles authentication, so users log in once to access all Ingress-enabled services. This leverages Home Assistant’s security features, including two-factor authentication (2FA), and eliminates the need for separate credentials for each service.
- Web Dashboard: Accessing services via their own web interfaces requires managing individual logins and potentially exposing additional ports to the internet, increasing security risks. Even when embedded in a Home Assistant dashboard using iframes, some services may not load due to browser security restrictions (e.g., Content Security Policy).
2. Seamless User Experience
- Ingress: Services appear as native panels in the Home Assistant sidebar, creating a cohesive interface. Users can navigate between Home Assistant’s dashboard and add-on interfaces without leaving the frontend, and the integration feels like a single system.
- Web Dashboard: Standalone dashboards (e.g., Homer or individual service UIs) require separate browser tabs or windows, disrupting the workflow. Iframe-based dashboards in Home Assistant can be clunky, with issues like scrollbars, reloading, or compatibility problems on mobile devices (e.g., Home Assistant Companion App).
3. Simplified Remote Access
- Ingress: With Home Assistant’s remote access solutions (e.g., Home Assistant Cloud or a reverse proxy), Ingress panels are accessible remotely without additional configuration. No extra ports need to be forwarded, reducing exposure to external threats.
- Web Dashboard: Remote access to standalone dashboards requires configuring port forwarding or a reverse proxy for each service, which is more complex and less secure. Iframe dashboards may not work reliably over remote connections due to mixed content or CORS issues.
4. Reduced Configuration Overhead
- Ingress: Once set up, Ingress panels require minimal maintenance. Add-on developers or the hass_ingress integration handle the backend proxying, and updates to services don’t typically break the integration.
- Web Dashboard: Maintaining a separate dashboard (e.g., Homer) or iframe panels involves ongoing configuration, especially when services change ports, URLs, or authentication methods. Some websites may not support embedding, requiring workarounds.
5. Better Mobile Experience
- Ingress: Ingress panels are optimized for the Home Assistant frontend, which is responsive and works well on mobile browsers. They integrate smoothly with Home Assistant’s UI, avoiding issues like iframe reloading or navigation glitches.
- Web Dashboard: Iframe-based dashboards often fail to load in the Home Assistant Companion App, and standalone dashboards may not be mobile-friendly without additional customization.
How to Add a Side Panel in Home Assistant Docker
In this guide, I’ll show you how to add two of the most popular Home Assistant add-ons — Zigbee2MQTT and File Editor (HA Configurator) — to the sidebar for easy access. This method can also be applied to include any other web-based services or tools in your Home Assistant side panel.
First, you need to ensure your Home Assistant Docker setup is properly configured so that all necessary services—like Zigbee2MQTT or File Editor—are accessible from the Home Assistant Core container within the same Docker network.
Configure Docker Networking
Use the following example for your own docker-compose configuration:
version: '3.8'

services:

  zigbee2mqtt:
    container_name: zigbee2mqtt
    image: ghcr.io/koenkk/zigbee2mqtt:latest
    hostname: zigbee2mqtt
    restart: unless-stopped
    privileged: true
    depends_on:
      - mosquitto
    volumes:
     - /opt/HA/zigbee2mqtt/data:/app/data
     - /run/udev:/run/udev:ro
     - /dev:/dev
     - /var/run/docker.sock:/var/run/docker.sock
    ports:
     - 8485:8080
    environment:
     - TZ=YOU_TIME_ZONE

  mosquitto:
    container_name: mqtt
    image: eclipse-mosquitto:latest
    hostname: core-mosquitto
    restart: unless-stopped
    volumes:
     - /opt/HA/mosquitto:/mosquitto
    #ports:
    #  - 1883:1883
    #  - 1884:1884
    environment:
     - TZ=YOU_TIME_ZONE

  hass-configurator:
    container_name: configurator
    image: "causticlab/hass-configurator-docker:latest"
    restart: unless-stopped
    hostname: configurator
    #ports:
    #  - "3218:3218/tcp"
    volumes:
      - /opt/HA/homeassistant:/hass-config
      - /opt/HA/configurator:/config

  home_assistant:
    container_name: ha
    image: "ghcr.io/home-assistant/home-assistant:stable"
    restart: unless-stopped
    hostname: ha
    volumes:
      - /opt/HA/homeassistant:/config
      - /etc/localtime:/etc/localtime:ro
      - /run/dbus:/run/dbus:ro
      - /BACKUP:/media
    ports:
     - 8123:8123
    privileged: true

networks:
  home_assistant:
    driver: bridge
⚠️ Important Notes:
- YOUR_TIME_ZONE replace with your actual time zone.
Please find the proper one here. - As shown in the configuration, all Docker containers are connected to the same custom network.
- The
hostnamevalue is especially important, as you’ll reference these names in the URLs when configuring the Home Assistant sidebar panels. - Note that the Mosquitto broker and File Editor (Configurator) containers do not expose external ports — this means they are isolated within the internal Docker network and are only accessible from the Home Assistant web interface.
- If you’d like to run your
docker-composesetup as a Linux service for better manageability, check out my another article.
With your docker-compose configuration completed, you’re now ready to move on to the Home Assistant setup.
Install HACS
HACS is required to install the hass_ingress integration, which enables Ingress functionality in Docker setups.
- Access Home Assistant:
- Log in to your Home Assistant instance via the web interface.
- Install HACS:
- Follow the official HACS installation guide (hacs.xyz).
- Briefly:
- Download the latest HACS release from GitHub.
- Copy the custom_components/hacs folder to your Home Assistant configuration directory (/config/custom_components).
- Restart Home Assistant.
- Add HACS as an integration via Settings > Devices & Services > Add Integration > HACS.
- Authenticate with a GitHub token as prompted.
- Verify HACS:
- After installation, you should see HACS in the Home Assistant sidebar.
Install the hass_ingress Integration
- Add the Repository:
- In HACS, go to Integrations > Explore & Download Repositories.
- Search for hass_ingress (repository: lovelylain/hass_ingress).
- Click Download and follow the prompts to install.
- Copy Files:
- If the automatic download doesn’t work, manually download the latest release from GitHub (github.com/lovelylain/hass_ingress).
- Unzip and copy the custom_components/ingress folder to /config/custom_components.
- Restart Home Assistant:
- Go to Settings > System > Restart to apply the changes.
- Alternatively restart your docker-compose
cd 'YOUR_HA_Directory'
sudo docker-compose down && docker-compose up -d
Configure the Ingress Panel
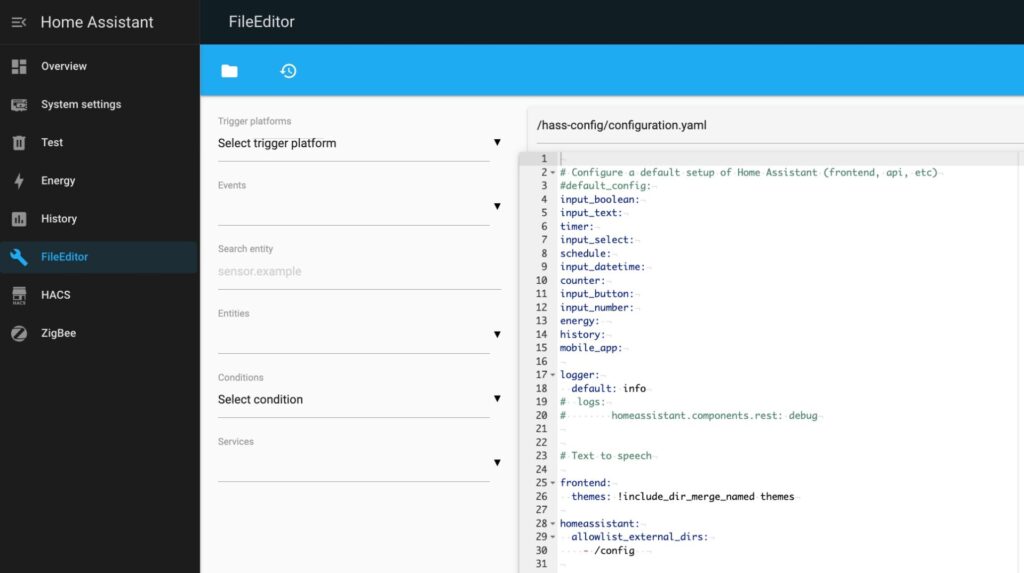
Open your Home Assistant configuration.yaml file and add the Ingress configuration to your configuration.yaml file to define the sidebar panels for your services.
ingress:
  zigbe:
    work_mode: ingress
    ui_mode: toolbar
    title: ZigBee
    icon: mdi:zigbee
    url: http://zigbee2mqtt:8080
  fileeditor:
    work_mode: ingress
    ui_mode: toolbar
    title: FileEditor
    icon: mdi:wrench
    url: http://configurator:3218
⚠️ Important Notes:
Make sure the hostnames in your URLs exactly match the ones you specified in your docker-compose configuration — they must be identical for everything to work correctly.
Restart your Home Assistant to apply the changes:
cd 'YOUR_HA_Directory'
sudo docker-compose down && docker-compose up -d
⚠️ Important Notes:
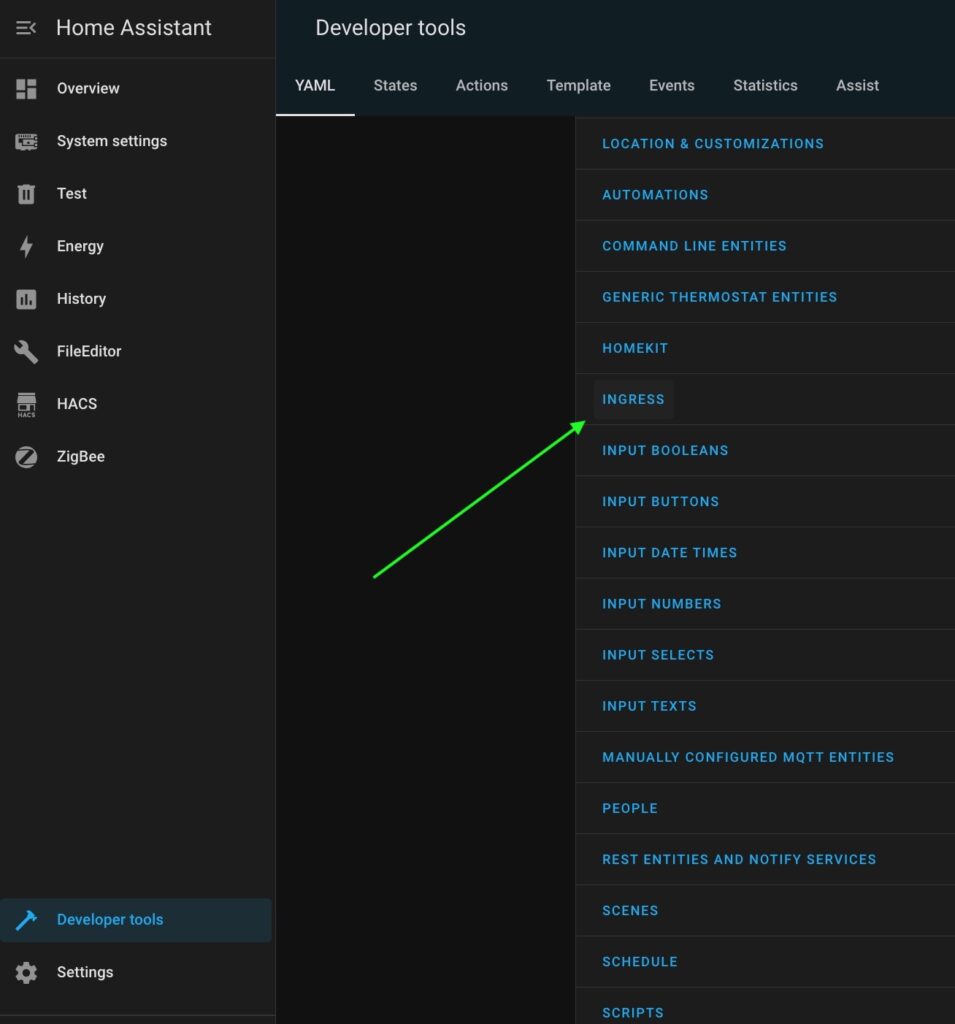
A Home Assistant restart is required the first time you add these configurations.
After that, any further changes can be applied directly through the Developer Tools → YAML section without needing a full restart.
Troubleshooting Common Issues
- Panel Not Loading:
- Check the url in configuration.yaml (ensure the service is reachable from the Home Assistant container).
- Verify Docker network connectivity using ping or curl from within the Home Assistant container.
- Authentication Errors:
- Ensure the service supports relative paths or use work_mode: auth with NGINX for services requiring custom authentication.
- Sidebar Not Showing:
- Confirm the ingress integration is installed correctly in /config/custom_components.
- Check Home Assistant logs (Settings > System > Logs) for errors.
- Mobile App Issues:
- Unlike iframes, Ingress panels should work in mobile browsers, but test thoroughly. If issues persist, ensure the service’s UI is mobile-friendly.