Since my domain is registered with GoDaddy, I originally used their API for DDNS. However, after they restricted API access for smaller clients, I had to find an alternative. Fortunately, Cloudflare offers a free API for managing DNS records. Even better, they allow you to keep your domain with your current registrar; you simply update your name servers to Cloudflare’s and manage your domain through their dashboard instead.
Why I Choose DDNS Over Cloudflare Tunnels
I prefer using Cloudflare strictly for DDNS rather than their Tunnel solution. My goal is to remain independent of their infrastructure’s reliability—especially following recent service outages.
By opting for DDNS, I’ve taken security into my own hands. While this requires more manual configuration, it ensures that my connectivity isn’t tied to a single provider’s uptime. To help you decide which path is right for your setup, I have provided a comparison table below.
| Feature | Cloudflare DDNS (Bash Script) | Cloudflare Tunnel (cloudflared) |
| Dependency | Low. Only relies on Cloudflare for DNS resolution. | High. Relies on Cloudflare’s infrastructure to route every packet. |
| Failure Mode | If Cloudflare is down, cached DNS might still work; Direct IP access is still possible. | If Cloudflare is down, your external URL is dead. Period. |
| Control | You own the traffic flow and the SSL certificates. | Cloudflare owns the connection; they can (and do) inspect traffic. |
| Security | Managed by Cloudflare | Managed by You (Firewall/VPN) |
| Privacy | You can use “DNS Only” (Grey Cloud) to keep Cloudflare out of your data. | All traffic must pass through their servers unencrypted at the edge. |
| Setup Effort | Higher (Requires port forwarding + local Reverse Proxy). | Lower (One container, no router config). |
Cloudflare configuration
Create API token
First of all, you have to set up your domain on Cloudflare following their documentation.
The next step is obtaining API keys for your script:
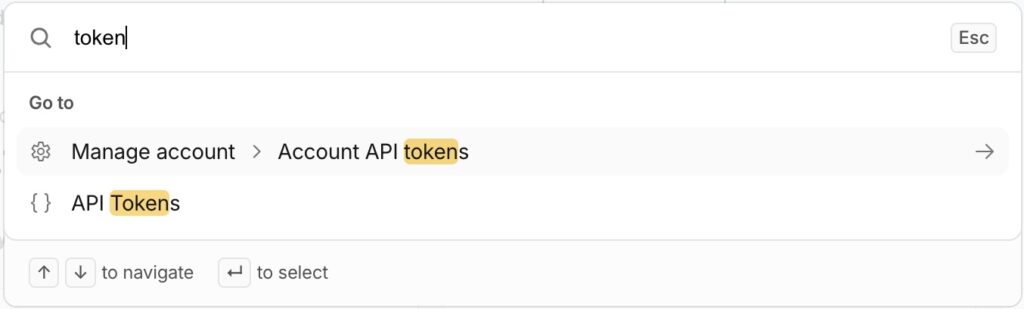
- Log into Cloudflare and click on the “Quick Search” field on the left panel.
- Type “token” keyword in the search field of a new window and click on API Tokens.
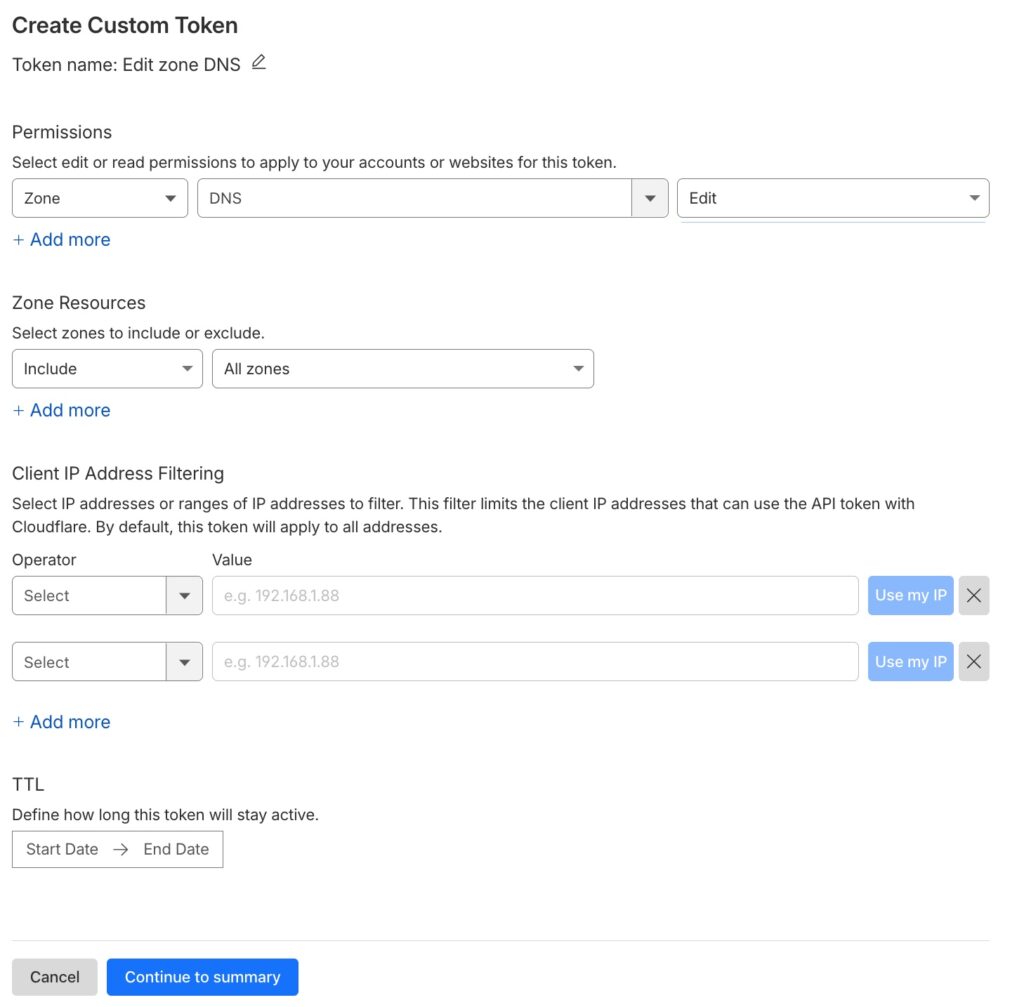
- Now, click on the “Create Token” button, find “Edit zone DNS” template, and click on “USE template”.
- Set up “Edit” permissions for your new token, and include all zones or a specific one.
- Click “Continue to summary”.
- Click on “Create token”.
Finally, you’ll see your new token and a curl command for checking if it works.
DNS Zone ID
Back to your account overview screen, scroll it down and find Zone ID code in the bottom-right corner.
Bash Script
Now, you have all nessessary information to create a script.
First of all, install dnsutils with the nslookup tool and the jq tool:
sudo apt-get update && sudo apt-get install dnsutils jq -yNext, create the file and make it excecutable:
sudo touch /opt/update_my_ip.sh
sudo chmod +x /opt/update_my_ip.sh
Open it in your preferred text editor e.g. mcedit, and add the following script:
#!/bin/bash

myrecord="YOUR_DNS_RECORD"

APItocken="YOUR_API_TOKEN"
ZONE_ID="YOUR_ZONE_ID"

myip=`/usr/bin/curl -s "https://api.ipify.org"`
dnsip=`/usr/bin/nslookup $myrecord 8.8.8.8 | tail -n 2 | grep Address`

dnsip=${dnsip##*' '}

echo "MyIP: $myip"
echo "CurrentDNS record: $dnsip"

if [ "$dnsip" != "$myip" ]; then

echo "IP is changed to: $myip"

recordID=`curl -s -X GET "https://api.cloudflare.com/client/v4/zones/$ZONE_ID/dns_records?type=A&name=$myrecord" \
-H "Authorization: Bearer $APItocken" \
-H "Content-Type: application/json" | jq -r '.result[0].id'`


curl -X PATCH "https://api.cloudflare.com/client/v4/zones/$ZONE_ID/dns_records/$recordID" \
-H "Authorization: Bearer $APItocken" \
-H "Content-Type: application/json" \
--data "{\"type\":\"A\",\"name\":\"$myrecord\",\"content\":\"$myip\",\"ttl\":120,\"proxied\":false}"

fi
⚠️ Explanation:
1. The Configuration (Variables)
At the top, you define your specific Cloudflare credentials.
myrecord: The domain or subdomain you want to update (e.g.,ha.yourdomain.com).APItocken: Your secret Cloudflare API Token.ZONE_ID: The unique identifier for your domain’s zone in Cloudflare.
2. The Discovery Phase
Before the script does anything, it needs to compare two things: your actual current IP and what Cloudflare thinks your IP is.
Fetching Local IP: It uses
curlto askapi.ipify.orgfor your public-facing IP address.Checking DNS Record: It uses
nslookupto ask Google’s DNS (8.8.8.8) what the current record is for your domain.Cleaning the Data: The line
dnsip=${dnsip##*' '}Bash string manipulation that strips away the text and leaves only the raw IP address.
Cloudflare is very generous with their free tier, but they don’t like being spammed. If your script sends an update request every few minutes when the IP hasn’t actually changed, Cloudflare’s security systems might flag your IP for Rate Limiting. In extreme cases, they could temporarily block your API access.
3. The Comparison & Update
This is the “brain” of the script.
The If-Statement: It compares
$dnsipto$myip. If they are the same, the script ends—no work needed! If they are different, it proceeds to the update.Fetching the Record ID: Cloudflare needs a specific
record_id(not just the name) to perform an update. The script sends aGETrequest to find this ID.The PATCH Request: Finally, it sends a
PATCHrequest to Cloudflare. This updates the “A” record with your new IP.ttl: 120: Sets a short “Time to Live” so the change propagates quickly.proxied: false: This keeps the Cloudflare proxy off.
Running Script by Scchedule
The last step is configuring cron to run the script by schedule.
Let’s create a cron file and set up the right permissions:
sudo touch /etc/cron.d/updateip
sudo chmod 0644 /etc/cron.d/updateip
Open it in your preferred text editor e.g. mcedit, and add the following config:
# Example of job definition:
# .---------------- minute (0 - 59)
# |  .------------- hour (0 - 23)
# |  |  .---------- day of month (1 - 31)
# |  |  |  .------- month (1 - 12) OR jan,feb,mar,apr ...
# |  |  |  |  .---- day of week (0 - 6) (Sunday=0 or 7) OR sun,mon,tue,wed,thu,fri,sat
# |  |  |  |  |
# *  *  *  *  * user-name command to be executed

*/10 * * * * root /opt/update_my_ip.sh > /dev/null
⚠️ Tips:
- Adjust scheduling according to your preferences.
- The last EMPTY row is MANDATORY, otherwise cron daemon won’t apply your config.
Restart cron daemon to apply the config:
sudo systemctl restart cronNow you have your free DDNS!!!