Why Migrate?
Why I Chose Docker Over HASS.io (Home Assistant OS)
After weighing the two primary installation options — Home Assistant OS (HASS.io) and a Docker-based setup — I opted for Docker, and here’s why:
- I don’t want a creepy castrated Linux HAOS for my home server.
Home Assistant OS is essentially a stripped-down Linux distribution focused solely on running HA. While it works well for many, I found its limitations too restrictive for a multipurpose home server. I don’t want to dedicate hardware exclusively to HA.
Running Docker allows me to host Home Assistant alongside other services on the same machine, maximizing the utility of my existing hardware.I want to avoid unnecessary layers of complexity.
Running HAOS in a virtual machine introduces an extra layer of virtualization, which can lead to additional maintenance, performance issues, and hardware passthrough headaches — especially when dealing with USB-based devices like Zigbee or Z-Wave dongles.
Prerequisites
Before starting, ensure you have:
A system with Docker installed (e.g., Raspberry OS, Ubuntu, Debian, or another supported OS).
- Administrative access to your current Home Assistant Supervisor instance.
- A backup of your existing configuration (available via the Supervisor’s backup feature).
- Basic familiarity with the command line and Docker concepts.
- Docker Compose
See my articleInstall Docker-compose onto Raspberry OS or Ubuntu
Step-by-Step Migration Guide
Step 1: Backup Your Current Configuration and Set Up Your Docker Environment
Log in to your Home Assistant Supervisor interface.
- Switch Off Backup encryption for the possibility of unpacking your backup in the future without additional tools.
Go to Settings → System →Backups → Settings and History → Locations → This system → Encryption, and click TURN OFF. - Navigate to Settings → System → Backups.
- Create a full backup, including add-ons and configurations.
- Download the backup file to a secure location (e.g., an external drive or cloud storage). This ensures you can restore your data if needed during the migration.
Install Docker & Docker Composer.
Step 2: Prepare the Directory Structure
For better organization and easier access, it’s recommended to place your Home Assistant setup under the /opt directory—this is a conventional location for optional software and makes managing your installation more straightforward.
When beginning the migration, it’s wise to start with the most critical components that ensure your smart home functions properly. These typically include:
Home Assistant Core
Zigbee2MQTT
Mosquitto MQTT Broker
Run the following commands to create the folder structure:
sudo -s
mkdir /opt/HA
mkdir /opt/HA/homeassistant
mkdir /opt/HA/zigbee2mqtt
mkdir /opt/HA/mosquitto
mkdir /opt/HA/mosquitto/data
mkdir /opt/HA/mosquitto/config
Step 3: STOP Your home assistant supervisor
Before proceeding further, you need to stop the Home Assistant Supervisor and all its associated add-ons. This step is crucial for several reasons:
To prevent database writes during migration, ensuring data consistency.
To avoid conflicts when running Home Assistant via Docker Compose—especially those related to network ports or direct hardware access (such as USB dongles for Zigbee).
To eliminate interference from Supervisor-managed services, which could cause unexpected behavior during or after the migration.
📝 Note Add-on Hostnames Before Stopping Home Assistant
Before shutting down Home Assistant Core and its add-ons, it’s important to document the hostnames of each add-on you plan to migrate. These hostnames are used internally by Home Assistant to communicate with services like MQTT, Zigbee2MQTT, or databases.
You’ll need these hostnames to correctly configure your docker-compose.yml file, ensuring seamless integration between Home Assistant Core and the migrated services.
🔍 How to Find Add-on Hostnames:
Open Home Assistant UI
Navigate to Settings → Add-ons
Click on each running add-on (e.g., Mosquitto, Zigbee2MQTT)
Look under the Info or Configuration tab for the hostname (often listed as something like
core_mosquitto,core_zigbee2mqtt, etc.)
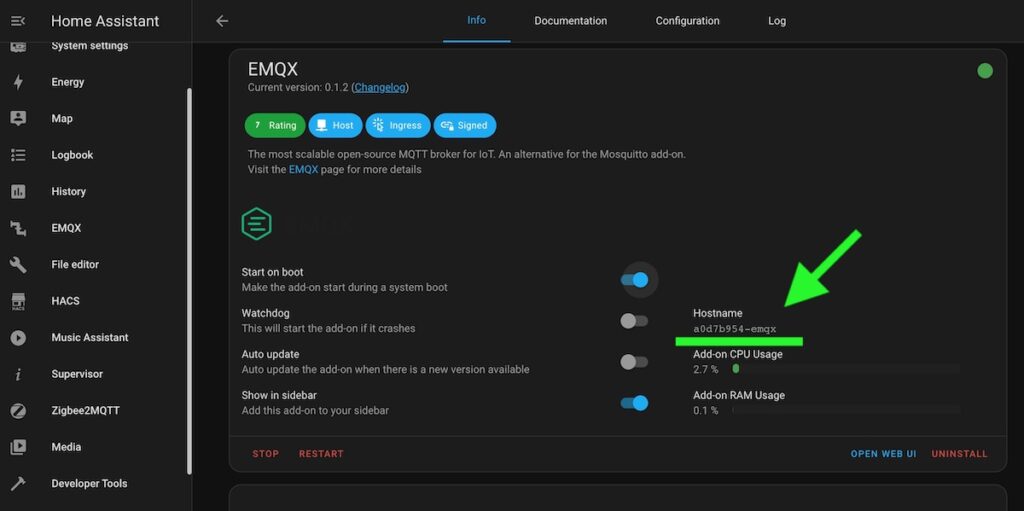
💡 Tip: In many cases, the hostname matches the Docker container name unless explicitly changed. Keeping them consistent in your Docker Compose setup will help avoid connectivity issues.
I provided the hostname placement from my previous article because I don’t have HA supervised setup anymore.
Once documented, you can safely proceed to stop Home Assistant and begin the Docker migration.
Disabling the Supervisor setup and its ecosystem ensures a clean transition to the new Docker-based setup:
- Navigate to Settings → Add-ons and stop all Add-ons.
- Perform the following commands to stop HA and prevent it’s auto-run:
sudo ha core stop
sudo systemctl stop hassio-supervisor.service
sudo systemctl disable hassio-supervisor.service
Step 4: COPY HA and add-ons data
Copy zigbee2mqtt
Now you have to find the directories with your add-ons data and copy it into the recently created.
Let’s start from zigbee2mqtt:
- In the terminal, check the following directory (I provided my response for example):
ls -l /usr/share/hassio/addons/data

total 36
drwxr-xr-x 2 root root 4096 Jun 12 15:04 45df7312_zigbee2mqtt
drwxr-xr-x 2 root root 4096 Jun 11 17:52 a0d7b954_sqlite-web
drwxr-xr-x 2 root root 4096 Jun 11 17:51 cebe7a76_hassio_google_drive_backup
drwxr-xr-x 2 root root 4096 Jun 11 17:52 core_configurator
drwxr-xr-x 4 root root 4096 Apr 23 15:34 core_letsencrypt
drwxr-xr-x 2 root root 4096 Jun 12 15:22 core_mosquitto
drwxr-xr-x 2 root root 4096 Jan 28 16:54 core_nginx_proxy
drwxr-xr-x 4 root root 4096 Jun 11 17:23 core_ssh
drwxr-xr-x 4 root root 4096 Jun 11 17:51 db21ed7f_scrutiny_fa
As you can see, I had “45df7312_zigbee2mqtt” directory, but you probably have another name.
Copy data from it:
Now, copy data from the main zigbee2mqtt directory:
sudo cp -R /usr/share/hassio/homeassistant/zigbee2mqtt/* /opt/HA/homeassistantsudo cp -R /usr/share/hassio/addons/data/45df7312_zigbee2mqtt/* /opt/HA/homeassistantCopy mosqitto data
Unlike standalone Mosquitto installations, the Mosquitto Broker add-on in Home Assistant is launched with a set of command-line parameters and runtime options that are not stored in the typical Mosquitto configuration directory (/etc/mosquitto or equivalent).
These parameters are managed internally by the Supervisor and are not visible or accessible in the file system, which makes it difficult to replicate the exact configuration when migrating to Docker Compose.
To run Mosquitto under Docker Compose, you need to create a dedicated mosquitto.conf file that explicitly defines the broker’s behavior.
Create the config file and open it with your preferable text editor e.g. mcedit:
sudo touch /opt/HA/mosquitto/config/mosquitto.confAdd following configuration and save it:
persistence true
persistence_location /mosquitto/data/
log_dest file /mosquitto/data/mosquitto.log
log_type all
allow_anonymous true
listener 1883
This setting “allow_anonymous true” allows any client to publish or subscribe to topics without authentication. While this might raise security concerns in general use cases, it works well in my setup for a few important reasons:
Private Communication Only:
The MQTT broker acts solely as a bridge between Home Assistant and Zigbee2MQTT—there are no external clients involved.Isolated Docker Network:
The entire MQTT service runs within a dedicated Docker network, fully isolated from the outside world. This ensures that no unauthorized devices or users can reach the broker.Simplified Configuration:
Removing the need for usernames and passwords simplifies the migration and avoids dealing withpasswdfiles and user management for an internal-only service.
⚠️ Note: If you plan to expose Mosquitto outside of Docker or allow remote clients (e.g., mobile apps, cloud services), it’s highly recommended to disable anonymous access and use proper authentication.
This approach keeps things clean and efficient when security is already enforced by network isolation.
Now, copy Mosquitto existing data:
sudo cp -R /usr/share/hassio/addons/data/core_mosquitto/* /opt/HA/mosquitto/data/Copy Home assistant data
It’s the most simple part, just run following command:
sudo cp -R /usr/share/hassio/homeassistant/* /opt/HA/homeassistant/Step 5: docker-compose file creation
Create the config file and open it with your preferable text editor e.g. mcedit:
sudo cp -R /opt/HA/docker-compose.ymlAdd following configuration and save it:
services:

  zigbee2mqtt:
    container_name: zigbee2mqtt
    image: ghcr.io/koenkk/zigbee2mqtt:latest
    hostname: zigbee2mqtt
    restart: unless-stopped
    privileged: true
    depends_on:
      - mosquitto
    volumes:
     - /opt/HA/zigbee2mqtt/data:/app/data
     - /run/udev:/run/udev:ro
     - /dev:/dev
     - /var/run/docker.sock:/var/run/docker.sock
    ports:
     - 8485:8080
    environment:
     - TZ=Europe/Warsaw
    labels:
      - updates2mqtt.name="Zigbee2MQTT Update"
      - updates2mqtt.compose_path=/opt/HA/docker-compose.yml
      - updates2mqtt.picture=https://www.zigbee2mqtt.io/logo.png
    networks:
      home_assistant:
       aliases:
         - zigbee2mqtt
       ipv4_address: 172.20.0.2

  mosquitto:
    container_name: mqtt
    image: eclipse-mosquitto:latest
    hostname: core-mosquitto
    restart: unless-stopped
    volumes:
     - /opt/HA/mosquitto:/mosquitto
    #ports:
    #  - 1883:1883
    #  - 1884:1884
    environment:
     - TZ=Europe/Warsaw
    labels:
      - updates2mqtt.name="Mosquito Update"
      - updates2mqtt.compose_path=/opt/HA/docker-compose.yml
      - updates2mqtt.picture=https://mosquitto.org/favicon-32x32.png
    networks:
      home_assistant:
       aliases:
         - core-mosquitto
       ipv4_address: 172.20.0.3

  home_assistant:
    container_name: ha
    image: "ghcr.io/home-assistant/home-assistant:stable"
    restart: unless-stopped
    hostname: ha
    depends_on:
      - zigbee2mqtt
    volumes:
      - /opt/HA/homeassistant:/config
      - /etc/localtime:/etc/localtime:ro
      - /run/dbus:/run/dbus:ro
      - /BACKUP:/media
    privileged: true
    network_mode: host
    extra_hosts:
      - "zigbee2mqtt:172.20.0.2"
      - "core-mosquitto:172.20.0.3"
    labels:
      - updates2mqtt.picture=https://www.home-assistant.io/images/favicon.ico
      - updates2mqtt.name="HA Update"
      - updates2mqtt.compose_path=/opt/HA/docker-compose.yml

networks:
  home_assistant:
    driver: bridge
    enable_ipv6: false
    name: home_assistant
    ipam:
      config:
        - subnet: 172.20.0.0/16
root@drive:/opt/HA#
⚠️ Explanation:
- hostname & aliases:
By setting a hostname and an alias of zigbee2mqtt andcore-mosquittowithin thehome_assistantnetwork, you ensure that any other container on that network can reach the broker using that specific name, regardless of what the container itself is named. - Static IP Allocation: The
ipv4_address: 172.20.0.2 and 172.20.0.3provides a “hardcoded” anchor. In complex setups, this prevents connection drops that can occur if the Docker engine reassigns internal IPs after a system reboot. - labels are needed if you use updates2mqtt to your Docker stack updateable from HA UI.
- YOUR_TIME_ZONE replace with your actual time zone. Please find the proper one here.
- hostname: core-mosquitto – change it to your wittern on STEP: 3.
- ports: the first statement is a port announced outside a docker container and accessible for a browser, the second one is the actual service’s port inside a container. Therefore, adjust the values according to your preferences and your Home Assistant config.
1. Networking: The Hybrid Approach
Most Docker containers operate on a private bridge network. However, for Home Assistant to “see” devices like smart TVs, Google Cast, or Apple HomeKit, it usually requires network_mode: host. This allows the container to share the host’s IP address and network stack directly.
2. Bridging the Network Gap with extra_hosts
Because the container is in host mode, it loses the ability to use Docker’s internal DNS resolution. It can no longer simply look up “mosquitto” to find the broker. To solve this without using brittle, changing IP addresses, we use the extra_hosts directive.
This acts as a local “hosts file” for the container, mapping your static service IPs back to friendly names (I provided configs to containers described in this article only to avoid overwhelming).
3. Hardware and System Access
To ensure full functionality, two specific volume mappings and a privilege flag are essential:
privileged: true: Grants the container access to USB Zigbee/Z-Wave sticks and Bluetooth radios./run/dbus: Mounted as read-only to allow Home Assistant to communicate with the host’s system bus (critical for Bluetooth and network management)./etc/localtime: Ensures that logs, automations, and the UI all reflect your physical time zone accurately.
Save your file and try to start it:
cd /opt/HA/
docker-compose up
Check the output and debug your configs if necessary.
Stop it with Ctr+C to perform the last step
Step 6: RUN YOUR home assistant in docker as the service
Now, let’s configure the service to make it started during your server boot.
Config is provided for Debian-based OSes.
Create the service config and open with your preferred text editor e.g. mcedit:
sudo touch /opt/HA/homeassistant.service
sudo mcedit /opt/HA/homeassistant.service
Add following config:
[Unit]
Description=HomeAssistant Docker Container
Requires=docker.service
After=docker.service

[Service]
Restart=always
RemainAfterExit=true
User=root
Group=root
WorkingDirectory=/opt/HA/
ExecStartPre=/usr/local/bin/docker-compose -f docker-compose.yml down
ExecStart=/usr/local/bin/docker-compose -f docker-compose.yml up -d --remove-orphans
ExecStop=/usr/local/bin/docker-compose -f docker-compose.yml down

[Install]
WantedBy=timers.target
Save it nad register it in your system:
sudo cp /opt/HA/homeassistant.service /etc/systemd/system
sudo systemctl enable homeassistant.service
sudo systemctl start homeassistant.service
What You’ll Miss in the Docker Version of Home Assistant
If you’ve been using the Supervised or HAOS setup, you may have already noticed that certain convenient features aren’t available in the Docker version of Home Assistant:
No built-in update notifications
Home Assistant won’t notify you when a new version is available — you’ll need to monitor release notes manually or script your own check.No sidebar access to add-ons
Interfaces for tools like Zigbee2MQTT, Mosquitto, or ESPHome won’t appear in the sidebar automatically. You’ll need to expose them separately (e.g., via Nginx reverse proxy).
Please see how to configure it in my article.No automatic backup of add-on configurations
Dockerized add-ons don’t integrate with the HA backup system. You’ll need to create your own solution to back up configurations to services like Google Drive.
📚 Don’t worry — I’ll cover each of these missing features and show you how to implement them manually in upcoming articles, so you don’t lose any critical functionality in your Docker-based setup.