If you’ve bought a newly built apartment in the last few years, chances are the real estate developer proudly advertised it as “smart-home ready” or “future-proofed with structured Ethernet cabling.” The glossy brochure likely had a diagram showing neat blue lines running from every room into a “central media rack” — the beating heart of your digital life.
Then you moved in.
And that “central media rack” turned out to be a wall-mounted cabinet smaller than a shoebox, tucked in a hallway closet, with the ventilation of a submarine and just enough depth to fit a basic patch panel — if you breathe in while closing the door.
The Power Problem Nobody Warned You About
Most people can live with cramming a modem and router into a tiny cabinet — until the first power cut. That’s when the second oversight hits: there’s no uninterruptible power supply (UPS) that fits in the space.
Sure, you could buy a consumer UPS, but good luck finding one that:
Fits in a 25-cm-deep cabinet without blocking airflow.
Doesn’t weigh enough to rip the rack off the drywall.
Can be installed without rerouting half the cables like a game of Twister.
The result? One power flicker, and your whole home network is down — including the smart doorbell, security cameras, and the smart thermostat that needs Wi-Fi to fetch its weather data.
The DIY UPS to the Rescue
Here’s where the tinkerer spirit comes in. The solution many homeowners are turning to is a compact, DIY low-voltage UPS specifically for the router and fiber-optic modem.
The concept is simple:
Use a 12 V DC battery pack with proper charge control.
Add a step-up/step-down converter to match your devices’ voltage (many modems and routers use 9 V, 12 V, or even USB-C PD).
Wire it so that mains power charges the battery while powering the devices — and if mains goes out, the battery takes over instantly.
List of componnets
First of all, you’ll need a 12V power supply that supports both battery operation and charging. These are commonly designed for alarm systems, so they typically come pre-assembled and don’t require any soldering—making them ideal for a DIY UPS setup.
So, the components list is pretty simple:
- Power supply like this: AC/DC Sc-60W-12V 5A Switching Power Supply AC DC UPS Power Supply
- Tiny 12 V battery: NB12-5.5HR 12V 5.5Ah
- Connector:12V 90 Degree DC 5.5mm x 2.1mm Male Plug
This article contains affiliate links. As an Amazon Associate, I earn from qualifying purchases.
⚠️ Important Notes:
The list of components is provided as an example and must be adjusted according to your needs and conditions.
The wiring diagram
First of all, you should check DC voltage of your router and other equipment in your cabinet, e.g. fiber-optic modem.
Originally, I used a TP-Link Archer router running OpenWRT, which I later replaced with a MikroTik RB750Gr3 because TP-Link Deco APs were added to my home network, and WiFi functionality of the router isn’t needed. This change was prompted by the fact that my fiber-optic modem came with separate access points and an IPS, eliminating the need for an all-in-one router. Conveniently, all of these devices run on 12 V DC power supplies. This made it simple to replace their individual adapters with a single CCTV-grade power supply that includes a built-in UPS feature.
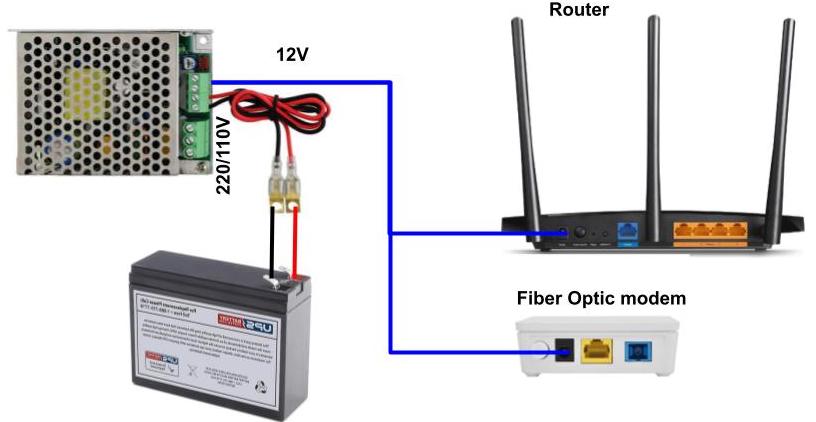
As you can see, the wiring schema is pretty simple.
The biggest efforts are needed for choosing the proper components according to your device’s power consumption, available space in your cabinet for installation, and desired time to keep your devices powered with a battery.
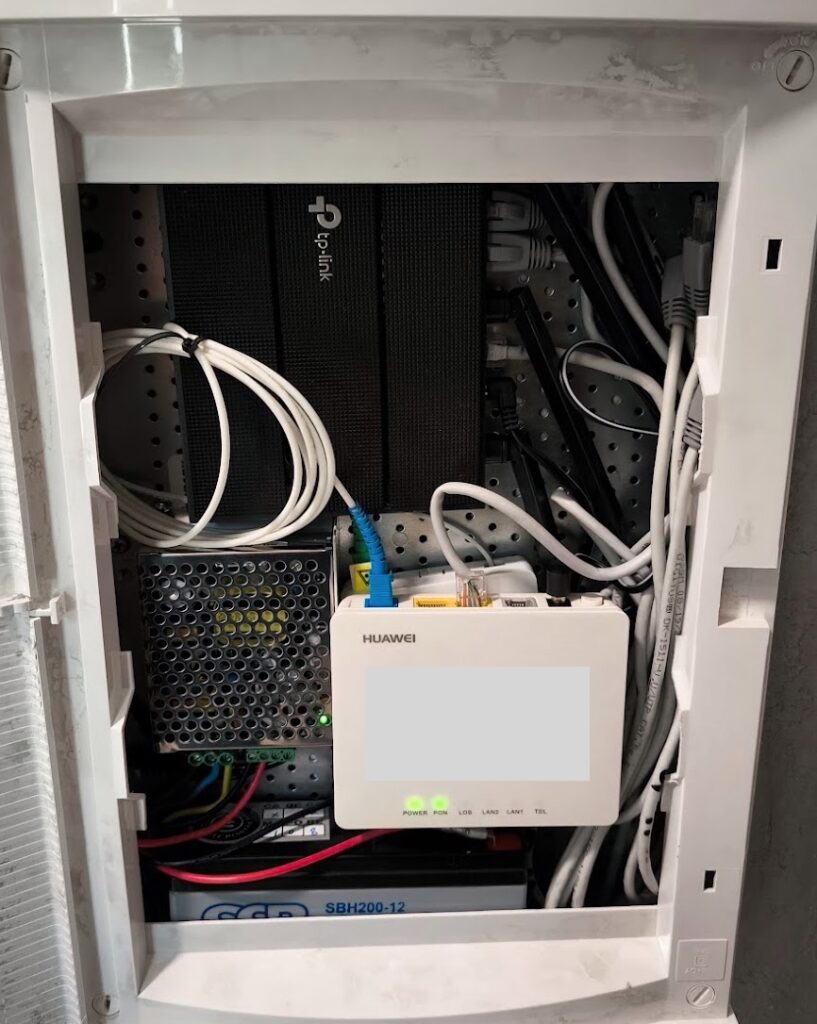
In reality, it looks like on image below:
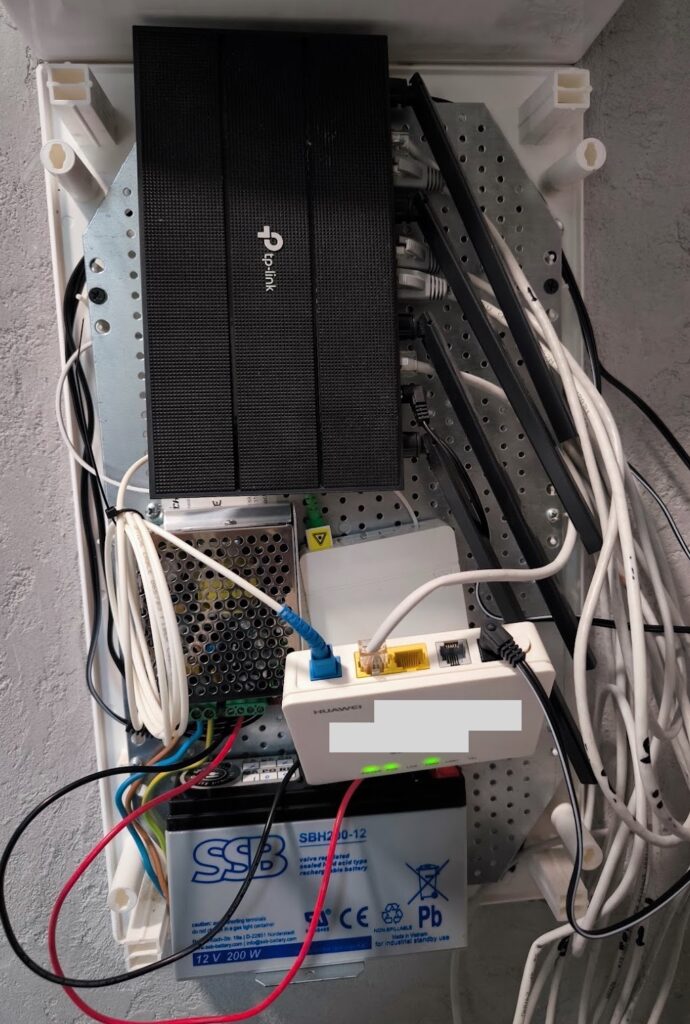
The image with the closed cabinet can be found at the beginning of this article.
Battery Capacity Calculation
This setup is essentially a trade-off between your desired off-grid runtime and the physical space available. I recommend starting by calculating the required battery capacity based on your runtime needs, and then adjusting the design to fit within the available space.
Find the Total Power Consumption
You first need to know how much power your devices actually consume. The simplest way is to check the labels on each device, which indicate the maximum possible power draw. Since these values are the upper limit, your actual consumption will likely be lower — giving you some extra battery capacity for future adjustments or additional equipment.
Example:
- Fiber modem: 12 V, 0.5 A → 12 × 0.5 = 6 W
- Router: 12 V, 1 A → 12 × 1 = 12 W
Total: 6 W + 12 W = 18 W
As usual, you can find the current consumption for DC e.g. 12 V, 0.5 A, but you can simply convert to it if only watts are indicated:
I = P/V
6W / 12V = 0.5A
Calculate Required Capacity
How long do you want it to run without mains power?
Example: 4 hours target.
Battery capacity (Ah) is:
Capacity = Current × Time;
Using the example:
Capacity = 1.5 A×4 h = 6 Ah
Unfortunately, DC-DC converters, charging circuits, and battery discharge limits eat some power.
A safe efficiency assumption for a small UPS is 85–90%.
To compensate:
Adjusted Capacity =(Required Capacity) / (Efficiency)
Adjusted = 6 / 0.856 ≈ 7.1 Ah
Choosing the right battery
Next, choose a battery with a capacity that matches your calculated needs while fitting within the physical constraints of your cabinet. Prioritize meeting the power requirements first, then select the largest capacity battery that can be accommodated in the available space.
CONCLUSION
I hope this article will help you to stay online even if you don’t have enough space for a common UPS.