In the Supervised or Home Assistant OS versions, add-ons like Zigbee2MQTT and Mosquitto Broker have built-in update notifications. However, if you’re running Home Assistant in Docker, you’re managing those services as separate containers, so version monitoring and update notifications are not provided out-of-the-box.
This article will walk you through a reliable way to receive notifications in Home Assistant when new Docker image versions are available for your containers like Zigbee2MQTT and Mosquitto.
How it works
The core idea is simple and consists of the following steps:
Extract and Save Installed Versions:
Check the currently installed versions of your Docker-based components (e.g., Zigbee2MQTT, Mosquitto) and save those versions to text files accessible by Home Assistant.Expose Installed Versions to Home Assistant:
Configure file sensors in Home Assistant to read these version files and track the installed versions inside the HA interface.Fetch Latest Available Versions Periodically:
Use a scheduled script or automation to periodically check Docker Hub (or another registry) for the latest available image versions for each component.Compare Versions and Trigger Notification:
If a newer version is found compared to the one currently installed, Home Assistant will send a notification through your preferred channel (e.g., mobile push, Telegram, email).
This approach keeps your Docker setup modular, non-invasive, and does not auto-update anything — putting you in full control of when and how updates are applied. You’ll always be notified promptly when something new is ready.
Check the current versions
Different systems store their version information in different ways, so you’ll need separate scripts tailored to each system (e.g., Zigbee2MQTT, Mosquitto) to check and extract the currently installed version.
Zigbee2mqtt
Within the Z2M Docker image, there is a file located at /app/package.json that contains metadata about the application, including its version number. Because this file is embedded directly in the image, it provides a reliable and consistent source for retrieving version information.
Let’s create the script to read the version and write to a file for further reading in Home Assistant.
Create a file and make it excecutible:
sudo touch /opt/check_version_z2m.sh
sudo chmod a+x /opt/check_version_z2m.sh
Open the script file in your preferred text editor and add following code:
#!/bin/bash

# Replace 'zigbee2mqtt' with your actual container name or ID
CONTAINER_NAME="zigbee2mqtt"
# Replace with your HA config directory path
VERSION_FILE="/opt/HA/homeassistant/version_z2m"

# Check if jq is installed on the host; if not, use an alternative method
if command -v jq >/dev/null 2>&1; then
    # Use jq to parse the version from package.json
    VERSION=$(docker exec $CONTAINER_NAME cat /app/package.json | jq -r '.version')
else
    # Fallback to grep and awk if jq is not available
    VERSION=$(docker exec $CONTAINER_NAME cat /app/package.json | grep '"version"' | awk -F'"' '{print $4}')
fi

if [ -n "$VERSION" ]; then
    echo "Zigbee2MQTT Version: $VERSION"
    echo $VERSION > $VERSION_FILE
else
    echo "Error: Could not retrieve Zigbee2MQTT version. Ensure the container is running and /app/package.json exists."
    echo "ERROR" > $VERSION_FILE
fi
Be sure to adjust the following variables to match your actual setup:
CONTAINER_NAME: This must exactly match the name of your Zigbee2MQTT container as specified in your Docker Compose file. For a working example of a Docker Compose configuration, refer to the article Migrating from Home Assistant Supervisor to Docker: A Step-by-Step Guide
VERSION_FILE: The path should correspond to the configured volume for your Home Assistant Docker container. For example:
In the script, any “ERROR” responses are saved to a file for later notification, helping you track and address any issues that arise during execution.
Now, run your script:
/opt/check_version_z2m.sh
Zigbee2MQTT Version: 2.4.0
Check your file for Home Assistant:
cat /opt/HA/homeassistant/version_z2m
2.4.0
Of course, version 2.4.0 is accurate at the time of writing this article, but newer versions may be available.
Mosquitto Brocker
Mosquitto doesn’t use /app/package.json file, but version can be checked with the following command inside the container:
mosquitto -hSo, let’s create a new script file for it:
sudo touch /opt/check_version_mqtt.sh
sudo chmod a+x /opt/check_version_mqtt.sh
Open the script file in your preferred text editor and add following code:
#!/bin/bash

# Replace 'mosquitto' with your actual container name or ID
CONTAINER_NAME="mqtt"
VERSION_FILE="/opt/HA/homeassistant/version_mqtt"

# Execute the command inside the Docker container to get the Mosquitto version
VERSION=$(docker exec $CONTAINER_NAME mosquitto -h 2>&1 | grep -i "mosquitto version" | awk '{print $3}')

if [ -n "$VERSION" ]; then
    echo "Mosquitto Version: $VERSION"
    echo $VERSION > $VERSION_FILE
else
    echo "Error: Could not retrieve Mosquitto version. Ensure the container is running and mosquitto is installed."
    echo "ERROR" > $VERSION_FILE
fi
Adjust the variables in the same manner as demonstrated in the previous script.
Versions Updating
Installed versions only change after an update, so there is little reason to run these scripts regularly using cron jobs. The best approach is to include them as the final step in your update script, ensuring they execute only during the update process.
Please see my very simple update script for example:
#!/bin/sh

cd /opt/HA
docker-compose down
docker-compose pull
docker-compose up -d --remove-orphans
docker image prune -f
cd /opt

/opt/check_version_z2m.sh
/opt/check_version_mqtt.sh
Home Assistant Configuration
Now that we’ve completed the necessary preparations outside of Home Assistant, it’s time to move on to configuring it.
First, verify that the files containing the current version information are accessible from within Home Assistant:
Navigate to FileEditor and simply open those files with it:
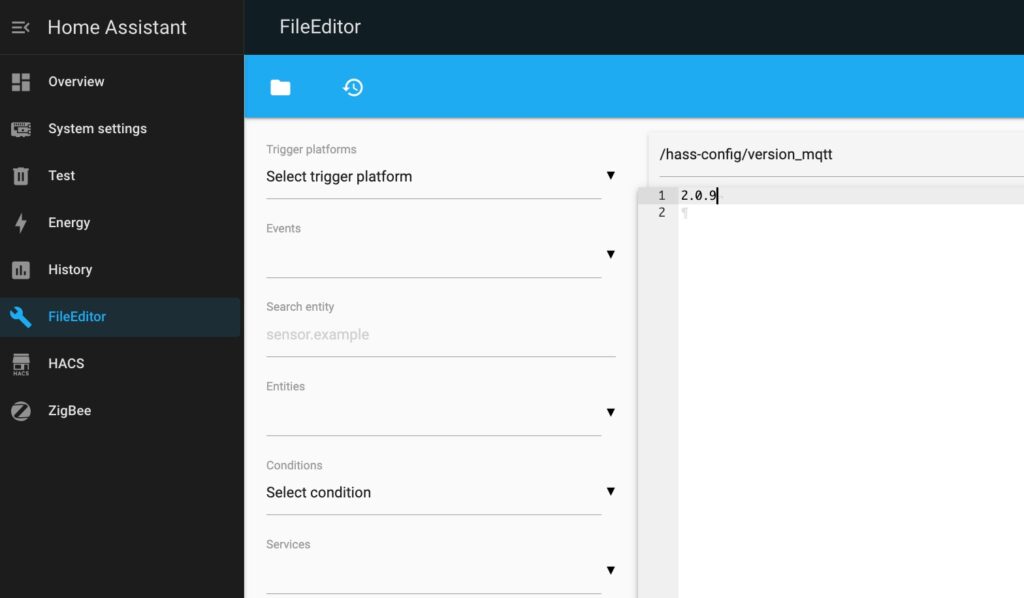
⚠️ Notes:
Pay attention to the file path displayed at the top of the File Editor, just above the file content—it will be needed in the next step.
Please read my following guidance if didn’t add FileEditor before:
Adding File Sensors
Let’s configure file-based sensors to make the current version information accessible for Home Assistant automation:
- Navigate to Settings → Devices & Services.
- Click “+ADD INTEGRATION” and choose “File”:

- Choose “Set up a file-based sensor”.
- Input the path to your file: /hass-config/version_z2m
- Click submit.
Unfortunately, Home Assistant assigns file sensors unintuitive default names and IDs, so it’s a good idea to rename them to something more recognizable for use in later steps:
- Navigate to Settings → Devices & Services.
- Click on “File” integration.
- Click on “Entity”.
- Finally, click on your file entity on the new window, and click on the “Gear” icon on the window with your entity state.
- Name your sensor and click on refresh icon in “EntityID” field:
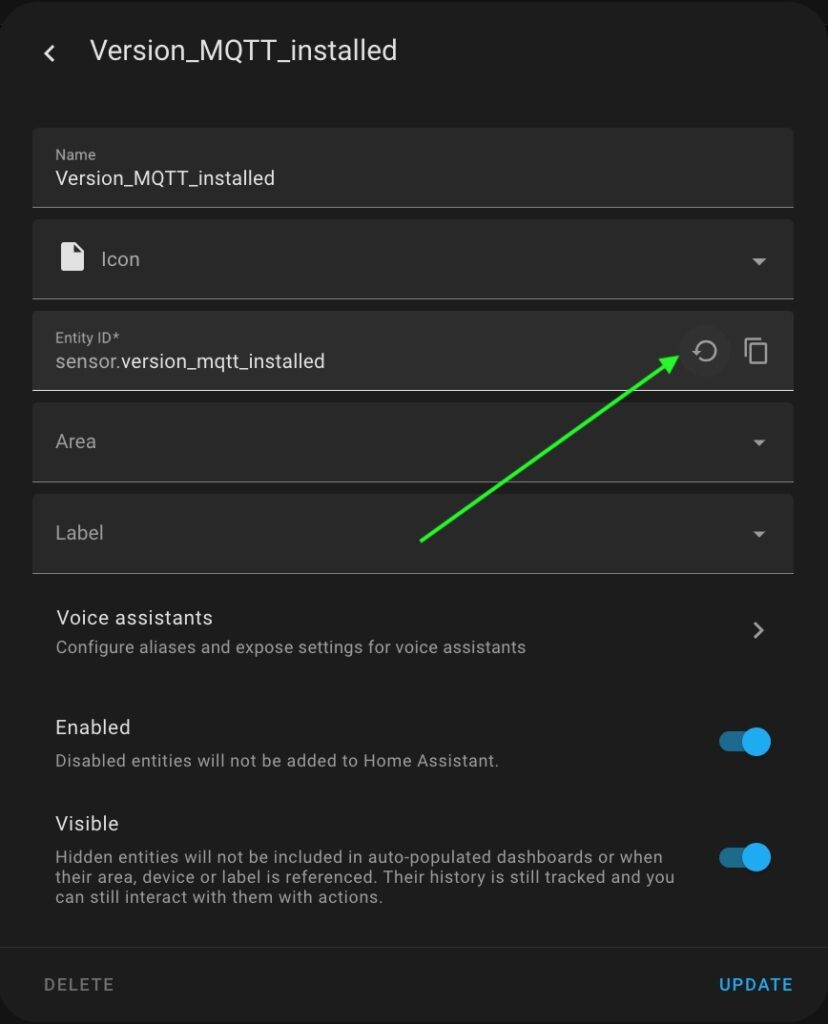
- Click “UPDATE” to save changes.
The first sensor is ready, so simply repeat the steps in this chapter to create the second one.
Adding REST Sensors
Next, we need to configure sensors that retrieve the latest available versions from Docker Hub. The most effective way to achieve this is by using RESTful sensors, as this integration offers a straightforward method for parsing API responses directly into a sensor.
Getting Zigbee2MQTT latest version
Navigate to FileEditor, open your configuration.yaml file, and add the following code:
rest:
 - resource: https://registry.hub.docker.com/v2/repositories/koenkk/zigbee2mqtt/tags?page_size=100
   scan_interval: 86400  #Daily update
   timeout: 30
   sensor:
     name: version_z2m_available
     value_template: >
      {{ value_json.results | selectattr('name', 'match', '^[0-9]+\.[0-9]+\.[0-9]+$')
      | map(attribute='name') | list | sort | last }}
The “rest:” directive is needed if you add your first REST sensor. Otherwise, add the config without it.
💾 Save and Restart Required
Don’t forget to save your configuration.yaml file after making changes. If you’re adding your first REST sensor, simply reloading YAML from the Developer Tools won’t be sufficient. In this case, you need to restart Home Assistant docker container to properly apply the changes.
After reloading, check your new sensor:
- Navigate to Developer Tools → States.
- Find your sensor and check the state:
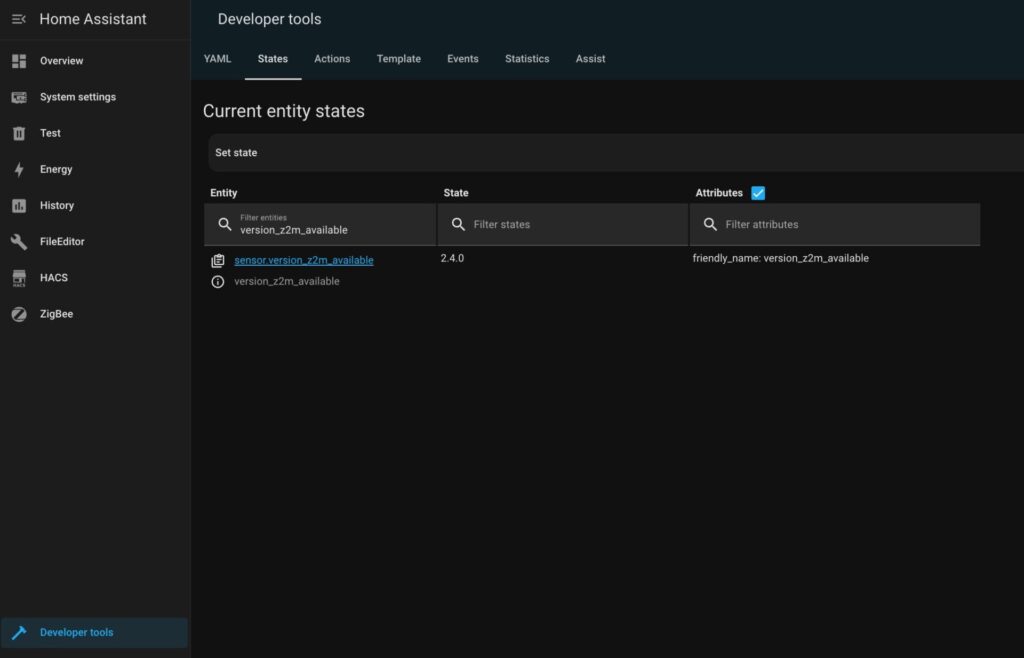
You should see an available version.
Getting Mosquitto latest version
Navigate to FileEditor again, open your configuration.yaml file, and add the following code:
 - resource: https://registry.hub.docker.com/v2/namespaces/library/repositories/eclipse-mosquitto/tags?page_size=100
   scan_interval: 86400  #Daily update
   timeout: 30
   sensor:
     name: versio_mqtt_available
     value_template: >
      {% set versions = value_json.results | selectattr('name', 'match', '^[0-9]+\.[0-9]+\.[0-9]+$')
      | map(attribute='name') | list | sort %}
      {{ versions[-1] if versions else 'unknown' }}
As you can see, the version information for Mosquitto is provided in a different format, which requires a separate parsing configuration. Therefore, some additional research and customization are necessary to implement notifications for each individual component.
💾 Save and Restart Required
Don’t forget to save your configuration.yaml file after making changes. Now, simply reload YAML from the Developer Tools.
After reloading, check your new sensor:
- Navigate to Developer Tools → States.
- Find your sensor and check the state.
Home Assistant Versions Sensors
Fortunately, the Home Assistant Docker version includes a built-in integration that handles both storing the current version and checking for the availability of updates.
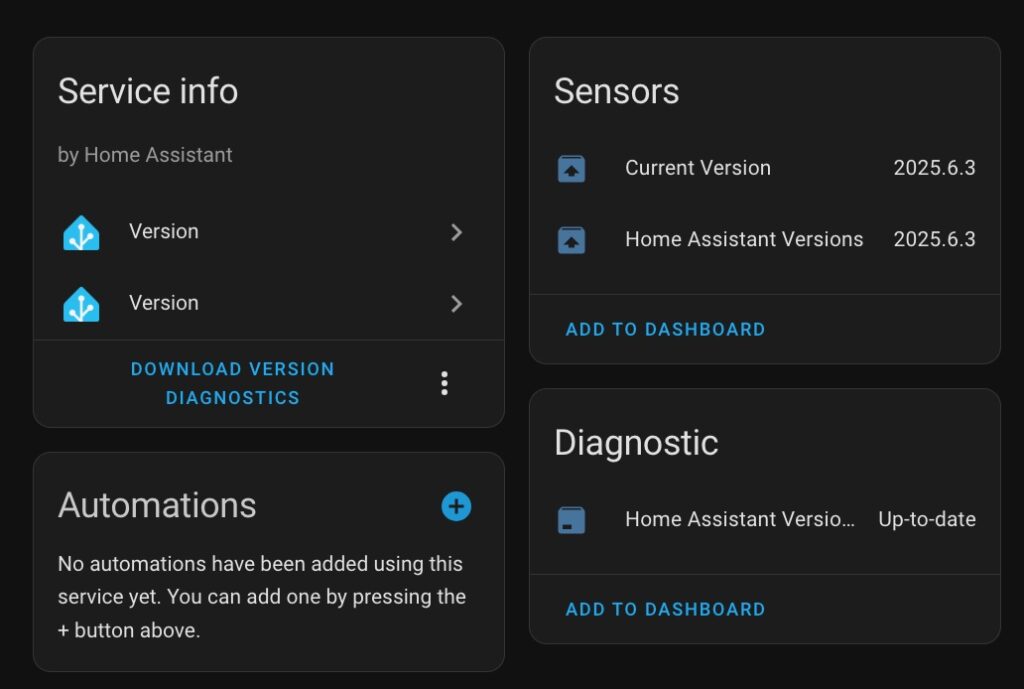
- Navigate to Settings → Devices & Services.
- Click “+ADD INTEGRATION” and choose “Version”.
As a result, you will have the following entities available:
Notifications
Some time ago, I created a script for sending notifications to a phone, which simplifies and standardizes the process. This approach makes managing notifications easier and more consistent across your Home Assistant setup. You can find detailed guidance in a separate article: Universal script for Home Assistant notifications
The following automation is based on the article mentioned above, and the “Universal” script will be used.
To begin, let’s create an automation that sends a notification when a new Home Assistant version is available:
Navigate to Settings → Automations & Scenes, click “+ CREATE AUTOMATION”, and select “Create new automation.”
Click “+ ADD TRIGGER” and choose “Template” as the trigger type.
Open the triple-dot menu in the top-right corner and select “Edit ID.” Set the Trigger ID to
"HA update".In the Value template field, enter the following code to trigger the automation when the installed and available Home Assistant versions differ:
{{states('sensor.current_version') != states('sensor.home_assistant_versions')}}Click “+ ADD TRIGGER” again and choose “Template” as the trigger type.
Open the triple-dot menu in the top-right corner and select “Edit ID.” Set the Trigger ID to
"MQTT update".In the Value template field, enter the following code to trigger the automation when the installed and available Mosquitto Brocker versions differ:
{{states('sensor.version_mqtt_available') != states('sensor.version_mqtt_installed')}}Click “+ ADD TRIGGER” again and choose “Template” as the trigger type.
Open the triple-dot menu in the top-right corner and select “Edit ID.” Set the Trigger ID to
"Z2M update".In the Value template field, enter the following code to trigger the automation when the installed and available Mosquitto Brocker versions differ:
{{states('sensor.version_z2m_available') != states('sensor.version_z2m_available')}}⚠️ Notes:
Don’t forget to adjust the sensors’ names if you have other names.
Now, you should have such set of triggers:
Let’s create actions:
- Click “+ADD ACTION” and select “Choose” one.
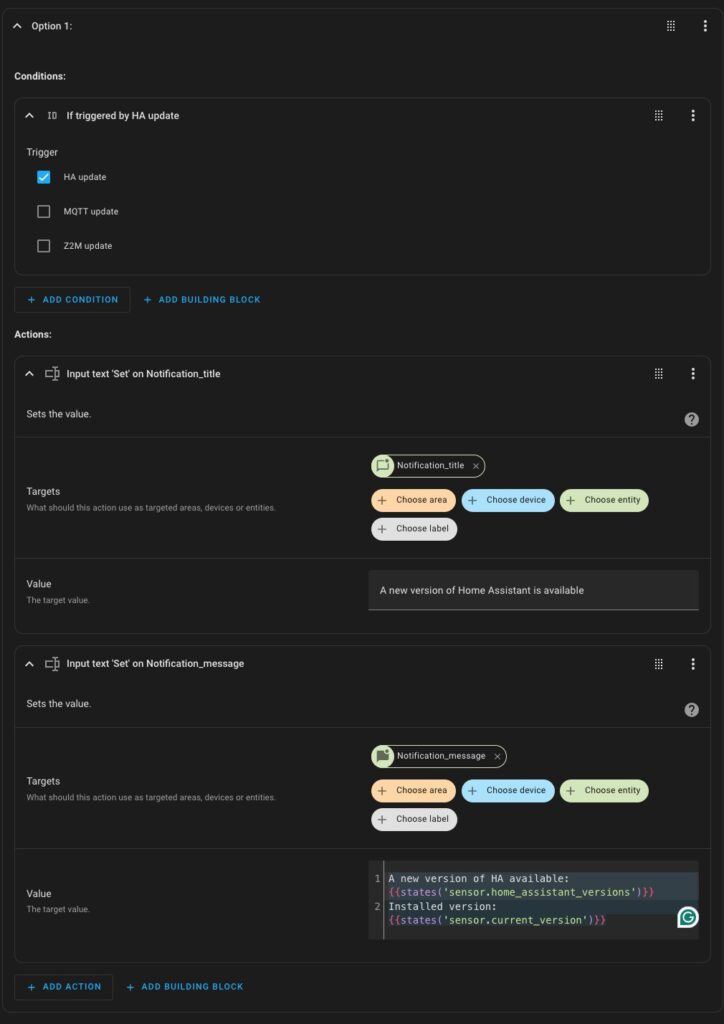
- “Option 1″ section will be created by default, so click “+ADD CONDITION” in “Option 1″ and choose “Triggered by”.
- Select “HA update” trigger.
- Click “+ADD ACTION” in “Option 1″ and choose “Input text: Set”.
- Click “+Chose Entity“, choose “Notification_title” helper, and add this text “A new version of Home Assistant is available” in the Value field.
- Click “+ADD ACTION” in “Option 1″ again and choose “Input text: Set”.
- Click “+Chose Entity“, choose “Notification_message” helper, and add the following template in the Value field:
A new version of HA available: {{states('sensor.home_assistant_versions')}}
Installed version: {{states('sensor.current_version')}}- Your “Option 1” should be like illustrated on the picture below:
Let’s create the second Option:
- Click “+ADD OPTION” to create a new one.
- Click “+ADD CONDITION” in “Option 2″ and choose “Triggered by”.
- Select “MQTT update” trigger.
- Click “+ADD ACTION” in “Option 2″ and choose “Input text: Set”.
- Click “+Chose Entity“, choose “Notification_title” helper, and add this text “A new version of Mosquito is available” in the Value field.
- Click “+ADD ACTION” in “Option 1″ again and choose “Input text: Set”.
- Click “+Chose Entity“, choose “Notification_message” helper, and add the following template in the Value field:
A new version of MQTT available: {{states('sensor.versio_mqtt_available')}}
Installed version: {{states('sensor.version_mqtt_installed')}}
Let’s create the last Option:
- Click “+ADD OPTION” to create a new one.
- Click “+ADD CONDITION” in “Option 3″ and choose “Triggered by”.
- Select “Z2M update” trigger.
- Click “+ADD ACTION” in “Option 3″ and choose “Input text: Set”.
- Click “+Chose Entity“, choose “Notification_title” helper, and add this text “A new version of Z2M is available” in the Value field.
- Click “+ADD ACTION” in “Option 1″ again and choose “Input text: Set”.
- Click “+Chose Entity“, choose “Notification_message” helper, and add the following template in the Value field:
A new version of Z2M available: {{states('sensor.version_z2m_available')}}
Installed version: {{states('sensor.version_z2m_available')}}
⚠️ Notes:
At this point, your automation prepares a notification for each component when a new version is available. The final step is to define the action that actually sends the message:
- Click “+ADD ACTION” outside of your “Choose” section, at the bottom of your HA page, and select “Perform action” type
- Click on “Action” field and choose your script for sending a notification.
💾 Save your script!
Finally, you can test your script action by manually editing the /hass-config/version_mqtt file using File Editor. This simulates a version change and allows you to confirm that the automation triggers as expected.
Keep in mind that Home Assistant reads file-based sensors with a delay—typically every few minutes—so the notification may not appear immediately after saving the file. Please allow a short delay before expecting the notification to arrive.
Conclusion
With this setup, you now have a basic configuration for receiving notifications about new versions of the most commonly used components.
I hope this serves as a helpful example that you can build upon to create similar notifications for any other components in your Home Assistant environment.