In this article, I describe how to integrate Deye hybrid inverter with Home Assistant using the following integrations:
- Solarman is available in HACS.
- Sunsynk is available as HA Add-on and stand standalone docker container.
I use a Docker setup for my Home Assistant instance; therefore, this article focuses on that installation method.
Comparing two integration
Both Sunsynk and Solarman provide pretty similar functionality and sets of entities, but still, they have advantages and disadvantages. I started from Sunsink, but later I added Solarman and use both of them.
To help you decide which integration—or combination—is right for you, let’s review the table below, which highlights the key differences:
| Aspect | Sunsynk (kellerza) | Solarman (StephanJoubert) |
|---|---|---|
| Installation | Supervisor Add-On or Standalone Docker container; Please find more details on its site. | Installed through HACS. Please find more details on its site. |
| Connection Method | Local RS-485 → USB dongle or RS-485 → WiFi to Home Assistant. | Local network connection to Solarman logger, usually WiFi logger is included to an inverter package. |
| Hardware Required | RS-485 → USB costs more or less $15 | Solarman Wi-Fi/LAN logger (often pre-installed with DEYE systems). |
| Stability / Reliability | I don’t have any issues | The integration periodically becomes unresponsive and requires a Home Assistant restart to recover. This issue typically occurs following Wi-Fi disruptions, for example after a router reboot. |
| Update Frequency | 1-5 sec | 5 sec minimun |
| Switch ON/OFF-Grid mode | N/A | Available |
| BMS staistic | Available | N/A |
As you can see, both integrations offer similar functionality and can be used interchangeably depending on your preferences.
I use both, as they provide different types or representations of the same entities — for example, Battery Max Charging/Discharging Current.
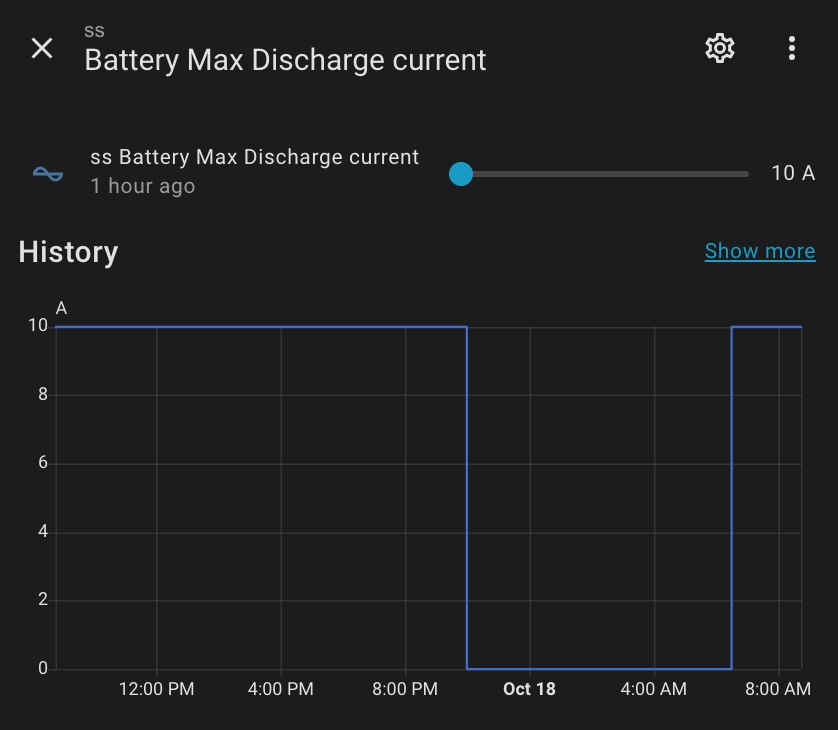
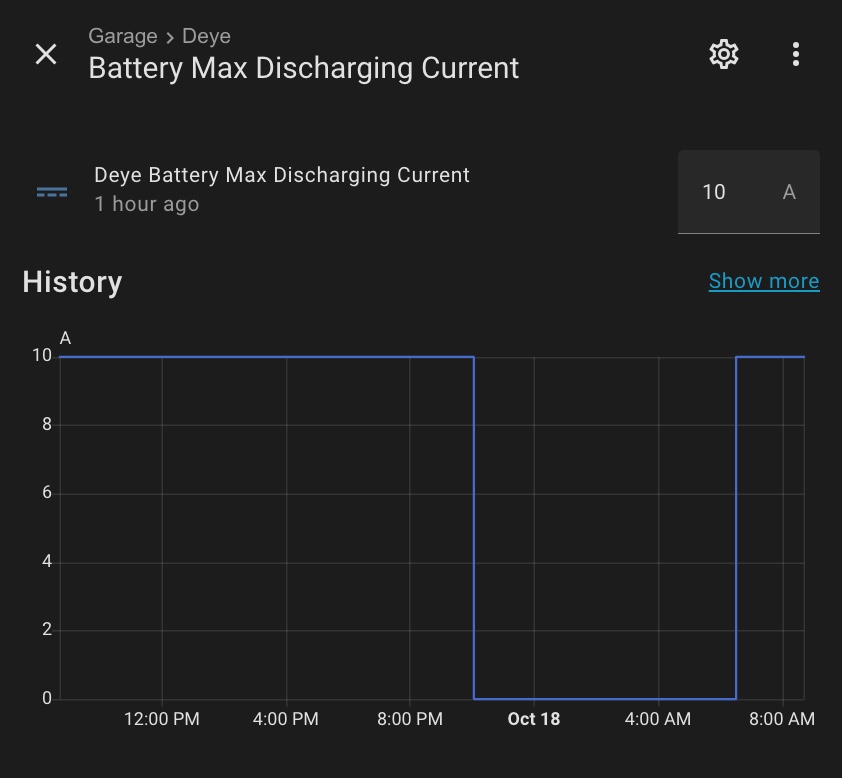
SunSynk provides a slider for adjusting values by default, whereas Solarman uses a numeric input field instead.
This difference is quite significant when using a mobile interface, as it’s much easier to set a predefined value with a slider on a small screen.
Additionally, SunSynk offers flexibility, allowing you to choose between a slider and a numeric input field—something Solarman does not support.
Example of solving issue with integration
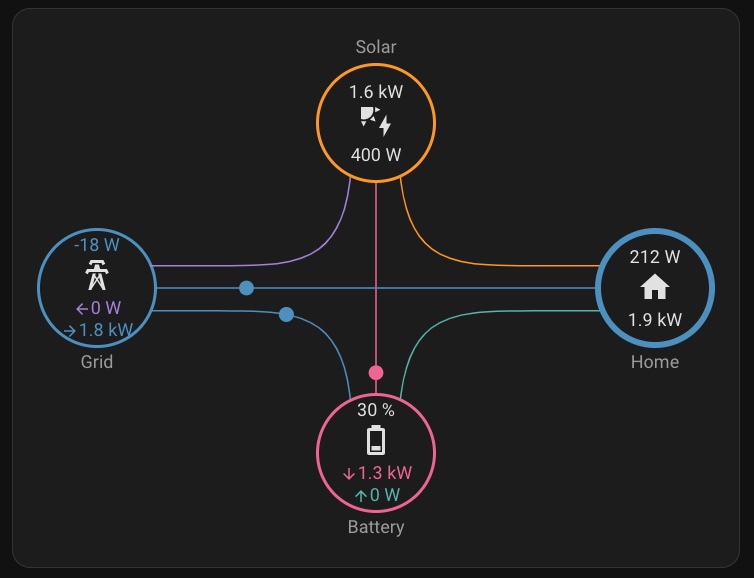
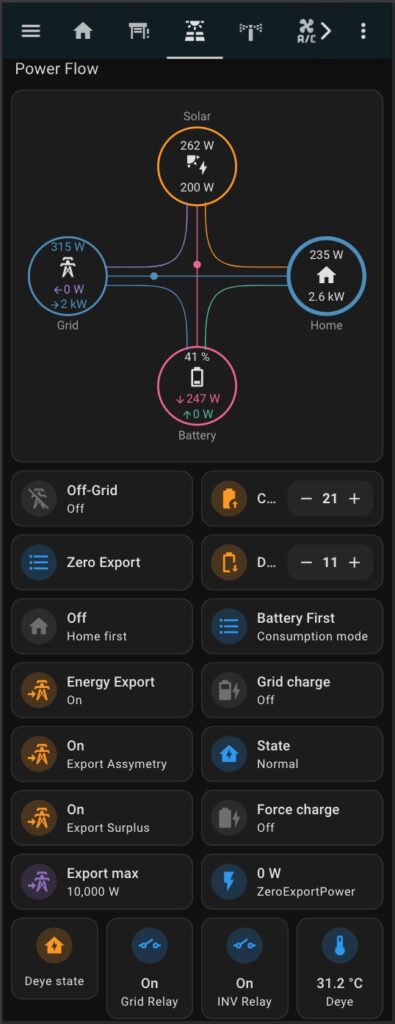
I noticed that my Deye inverter continuously draws a small amount of power from the grid, even when the solar panels produce enough energy to cover both the household load and battery charging:
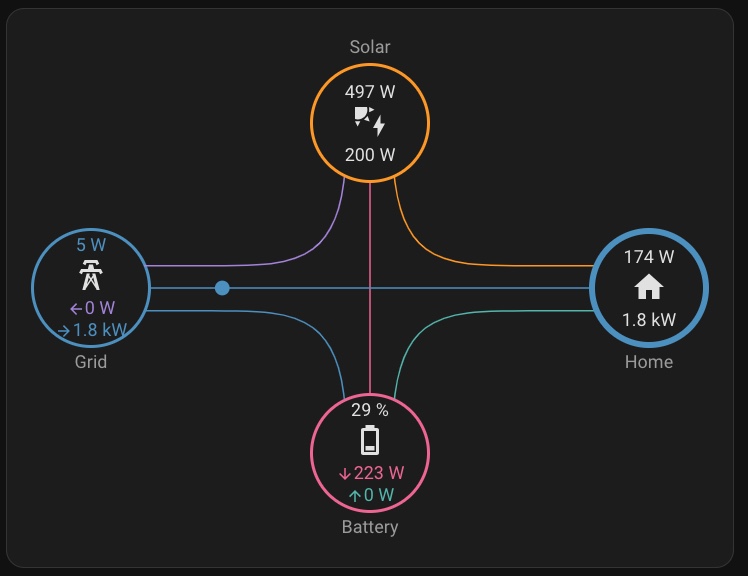
As you can see, 5W is still being drawn from the grid, even though the solar panels are producing sufficient power.
The SunSynk integration includes a useful parameter called LoadLimit, which appears to address this issue.
Solarman provides “work_mode” parameter.
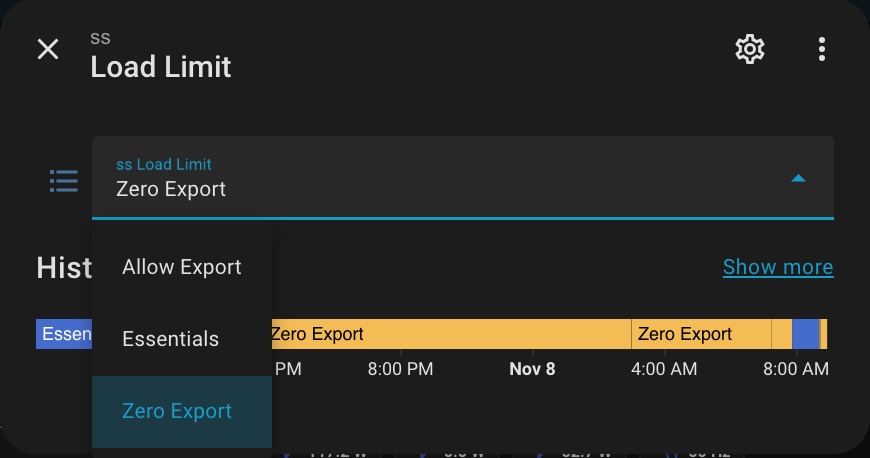
When the LoadLimit parameter is set to “Essentials” the Deye inverter begins exporting a small amount of power to the grid instead of consuming it.
Solarman’s “work_mode” parameter is set to “Zero Export To Load”.
I created an automation that sets the LoadLimit to “Essentials” when solar production is sufficient, and reverts it back to “ZeroExport” when production stops to prevent unnecessary battery drain.
Additionally, I switched my Deye inverter to Off-grid mode to ensure it doesn’t draw power from the grid until the battery is discharged to 40%.
Solarman integration setup
SunSynk integration setup
- It requires a direct RS485 connection via a USB dongle or an RS485-to-Ethernet bridge.
- SunSynk does not have a native integration with Home Assistant, so an MQTT broker is necessary.
- Although SunSynk is available as a Home Assistant add-on, it can also be installed as a standalone Docker container.
Hardware
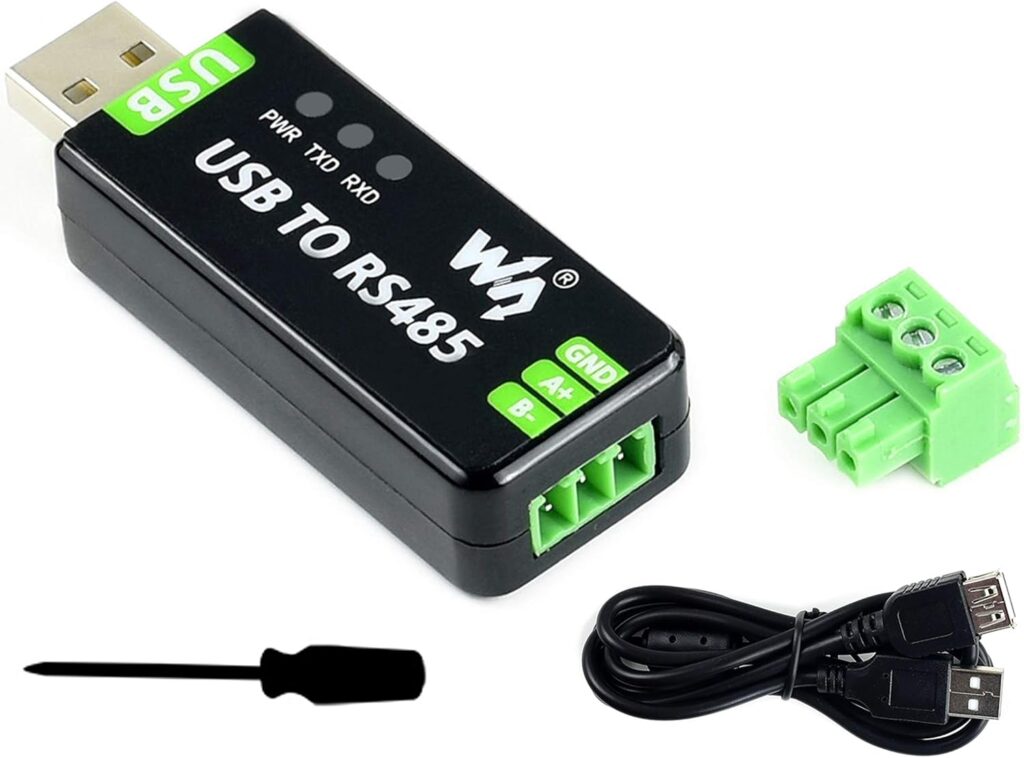
First, you’ll need an RS485 adapter or bridge to connect to your Deye inverter. My Raspberry Pi running Home Assistant is located in the same room as the inverter, so I opted for a USB dongle. There are many options available on the market, and I chose one with an FTDI chip, which is natively supported by the Linux kernel—meaning no additional drivers are required.
Additionally, I reviewed user feedback on various dongles and selected the one that had the most positive reviews and reliable performance: USB to RS485 Converter Industrial Adapter Original FT232RL and SP485EEN
This description contains affiliate links. As an Amazon Associate, I earn from qualifying purchases.
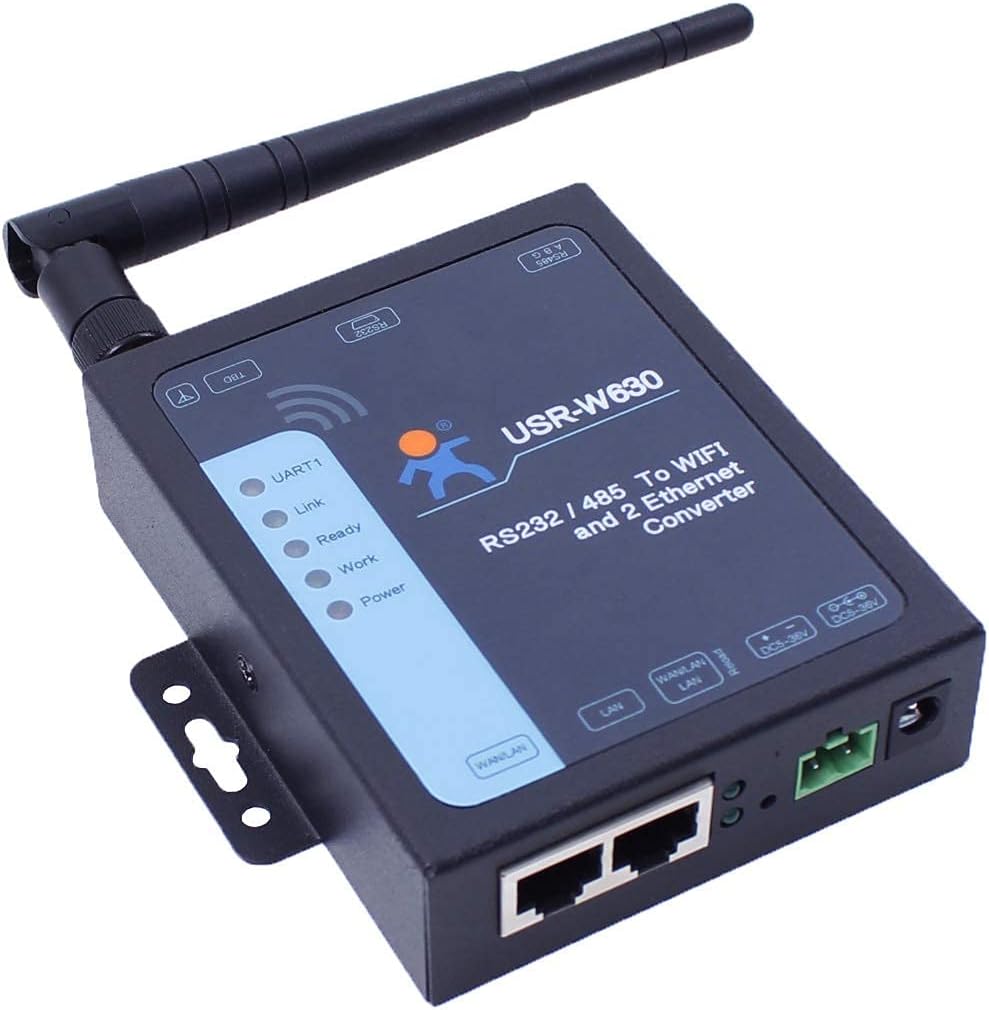
If a direct wired connection to your Home Assistant appliance isn’t possible, SunSynk recommends using the following WiFi bridge as an alternative: USR-W630 Industrial Serial RS232/RS485 to WiFi and Ethernet Converter
This description contains affiliate links. As an Amazon Associate, I earn from qualifying purchases.
If a direct wired connection to your Home Assistant appliance isn’t possible, SunSynk recommends using the following WiFi bridge as an alternative: USR-W630 Industrial Serial RS232/RS485 to WiFi and Ethernet Converter
Please find more details due to a bridge configuration and wiring on SunSynk web-site.
This description contains affiliate links. As an Amazon Associate, I earn from qualifying purchases.
WIRING
Deye inverters have RJ45 cocket for rs485 connection, in the time USB dongle have 3-wire Screw Terminal Block with A+, B-, and ground connections.
Please find more details due to wiring on SunSynk web-site.
You have two options for connecting your RS485 lines:
- Buy an Ethernet cable and cut off one RJ45 connector.
- Buy a cable and attach an RJ45 connector using a crimper.
I recommend the second approach. Most Ethernet cables use stranded wires, which don’t hold as securely in the screw terminals of an RS485 USB dongle. Solid-core wires are much better suited for these connections.
SunSynk config
SunSynk offers two ways to configure its connection:
- Define parameters directly in a docker-compose file
- Use SunSynk’s own configuration file
I recommend the second option, as it keeps your docker-compose setup simpler and avoids unnecessary complexity.
⚠️ Important Note:
All configurations provided below assume that your Home Assistant Docker setup is located in the /opt/HA folder.
Make sure to adjust any file paths in the configuration files according to your actual setup.
Let’s create SunSynk config file with the following commands:
mkdir -p /opt/HA/sunsynk
touch /opt/HA/sunsynk/options.yaml DRIVER: "pymodbus"
INVERTERS:
- SERIAL_NR: "XXXXXXX"
HA_PREFIX: SS
MODBUS_ID: 0
PORT: /dev/serial/by-id/usb-FTDI_FT232R_USB_UART_BG00QAN4-if00-port0
SENSOR_DEFINITIONS: three-phase-hv
SENSORS:
- all
SENSORS_FIRST_INVERTER:
- settings
MANUFACTURER: Deye
READ_ALLOW_GAP: 2
READ_SENSORS_BATCH_SIZE: 20
SCHEDULES:
- KEY: W
READ_EVERY: 5
REPORT_EVERY: 30
CHANGE_ANY: false
CHANGE_BY: 40
CHANGE_PERCENT: 0
NUMBER_ENTITY_MODE: "box"
MQTT_HOST: core-mosquitto
MQTT_PORT: 1883
MQTT_USERNAME: hass
MQTT_PASSWORD: ""⚠️ Explanations:
DRIVER: “pymodbus” – default python serial driver.
– SERIAL_NR: “XXXXXXX” – This value can be anything, as the integration uses it primarily to differentiate entities in setups with multiple inverters.
HA_PREFIX: SS – it defines the name of your inverter in Home Assistant.
MODBUS_ID: 0 – must be the same as the corresponding parameter in your Deye inverter.
PORT: /dev/serial/by-id/usb-FTDI_FT232R_USB_UART_BG00QAN4-if00-port0 – your rs485 dongle.
Run the following command to find your own dongle’s ID:
ls /dev/serial/by-id/You can use a name like /dev/ttyUSB0, but it can be changed when you add a new USB device e.g. Zigbee usb dongle.
SENSOR_DEFINITIONS: three-phase-hv – the right type of your inverter definition.
Possible values are:
- single-phase
- three-phase [low voltage]
- three-phase-hv [high voltage]
MANUFACTURER: Deye
Possible values are:
- Sunsynk: For standard Sunsynk hybrid inverters (most common; e.g., 5kW models).
- Deye: For Deye-branded hybrids (e.g., SUN-10K-SG01HP3-EU-AM2 three-phase models).
- Deye-8k: Variant for specific Deye 8kW models with custom sensor offsets.
- Sofar: For Sofar-branded inverters (e.g., HYD-5000-EP series, which use compatible protocols).
- sunsynkdirect: For direct Sunsynk connections or dongle variants with adjusted timing.
NUMBER_ENTITY_MODE: “box” – can be changed any time to adjust the number entity type for better usability e.g. for a mobile phone interface.
- auto – Home Assistant automatically chooses the best mode (slider if min/max defined, else box).
- box – Displays as a simple text input box for exact numeric entry.
- slider – Displays as a draggable slider for quick range selection.
MQTT_HOST: core-mosquitto – this is the hostname of your Mosquitto broker within your Docker network. Must be the same as defined in your docker-compose file.
⚠️ Define a username and password if you already have a configured Mosquitto broker that requires authentication.
Please find more details on SunSynk web-site.
Mosquitto config
⚠️ This chapter is not necessary if you already have a configured Mosquitto broker.
Let’s create SunSynk config file with the following commands:
Now, open the newly created file with your preferred text editor (e.g., mcedit) and add the following parameters:
mkdir -p /opt/HA/mosquitto/config
mkdir -p /opt/HA/mosquitto/data
mkdir -p /opt/HA/mosquitto/log
touch /opt/HA/mosquitto/config/mosquitto.conf
persistence true
persistence_location /mosquitto/data/
log_dest file /mosquitto/data/mosquitto.log
log_type all
allow_anonymous true
listener 1883⚠️ Explanations:
allow_anonymous true – allows connections without a username or password. Since my broker is only accessible from the internal Docker network, this poses no security risk and simplifies the configuration.
listener 1883 – mosquitto port inside docker network.
Docker-compose config
I assume you already have your own Docker Compose configuration for your setup, but I’m including the full configuration here for clarity and easier understanding.
First, you’ll need to add a Mosquitto Docker container to your setup if it hasn’t been configured yet, and then integrate it with your Home Assistant instance.
Let’s create Docker Compose file:
touch /opt/HA/docker-compose.ymlNow, open the newly created file with your preferred text editor (e.g., mcedit) and add the following parameters:
version: '3.8'

services:

  mosquitto:
    container_name: mqtt
    image: eclipse-mosquitto:latest
    hostname: core-mosquitto
    restart: unless-stopped
    volumes:
     - /opt/HA/mosquitto:/mosquitto
    environment:
     - TZ=YTZ
    networks:
      home_assistant:
       aliases:
         - core-mosquitto
       ipv4_address: 172.20.0.3

  home_assistant:
    container_name: ha
    image: "ghcr.io/home-assistant/home-assistant:stable"
    restart: unless-stopped
    hostname: ha
    volumes:
      - /opt/HA/homeassistant:/config
      - /etc/localtime:/etc/localtime:ro
      - /run/dbus:/run/dbus:ro
    privileged: true
    network_mode: host
    extra_hosts:
      - "zigbee2mqtt:172.20.0.2"
      - "core-mosquitto:172.20.0.3"
      - "hass-configurator:172.20.0.4"
      - "portainer:172.20.0.5"
      - "sunsynk:172.20.0.6"


networks:
  home_assistant:
    driver: bridge
    name: home_assistant
    ipam:
      config:
        - subnet: 172.20.0.0/16
⚠️ Explanations:
mosquitto: – section:
volumes:
– /opt/HA/mosquitto:/mosquitto – don’t forget to adjust it to your actual path.
environment:
– TZ=YTZ – change it according to Your Time Zone.
networks: — this section is essential because my Home Assistant instance is connected both to the Docker internal network and to my home network. This setup keeps other containers (such as Mosquitto) isolated while still allowing Home Assistant to discover devices on the local network simultaneously.
home_assistant: section:
volumes: – don’t forget to adjust the following paths to your actual paths.
– /opt/HA/homeassistant:/config – mount the folder with HA configs
– /etc/localtime:/etc/localtime:ro – provide HA access to your system timezone config
– /run/dbus:/run/dbus:ro – allow home assistant access to the system parameters.
ports:
– 8120:8120 – must be the same as defined in your HA configuration.yaml
privileged: true – to allow access to the system parameters e.g. CPU and other sensors
network_mode: host – connect your HA to your local network directly to allow network discovery functionality
The Problem of network_mode: host usage
- Without network_mode: host, services on a shared Docker network (e.g., ha-network) use Docker’s built-in DNS to resolve names automatically (e.g., HA connects to MQTT at mosquitto:1883).
- With network_mode: host, HA shares the host’s network interfaces and DNS resolver but loses this internal resolution. Attempting to connect to another container by name fails with “host not found” errors, as Docker’s DNS isn’t consulted.
To solve the issue the following section is needed:
extra_hosts:
– “zigbee2mqtt:172.20.0.2”
– “core-mosquitto:172.20.0.3”
– “hass-configurator:172.20.0.4”
– “portainer:172.20.0.5”
– “sunsynk:172.20.0.6”
- extra_hosts adds static hostname-to-IP mappings to the container’s /etc/hosts file, acting as a manual workaround for name resolution.
- It’s essential when:
- HA needs to communicate with other compose services (e.g., MQTT broker, MariaDB, or Node-RED) without exposing their ports to the host or using IPs directly.
- You want to keep services containerized but maintain “host-like” networking for HA.
Run your config with the following commands:
cd /opt/HA
docker-compose up -d --remove-orphans
Wait for until your Docker setup is started and configure MQTT integration:
- Navigate to Settings > Devices & Services.
- Click + Add Integration in the bottom right.
- Search for and select MQTT.
Enter your broker details:
- Broker: core-mosquitto
- Port:
- Username/Password: If you don’t add “allow_anonymous true” parameter in your mosquitto configuration.
Now you can add SunSynk section to your docker-compose file:
version: '3.8'

services:

  mosquitto:
    container_name: mqtt
    image: eclipse-mosquitto:latest
    hostname: core-mosquitto
    restart: unless-stopped
    volumes:
     - /opt/HA/mosquitto:/mosquitto
    environment:
     - TZ=YTZ
    networks:
      home_assistant:
       aliases:
         - core-mosquitto
       ipv4_address: 172.20.0.3

 sunsynk-multi:
    restart: unless-stopped
    image: ghcr.io/kellerza/hass-addon-sunsynk-multi:stable
    container_name: sunsynk
    privileged: true
    volumes:
      - /opt/HA/sunsynk/options.yaml:/data/options.yaml
      - /dev:/dev
    networks:
     home_assistant:
       aliases:
         - sunsynk
       ipv4_address: 172.20.0.6

  home_assistant:
    container_name: ha
    image: "ghcr.io/home-assistant/home-assistant:stable"
    restart: unless-stopped
    hostname: ha
    volumes:
      - /opt/HA/homeassistant:/config
      - /etc/localtime:/etc/localtime:ro
      - /run/dbus:/run/dbus:ro
    privileged: true
    network_mode: host
    extra_hosts:
      - "zigbee2mqtt:172.20.0.2"
      - "core-mosquitto:172.20.0.3"
      - "hass-configurator:172.20.0.4"
      - "portainer:172.20.0.5"
      - "sunsynk:172.20.0.6"


networks:
  home_assistant:
    driver: bridge
    name: home_assistant
    ipam:
      config:
        - subnet: 172.20.0.0/16
I provided a whole docker-compose file for better understanding.
Now start SunSynk with the following command.
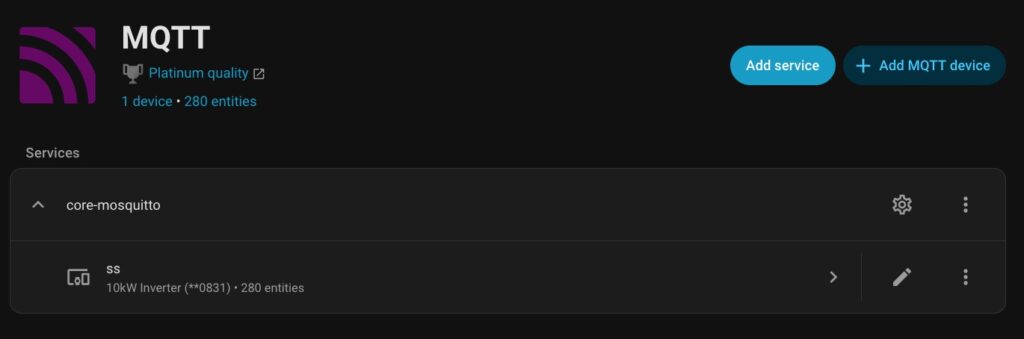
docker-compose up -d --remove-orphansWithin a few minutes (depending on your home server’s performance), a new device should appear under your MQTT integration:
Your integration is ready, so you can build your Solar Panel integration.
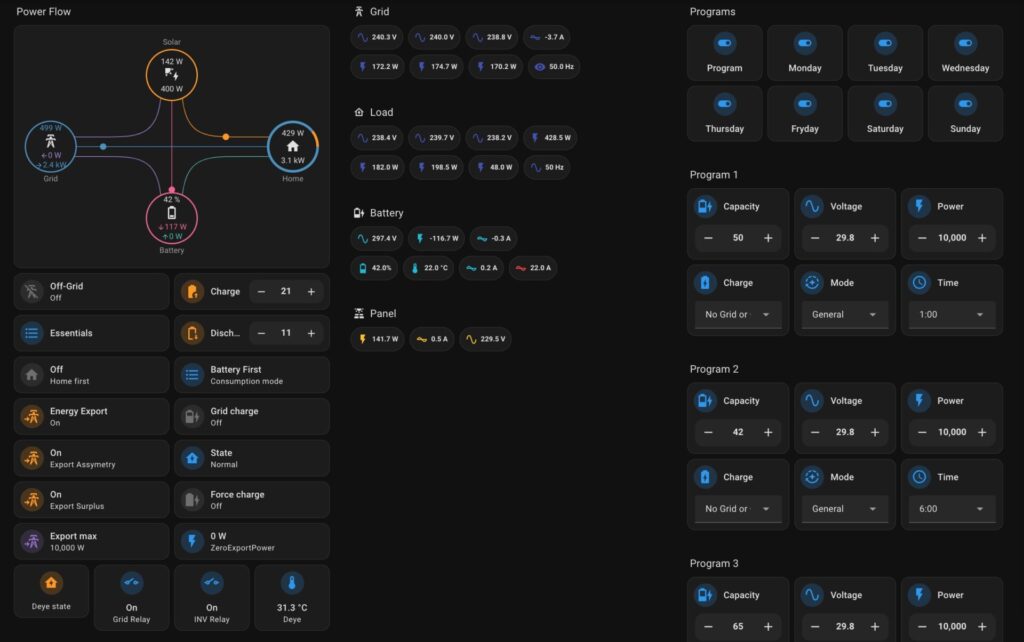
Create Dashboard
Since I primarily access Home Assistant through my mobile phone, I designed the following dashboard specifically optimized for a mobile interface.

Necessary components
The following components must be installed in your Home Assistant setup for such dashboard:
- Solarman integration
- SunSynk integration
- Mushroom UI components
- Energy Flow Card Plus
Dashboard confing
The complete dashboard YAML file is often too large and impractical for quick editing or replacing example entity names with your own.
To significantly simplify customization, I’ve divided the dashboard configuration into logical sections. Now, you can easily implement the new configuration by creating a new dashboard or by adding a new view to your existing one.
Option 1: Create a New Dashboard (Recommended for Clean Setup)
Open Home Assistant and go to Settings → Dashboards.
Click + Add Dashboard.
Choose “New dashboard from scratch”.
Give it a name (e.g., “Deye Inverter Control”).
Select an icon if you want (e.g., mdi:solar-power-variant).
Click Create — a blank dashboard will appear.
Open the new dashboard, click the ⋮ (three dots) menu in the top-right corner, and select Edit Dashboard → Take Control.
Option 2: Add a New View to an Existing Dashboard
Open your current dashboard (e.g., “Home” or “Energy”).
Click the ⋮ (three dots) menu in the top-right corner and select Edit Dashboard.
Click + Add View at the top of the screen.
Choose “Sections” Layout type.
Enter a name for the view (e.g., “Inverter” or “Solar Control”).
Choose an icon and layout (e.g., mdi:solar-power-variant).
- Set “Max number of sections wide” to 3.
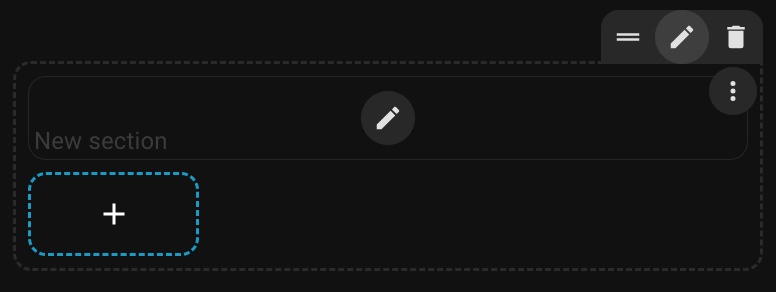
Add your first section.
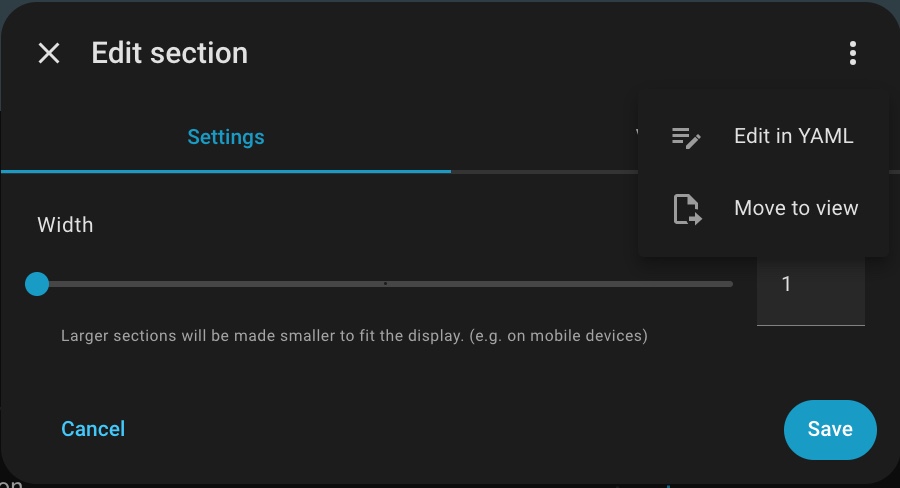
Click on the “Pen” icon on the right-top of your section:
In a new window, click on the “three-dot” menu and choose “Edit in YAML”.
Place the following code into the new window, replace example entities with your own:
type: grid
cards:
  - type: heading
    heading_style: title
    heading: Power Flow
  - type: custom:power-flow-card-plus
    entities:
      battery:
        entity: sensor.ss_battery_1_power
        state_of_charge: sensor.ss_battery_1_bms_soc
        color_value: true
      grid:
        entity:
          "0": b
          "1": i
          "2": "n"
          "3": a
          "4": r
          "5": "y"
          "6": _
          "7": s
          "8": e
          "9": "n"
          "10": s
          "11": o
          "12": r
          "13": .
          "14": s
          "15": s
          "16": _
          "17": g
          "18": r
          "19": i
          "20": d
          "21": _
          "22": g
          "23": i
          "24": v
          "25": e
          "26": _
          "27": p
          "28": o
          "29": w
          "30": e
          "31": r
          "32": _
          "33": t
          "34": o
          "35": _
          "36": r
          "37": e
          "38": l
          "39": a
          "40": "y"
          "41": _
          "42": s
          "43": t
          "44": a
          "45": t
          "46": u
          "47": s
          consumption: sensor.ss_day_grid_import
          production: sensor.ss_day_grid_export
        secondary_info:
          entity: sensor.ss_grid_ct_power
          color_value: true
          display_zero: false
          accept_negative: true
      solar:
        entity: sensor.ss_day_pv_energy
        display_zero_state: true
        secondary_info:
          entity: sensor.ss_pv_power
      home:
        secondary_info:
          entity: sensor.ss_load_power
        entity: sensor.ss_day_load_energy
        circle_animation: true
        subtract_individual: false
        override_state: true
        use_metadata: false
      individual: []
      fossil_fuel_percentage:
        secondary_info:
          entity: sensor.ss_fault
          color_value: false
          accept_negative: true
          unit_white_space: true
        icon: mdi:alarm-light
        color_icon: true
        color_value: false
        display_zero: false
        name: Fault
        display_zero_state: true
        unit_white_space: false
        use_metadata: false
    clickable_entities: true
    display_zero_lines:
      mode: show
      transparency: 50
      grey_color:
        - 189
        - 189
        - 189
    use_new_flow_rate_model: true
    w_decimals: 0
    kw_decimals: 1
    min_flow_rate: 0.75
    max_flow_rate: 6
    max_expected_power: 2000
    min_expected_power: 0.01
    watt_threshold: 1000
    transparency_zero_lines: 0
    sort_individual_devices: true
    disable_dots: false
  - type: custom:mushroom-entity-card
    entity: switch.deye_off_grid
    name: Off-Grid
    icon: mdi:transmission-tower-off
    secondary_info: state
    primary_info: name
  - type: custom:mushroom-number-card
    entity: number.ss_battery_max_charge_current
    name: Charge
    secondary_info: none
    icon_color: accent
    primary_info: name
    display_mode: buttons
    layout: horizontal
    grid_options:
      columns: 6
      rows: 1
    icon: mdi:battery-arrow-up
  - type: custom:mushroom-entity-card
    entity: select.ss_load_limit
    name: Export mode
    secondary_info: none
    primary_info: state
  - type: custom:mushroom-number-card
    entity: number.ss_battery_max_discharge_current
    secondary_info: none
    icon_color: accent
    primary_info: name
    display_mode: buttons
    layout: horizontal
    grid_options:
      columns: 6
      rows: 1
    icon: mdi:battery-arrow-down-outline
    name: Discharge
  - type: custom:mushroom-entity-card
    entity: switch.ss_priority_load
    icon: mdi:home
    icon_color: accent
    name: Home first
    primary_info: state
    secondary_info: name
  - type: custom:mushroom-entity-card
    entity: select.deye_energy_pattern
    primary_info: state
    name: Consumption mode
    secondary_info: name
  - type: custom:mushroom-entity-card
    entity: switch.ss_solar_export
    icon: mdi:transmission-tower-import
    icon_color: accent
    name: Energy Export
  - type: custom:mushroom-entity-card
    entity: switch.ss_grid_charge_enabled
    icon: mdi:battery-charging-60
    name: Grid charge
  - type: custom:mushroom-entity-card
    entity: switch.deye_export_asymmetry
    icon: mdi:transmission-tower-import
    name: Export Assymetry
    primary_info: state
    secondary_info: name
    icon_color: accent
  - type: custom:mushroom-entity-card
    entity: sensor.deye_device_state
    secondary_info: state
    icon: mdi:home-lightning-bolt
    name: State
  - type: custom:mushroom-entity-card
    entity: switch.deye_export_surplus
    name: Export Surplus
    icon: mdi:transmission-tower-import
    icon_color: accent
    primary_info: state
    secondary_info: name
  - type: custom:mushroom-entity-card
    entity: switch.ss_battery_1_bms_other_flag_battery_1_force_charge
    icon: mdi:battery-charging-100
    name: Force charge
  - type: custom:mushroom-entity-card
    entity: number.deye_grid_max_export_power
    name: Export max
    icon: mdi:transmission-tower-import
    icon_color: purple
  - type: custom:mushroom-entity-card
    entity: number.ss_system_zero_export_power
    name: ZeroExportPower
    primary_info: state
    secondary_info: name
  - type: horizontal-stack
    cards:
      - type: custom:mushroom-entity-card
        entity: sensor.ss_fault
        name: Deye state
        icon_color: accent
        icon: mdi:home-lightning-bolt
        primary_info: state
        secondary_info: name
        layout: vertical
      - type: custom:mushroom-entity-card
        entity: binary_sensor.ss_grid_relay_status
        primary_info: state
        secondary_info: name
        name: Grid Relay
        icon: mdi:electric-switch
        fill_container: false
        layout: vertical
      - type: custom:mushroom-entity-card
        entity: binary_sensor.ss_inv_relay_status
        primary_info: state
        secondary_info: name
        name: INV Relay
        icon: mdi:electric-switch
        fill_container: false
        layout: vertical
      - type: custom:mushroom-entity-card
        entity: sensor.ss_radiator_temperature
        name: Deye
        layout: vertical
        primary_info: state
        secondary_info: name
Repeat the previous steps to create the next panel and place the following code with replacing example entities with yours:
type: grid
cards:
  - type: heading
    heading: Grid
    heading_style: title
    icon: mdi:transmission-tower
  - type: custom:mushroom-chips-card
    chips:
      - type: entity
        entity: sensor.ss_grid_l1_voltage
        name: L1
        icon_color: indigo
      - type: entity
        entity: sensor.ss_grid_l2_voltage
        icon_color: indigo
      - type: entity
        entity: sensor.ss_grid_l3_voltage
        icon_color: indigo
      - type: entity
        entity: sensor.ss_grid_current
        icon_color: indigo
    grid_options:
      columns: 12
      rows: auto
  - type: custom:mushroom-chips-card
    chips:
      - type: entity
        entity: sensor.ss_grid_l1_power
        icon_color: indigo
      - type: entity
        entity: sensor.ss_grid_l2_power
        name: L2
        icon_color: indigo
      - type: entity
        entity: sensor.ss_grid_l3_power
        icon_color: indigo
      - type: entity
        entity: sensor.ss_grid_frequency
        icon_color: indigo
        icon: ""
  - type: heading
    heading: Load
    heading_style: title
    icon: mdi:home-lightning-bolt-outline
  - type: custom:mushroom-chips-card
    chips:
      - type: entity
        entity: sensor.ss_load_l1_voltage
        name: L1
        icon_color: indigo
      - type: entity
        entity: sensor.ss_load_l2_voltage
        icon_color: indigo
      - type: entity
        entity: sensor.ss_load_l3_voltage
        icon_color: indigo
      - type: entity
        entity: sensor.ss_load_power
        icon_color: indigo
    grid_options:
      columns: 12
      rows: auto
  - type: custom:mushroom-chips-card
    chips:
      - type: entity
        entity: sensor.ss_load_l1_power
        icon_color: indigo
      - type: entity
        entity: sensor.ss_load_l2_power
        name: L2
        icon_color: indigo
      - type: entity
        entity: sensor.ss_load_l3_power
        icon_color: indigo
      - type: entity
        entity: sensor.deye_load_frequency
        icon_color: indigo
  - type: heading
    heading: Battery
    heading_style: title
    icon: mdi:battery-charging-30
  - type: custom:mushroom-chips-card
    chips:
      - type: entity
        entity: sensor.ss_battery_1_voltage
        icon_color: cyan
      - type: entity
        entity: sensor.ss_battery_1_power
        icon_color: cyan
      - type: entity
        entity: sensor.ss_battery_1_current
        icon_color: cyan
  - type: custom:mushroom-chips-card
    chips:
      - type: entity
        entity: sensor.ss_battery_1_bms_soc
        icon_color: cyan
      - type: entity
        entity: sensor.ss_battery_1_bms_temperature
        icon_color: cyan
      - type: entity
        entity: sensor.ss_battery_1_bms_current
        icon_color: cyan
      - type: entity
        entity: sensor.ss_battery_1_bms_charging_current_limit
        icon_color: red
        name: Current Limit
  - type: heading
    heading: "Panel "
    heading_style: title
    icon: mdi:solar-power-variant
  - type: custom:mushroom-chips-card
    chips:
      - type: entity
        entity: sensor.ss_pv_power
        icon_color: amber
      - type: entity
        entity: sensor.ss_pv1_current
        icon_color: amber
      - type: entity
        entity: sensor.ss_pv1_voltage
        icon_color: amber
Now add the last pannel:
type: grid
cards:
  - type: heading
    heading: Programs
    heading_style: title
  - type: horizontal-stack
    cards:
      - type: custom:mushroom-entity-card
        entity: switch.ss_prog_time_of_use_enabled
        icon: mdi:toggle-switch
        name: Program
        primary_info: name
        secondary_info: none
        layout: vertical
      - type: custom:mushroom-entity-card
        entity: switch.ss_prog_monday_enabled
        icon: mdi:toggle-switch
        name: Monday
        primary_info: name
        secondary_info: none
        layout: vertical
      - type: custom:mushroom-entity-card
        entity: switch.ss_prog_tuesday_enabled
        icon: mdi:toggle-switch
        name: Tuesday
        primary_info: name
        secondary_info: none
        layout: vertical
      - type: custom:mushroom-entity-card
        entity: switch.ss_prog_wednesday_enabled
        icon: mdi:toggle-switch
        name: Wednesday
        primary_info: name
        secondary_info: none
        layout: vertical
  - type: horizontal-stack
    cards:
      - type: custom:mushroom-entity-card
        entity: switch.ss_prog_thursday_enabled
        icon: mdi:toggle-switch
        name: Thursday
        primary_info: name
        secondary_info: none
        layout: vertical
      - type: custom:mushroom-entity-card
        entity: switch.ss_prog_friday_enabled
        icon: mdi:toggle-switch
        name: Fryday
        primary_info: name
        secondary_info: none
        layout: vertical
      - type: custom:mushroom-entity-card
        entity: switch.ss_prog_saturday_enabled
        icon: mdi:toggle-switch
        name: Saturday
        primary_info: name
        secondary_info: none
        layout: vertical
      - type: custom:mushroom-entity-card
        entity: switch.ss_prog_sunday_enabled
        icon: mdi:toggle-switch
        name: Sunday
        primary_info: name
        secondary_info: none
        layout: vertical
  - type: heading
    heading: Program 1
    heading_style: title
  - type: horizontal-stack
    cards:
      - type: custom:mushroom-number-card
        entity: number.ss_prog1_capacity
        secondary_info: none
        primary_info: name
        display_mode: buttons
        name: Capacity
        icon: mdi:battery-charging-40
      - type: custom:mushroom-number-card
        entity: number.ss_prog1_voltage
        secondary_info: none
        primary_info: name
        display_mode: buttons
        name: Voltage
      - type: custom:mushroom-number-card
        entity: number.ss_prog1_power
        secondary_info: none
        primary_info: name
        display_mode: buttons
        name: Power
  - type: horizontal-stack
    cards:
      - type: custom:mushroom-select-card
        entity: select.ss_prog1_charge
        secondary_info: none
        name: Charge
        icon: mdi:battery-charging
      - type: custom:mushroom-select-card
        entity: select.ss_prog1_mode
        secondary_info: none
        name: Mode
        icon: mdi:auto-mode
      - type: custom:mushroom-select-card
        entity: select.ss_prog1_time
        secondary_info: none
        name: Time
        icon: mdi:clock-outline
  - type: heading
    heading: Program 2
    heading_style: title
  - type: horizontal-stack
    cards:
      - type: custom:mushroom-number-card
        entity: number.ss_prog2_capacity
        secondary_info: none
        primary_info: name
        display_mode: buttons
        name: Capacity
        icon: mdi:battery-charging-40
      - type: custom:mushroom-number-card
        entity: number.ss_prog2_voltage
        secondary_info: none
        primary_info: name
        display_mode: buttons
        name: Voltage
      - type: custom:mushroom-number-card
        entity: number.ss_prog2_power
        secondary_info: none
        primary_info: name
        display_mode: buttons
        name: Power
  - type: horizontal-stack
    cards:
      - type: custom:mushroom-select-card
        entity: select.ss_prog2_charge
        secondary_info: none
        name: Charge
        icon: mdi:battery-charging
      - type: custom:mushroom-select-card
        entity: select.ss_prog2_mode
        secondary_info: none
        name: Mode
        icon: mdi:auto-mode
      - type: custom:mushroom-select-card
        entity: select.ss_prog2_time
        secondary_info: none
        name: Time
        icon: mdi:clock-outline
  - type: heading
    heading: Program 3
    heading_style: title
  - type: horizontal-stack
    cards:
      - type: custom:mushroom-number-card
        entity: number.ss_prog3_capacity
        secondary_info: none
        primary_info: name
        display_mode: buttons
        name: Capacity
        icon: mdi:battery-charging-40
      - type: custom:mushroom-number-card
        entity: number.ss_prog3_voltage
        secondary_info: none
        primary_info: name
        display_mode: buttons
        name: Voltage
      - type: custom:mushroom-number-card
        entity: number.ss_prog3_power
        secondary_info: none
        primary_info: name
        display_mode: buttons
        name: Power
  - type: horizontal-stack
    cards:
      - type: custom:mushroom-select-card
        entity: select.ss_prog3_charge
        secondary_info: none
        name: Charge
        icon: mdi:battery-charging
      - type: custom:mushroom-select-card
        entity: select.ss_prog3_mode
        secondary_info: none
        name: Mode
        icon: mdi:auto-mode
      - type: custom:mushroom-select-card
        entity: select.ss_prog3_time
        secondary_info: none
        name: Time
        icon: mdi:clock-outline
  - type: heading
    heading: Program 4
    heading_style: title
  - type: horizontal-stack
    cards:
      - type: custom:mushroom-number-card
        entity: number.ss_prog4_capacity
        secondary_info: none
        primary_info: name
        display_mode: buttons
        name: Capacity
        icon: mdi:battery-charging-40
      - type: custom:mushroom-number-card
        entity: number.ss_prog4_voltage
        secondary_info: none
        primary_info: name
        display_mode: buttons
        name: Voltage
      - type: custom:mushroom-number-card
        entity: number.ss_prog4_power
        primary_info: name
        secondary_info: none
        display_mode: buttons
        name: Power
  - type: horizontal-stack
    cards:
      - type: custom:mushroom-select-card
        entity: select.ss_prog4_charge
        secondary_info: none
        name: Charge
        icon: mdi:battery-charging
      - type: custom:mushroom-select-card
        entity: select.ss_prog4_mode
        secondary_info: none
        name: Mode
        icon: mdi:auto-mode
      - type: custom:mushroom-select-card
        entity: select.ss_prog4_time
        secondary_info: none
        name: Time
        icon: mdi:clock-outline
  - type: heading
    heading: Program 5
    heading_style: title
  - type: horizontal-stack
    cards:
      - type: custom:mushroom-number-card
        entity: number.ss_prog5_capacity
        secondary_info: none
        primary_info: name
        display_mode: buttons
        name: Capacity
        icon: mdi:battery-charging-40
      - type: custom:mushroom-number-card
        entity: number.ss_prog5_voltage
        secondary_info: none
        primary_info: name
        display_mode: buttons
        name: Voltage
      - type: custom:mushroom-number-card
        entity: number.ss_prog5_power
        secondary_info: none
        primary_info: name
        display_mode: buttons
        name: Power
  - type: horizontal-stack
    cards:
      - type: custom:mushroom-select-card
        entity: select.ss_prog5_charge
        secondary_info: none
        name: Charge
        icon: mdi:battery-charging
      - type: custom:mushroom-select-card
        entity: select.ss_prog5_mode
        secondary_info: none
        name: Mode
        icon: mdi:auto-mode
      - type: custom:mushroom-select-card
        entity: select.ss_prog5_time
        secondary_info: none
        name: Time
        icon: mdi:clock-outline
  - type: heading
    heading: Program 6
    heading_style: title
  - type: horizontal-stack
    cards:
      - type: custom:mushroom-number-card
        entity: number.ss_prog6_capacity
        secondary_info: none
        primary_info: name
        display_mode: buttons
        name: Capacity
        icon: mdi:battery-charging-40
      - type: custom:mushroom-number-card
        entity: number.ss_prog6_voltage
        secondary_info: none
        primary_info: name
        display_mode: buttons
        name: Voltage
      - type: custom:mushroom-number-card
        entity: number.ss_prog6_power
        secondary_info: none
        primary_info: name
        display_mode: buttons
        name: Power
  - type: horizontal-stack
    cards:
      - type: custom:mushroom-select-card
        entity: select.ss_prog6_charge
        secondary_info: none
        name: Charge
        icon: mdi:battery-charging
      - type: custom:mushroom-select-card
        entity: select.ss_prog6_mode
        secondary_info: none
        name: Mode
        icon: mdi:auto-mode
      - type: custom:mushroom-select-card
        entity: select.ss_prog6_time
        secondary_info: none
        name: Time
        icon: mdi:clock-outline
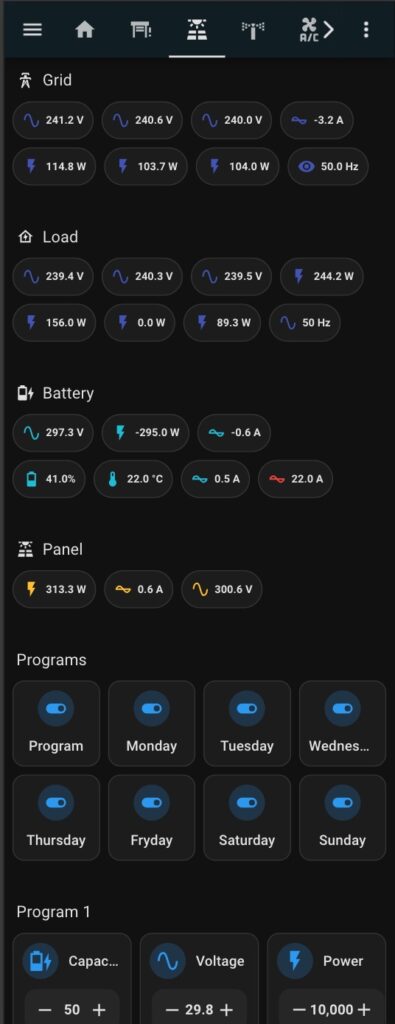
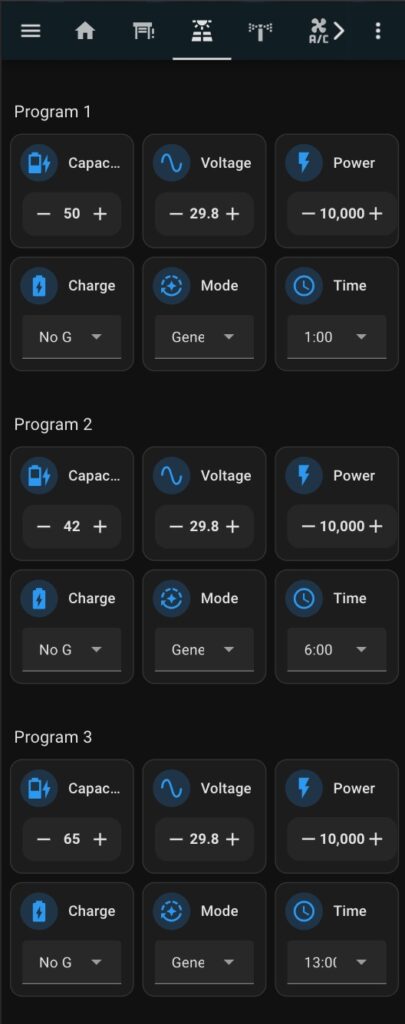
As a result, you should create such a dashboard: