This is a guide for advanced Home Assistant users who have chosen the Docker install method.
If you run Home Assistant OS (formerly Hass.io) or Supervised, update notifications are baked right into the UI. A shiny notification appears, you click a button, and the system updates.
But if you run Home Assistant Container (pure Docker), you get none of that. Your instance runs happily in its isolated container, completely unaware that a newer, shinier version exists on Docker Hub. You have to manually check releases or rely on external newsletters.
This article will show you how to bridge that gap using a fantastic little tool called updates2mqtt. It will monitor your containers and let Home Assistant know when an update is waiting.
Goal
After migrating from a Supervised setup to Docker, my biggest concern was keeping my stack up-to-date since the Docker version lacks built-in update management.
Initially, I wrote custom scripts to pull version data for Mosquitto and Zigbee2MQTT into Home Assistant. While those worked like a charm, they weren’t scalable—I didn’t want to write a new script for every single container. Motivated by a bit of ‘strategic laziness,’ I found a better way: Updates2MQTT.
It automatically exposes your installed and available versions to Home Assistant, allowing you to trigger updates directly from your settings. It does have one quirk—it occasionally displays docker image hashes instead of clean version numbers (like with Mosquitto)—but for ease of use, it’s unbeatable. Also, it doesn’t delete old images, so a manual clean-up is needed from Portainer or a command line.
If you still prefer the precision of custom scripts, check out my previous manual on that method!
⚠️ Important Distinction: This setup will notify you of updates. It will not perform the update automatically. In the Docker world, automatic updates (like Watchtower) can sometimes break things unexpectedly. This approach gives you the knowledge to perform the update manually when you are ready.
Prerequisites
An existing Home Assistant Docker installation.
A working MQTT Broker (like Mosquitto) that Home Assistant is already connected to.
Docker Compose (recommended for managing the stack).
Understanding updates2mqtt
Updates2mqtt is a minimalist Go application packaged in a Docker container. Its job is simple but vital:
It needs access to your host’s Docker socket (
/var/run/docker.sock) to see what containers are currently running and what image versions they are using.It periodically queries the associated container registry (usually Docker Hub or GitHub Container Registry) to see if a newer image tag exists for that image.
It publishes its findings to your MQTT broker as a JSON payload.
Home Assistant then consumes that MQTT message and turns it into a sensor.
Please find more information in the developer’s repository.
Configuration
Updates2mqtt Config
First, let’s create the necessary directories. Feel free to adjust these paths based on your personal preferences:
sudo mkdir -p {/opt/HA/updates2mqtt/config,/opt/HA/updates2mqtt/data}Next, create the updates2mqtt configuration file and set the required permissions:
sudo touch /opt/HA/updates2mqtt/config/config.yaml
sudo chmod 0644  /opt/HA/updates2mqtt/config/config.yaml
Open it in your preferred text editor e.g. mcedit, and add the following parameters:
mqtt:
  host: core-mosquitto
  port: 1883
  user: mqtt_user
  password: mqtt_password
  topic_root: updates2mqtt
⚠️ Explanation:
- host: corresponded to the defined hostname for your mosquitto brocker
- port: your mqtt server port
- user and password are needed if your mqtt broker uses authentication
- topic_root: updates2mqtt
This defines the prefix for every message sent. Instead of just sending a message named “homeassistant,” it will send it asupdates2mqtt/homeassistant. This keeps your MQTT “folders” organized so you don’t mix up update data with, say, your Zigbee or Shellies data.
Use this command to add a new MQTT user (be sure to replace mqtt with your container name), and restart mqtt to apply a new user adding:
sudo docker exec -it mqtt mosquitto_passwd /mosquitto/config/password.txt
sudo docker restart mqtt
Now add updates2mqtt to docker-compose.yaml.
  updates2mqtt:
    image: ghcr.io/rhizomatics/updates2mqtt:latest
    container_name: updates2mqtt
    hostname: updates2mqtt
    restart: unless-stopped
    depends_on:
      - mosquitto
    volumes:
      - /var/run/docker.sock:/var/run/docker.sock
      - /YOUR_PATH/config:/app/conf
      - /YOUR_PATH/data:/app/data
      - /STACK1_PATH/docker-compose.yml:/opt/HA/docker-compose.yml
      - /STACK2_PATH/docker-compose.yml:/opt/beszel/docker-compose.yml
    environment:
      - UPDATES2MQTT_CHECK_INTERVAL=7200
      - UPDATES2MQTT_CONTAINERS=all
      - UPDATES2MQTT_ALLOW_UPDATES="true"
      - TZ=YOUR_TIME_ZONE
    labels:
      - updates2mqtt.compose_path=/opt/HA/docker-compose.yml
    networks:
     home_assistant:
       aliases:
         - updates2mqtt
       ipv4_address: 172.20.0.8
⚠️ Explanation:
- volumes section: necessary permissions for performing your stacks updates.
- Don’t forget to replace “YOUR_PATH” with the real paths.
- Pay your attention to “STACK1_PATH” and “STACK2_PATH” – updates2mqtt needs access to all your docker-compose files to perform updates.
- environment:
- UPDATES2MQTT_CHECK_INTERVAL=7200: Sets the refresh rate to 7,200 seconds (2 hours) for staying up-to-date and not spamming container registries.
- UPDATES2MQTT_CONTAINERS=all: A global flag. Instead of white-listing specific IDs, this instructs the service to monitor every container running on the host.
- UPDATES2MQTT_ALLOW_UPDATES=”true”: This is the “Master Switch.” It enables the service to accept MQTT commands to actually pull images and restart containers.
Replase YOUR_TIME_ZONE with your exact time zone.
- labels:
– updates2mqtt.compose_path=/opt/HA/docker-compose.yml
It’s used by the application to identify exactly which file it needs to call when an update command is received via MQTT to update this container. - networks:
By assigning a fixedipv4_address(172.20.0.8), you eliminate any DNS resolution lag and ensure stay consistent even if you rebuild the stack.
Mosquito Broker Config
Now adjust mosquitto service in your docker-compose.yaml.
  mosquitto:
    container_name: mqtt
    image: eclipse-mosquitto:latest
    hostname: core-mosquitto
    restart: unless-stopped
    volumes:
     - /opt/HA/mosquitto:/mosquitto
    environment:
     - TZ=YOUR_TIME_ZONE
    labels:
      - updates2mqtt.name="Mosquito Update"
      - updates2mqtt.compose_path=/opt/HA/docker-compose.yml
      - updates2mqtt.picture=https://mosquitto.org/favicon-32x32.png
    networks:
      home_assistant:
       aliases:
         - core-mosquitto
       ipv4_address: 172.20.0.3
⚠️ Explanation:
- hostname & aliases:
By setting a hostname and an alias ofcore-mosquittowithin thehome_assistantnetwork, you ensure that any other container on that network can reach the broker using that specific name, regardless of what the container itself is named. - Static IP Allocation: The
ipv4_address: 172.20.0.3provides a “hardcoded” anchor. In complex setups, this prevents connection drops that can occur if the Docker engine reassigns internal IPs after a system reboot. - labels:
- updates2mqtt.name: Overrides the default container name in the UI, displaying “Mosquito Update” instead of a generic ID.
- updates2mqtt.compose_path: This allows the system to know exactly which file to call when you trigger a remote update.
- updates2mqtt.picture: Provides a URL to the Mosquitto logo, which
updates2mqttcan pass to Home Assistant to populate the entity picture of the update sensor. As usual, I use a favicon from an official web-site.
Home Assistant Config
Let’s finalize a Docker Compose file by adjusting Home Assistant configuration:
 home_assistant:
    container_name: ha
    image: "ghcr.io/home-assistant/home-assistant:stable"
    restart: unless-stopped
    hostname: ha
    depends_on:
      - zigbee2mqtt
    volumes:
      - /opt/HA/homeassistant:/config
      - /etc/localtime:/etc/localtime:ro
      - /run/dbus:/run/dbus:ro
      - /BACKUP:/media
    privileged: true
    network_mode: host
    extra_hosts:
      - "core-mosquitto:172.20.0.3"
      - "updates2mqtt:172.20.0.8"
    labels:
      - updates2mqtt.picture=https://www.home-assistant.io/images/favicon.ico
      - updates2mqtt.name="HA Update"
      - updates2mqtt.compose_path=/opt/HA/docker-compose.yml

networks:
  home_assistant:
    driver: bridge
    name: home_assistant
    ipam:
      config:
        - subnet: 172.20.0.0/16
⚠️ Explanation:
Running Home Assistant in a pure Docker environment offers unparalleled control, but it traditionally lacks the “one-click update” convenience found in Home Assistant OS. By combining Mosquitto, updates2mqtt, and a strategic Docker Compose layout, you can build a professional-grade smart home stack that notifies you of updates and allows you to trigger them directly from your dashboard.
1. Networking: The Hybrid Approach
Most Docker containers operate on a private bridge network. However, for Home Assistant to “see” devices like smart TVs, Google Cast, or Apple HomeKit, it usually requires network_mode: host. This allows the container to share the host’s IP address and network stack directly.
2. Bridging the Network Gap with extra_hosts
Because the container is in host mode, it loses the ability to use Docker’s internal DNS resolution. It can no longer simply look up “mosquitto” to find the broker. To solve this without using brittle, changing IP addresses, we use the extra_hosts directive.
This acts as a local “hosts file” for the container, mapping your static service IPs back to friendly names (I provided configs to containers described in this article only to avoid overwhelming):
extra_hosts:
      - "core-mosquitto:172.20.0.3"
      - "updates2mqtt:172.20.0.8"
3. Integrated Update Metadata (Labels)
To make Home Assistant “self-aware” within the updates2mqtt ecosystem, we attach specific labels. These labels tell the update service how to identify the HA container and which Compose file to use when a “Update Now” command is issued from the UI.
updates2mqtt.name: Overrides the generic container ID with a clean alias (“HA Update”).updates2mqtt.picture: Links to the official favicon to provide a polished look for your update entities.updates2mqtt.compose_path: The absolute path to yourdocker-compose.ymlon the host, enabling the remote update trigger.
4. Hardware and System Access
To ensure full functionality, two specific volume mappings and a privilege flag are essential:
privileged: true: Grants the container access to USB Zigbee/Z-Wave sticks and Bluetooth radios./run/dbus: Mounted as read-only to allow Home Assistant to communicate with the host’s system bus (critical for Bluetooth and network management)./etc/localtime: Ensures that logs, automations, and the UI all reflect your physical time zone accurately.
⚠️ Don’t forget to add “LABELS” section to ALL your containers’ configuration!
Otherwise, missed containers won’t be updated!
Let’s start your updated setup with the following command:
sudo docker compose up -dCheck updates2mqtt logs:
sudo docker logs updates2mqtt
 [debug    ] Starting updates2mqtt v1.8.0
 [info     ] App configured                 healthcheck_topic=healthcheck/updates2mqtt/updates2mqtt node=updates2mqtt scan_interval=10800
 [info     ] Client connection requested    action=start host=core-mosquitto integration=mqtt result_code=<MQTTErrorCode.MQTT_ERR_SUCCESS: 0>
 [info     ] Setting up healthcheck every 300 seconds to topic healthcheck/updates2mqtt/updates2mqtt
 [info     ] Added 196 linuxserver.io package details integration=docker
 [info     ] Handler subscribing            host=core-mosquitto integration=mqtt topic=updates2mqtt/updates2mqtt/docker
 [info     ] Scanning ...                   session=0e023a9d3eba4de9b5b5a6d2abde8255 source_type=docker
 [info     ] Matched rhizomatics/updates2mqtt 1.8.0 to latest release v1.8.0 integration=docker
 [info     ] Matched henrygd/beszel 0.18.2 to latest release v0.18.2 integration=docker
 [info     ] Completed                      action=scan container_count=9 integration=docker result_count=9 session=0e023a9d3eba4de9b5b5a6d2abde8255 source=docker throttled_count=0
 [info     ] Starting clean cycle, max time: 120 action=clean host=core-mosquitto integration=mqtt
 [info     ] Cleaned - discovered:522069, matched:29, cleaned:522040 action=clean host=core-mosquitto integration=mqtt
 [info     ] Scan #1 complete               session=0e023a9d3eba4de9b5b5a6d2abde8255 source_type=docker
Once started, check the logs; you should see a successful handshake with the Mosquitto broker and no connection errors. Updates2mqtt will then begin scanning your Docker images for available updates.
Home Sensors Adjustments
Once your stack has successfully started, you can verify the integration within the Home Assistant interface. Please note that updates2mqtt may take several minutes to populate data in the MQTT broker; the exact timing will vary based on your system’s resources.
let’s verify everything is communicating properly. Seeing those update entities appear in Home Assistant for the first time is a great “mission accomplished” moment!
How to Find Your New Entities
Once your stack is running, follow these steps to see your Docker containers inside the UI:
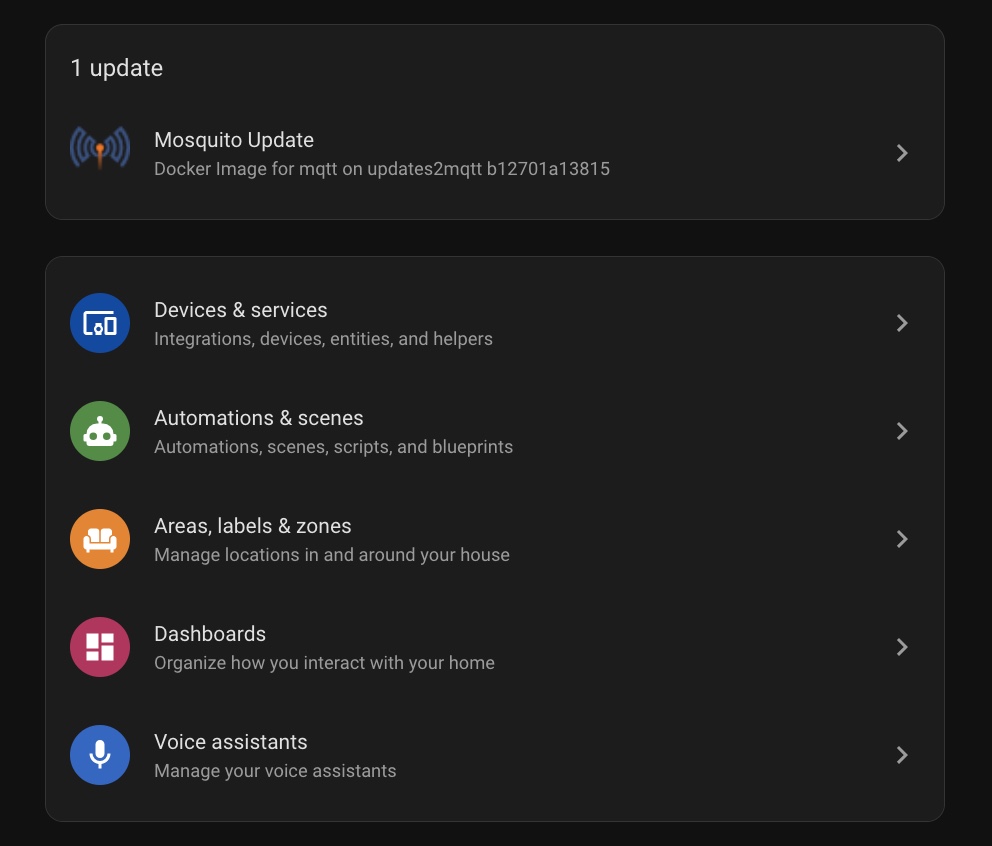
Navigate to Settings → Devices & Services.
Locate the MQTT integration card and click on the Devices link (or click the card itself).
Search for the device named “updates2mqtt” (or the specific name you gave your agent).
Click it, and you will see a list of your Docker images as Update Entities.
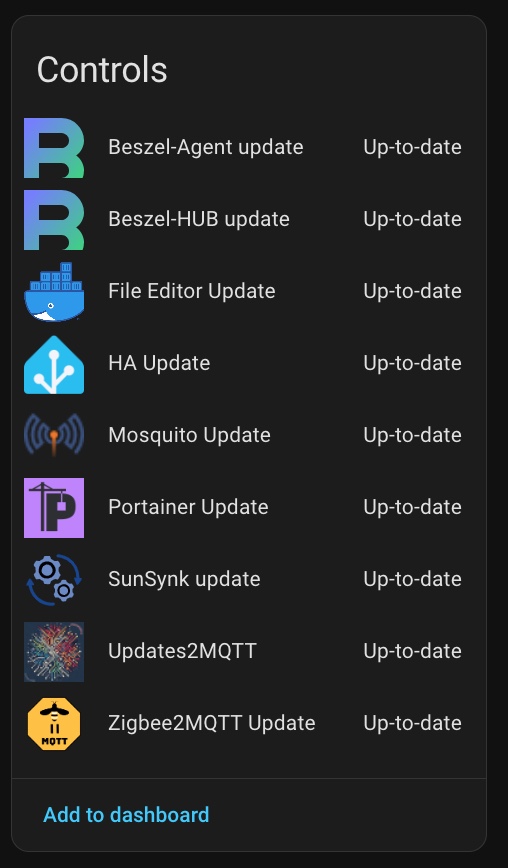
💡Your images could be different if you used links to other images during docker-compose.yaml configuration.
Depending on your docker-compose.yaml configuration, the entity names in Home Assistant may differ from what you expect. Occasionally, updates2mqtt may use the image name of your defined name in labels.
If you wish to rename your entities for a cleaner dashboard, follow these steps:
Click on the Entity you wish to modify.
- Select the Settings (gear icon) in the top-right corner of the dialog box.
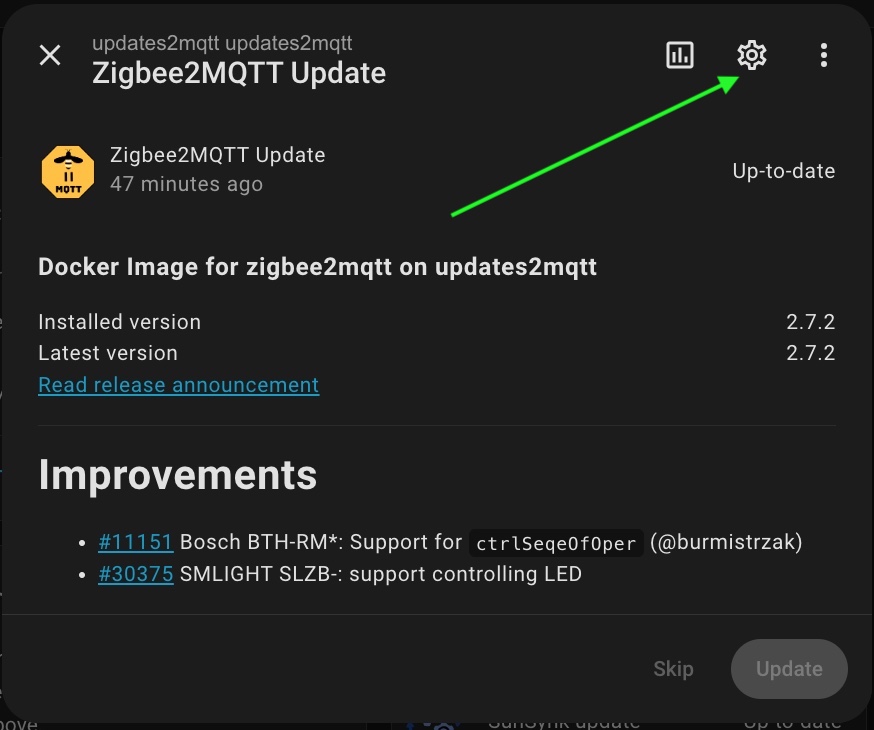
Enter your preferred name in the Name field and click Update.

Check How It Works
Don’t want to wait weeks for a real update to drop? You can simulate one right now using the Mosquitto image. We’ll basically trick Docker into thinking an old version is the “latest” one.
1. Preparation
First, download an older version of the Mosquitto image and stop your current running instance:
sudo docker pull eclipse-mosquitto:2.0.15Stop and remove your current Mosquitto container (use your actual container name if you use another name, but not “mqtt”):
sudo docker stop mqtt
sudo docker rm mqtt
2. The “Fake” Tag
Delete the actual latest image:
sudo docker rmi eclipse-mosquitto:latestRe-tag the old version as ‘latest’:
sudo docker tag eclipse-mosquitto:2.0.15 eclipse-mosquitto:latest3. Restart & Verify
Start your container back up and tell updates2mqtt to take a look:
sudo docker-compose up -d mosquitto
sudo docker restart updates2mqtt
4. Check Home Assistant
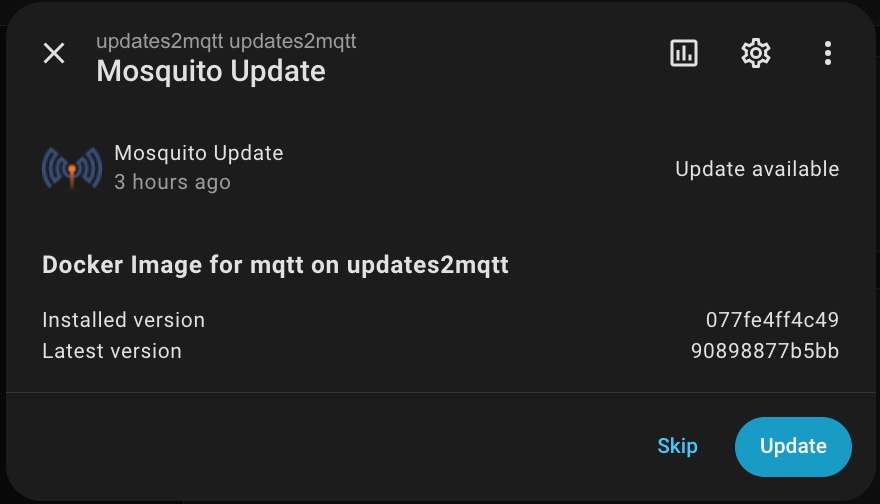
Wait a couple of minutes. Because your local “latest” image hash doesn’t match the one on Docker Hub, updates2mqtt will show the alarm in the Settings panel!
4. Update your Mosquitto Image
Now that Home Assistant has detected the “old” version, it’s time to perform the update.
Trigger the Update: Click on the update notification message in Home Assistant. In the pop-up window, click the Update button.
Wait for the Sync: It will take a few minutes for the agent to pull the real
latestimage and restart the container. Once finished, you should see the Installed version match the Latest version. The Update button will then become disabled (greyed out).Verify the Logs: To see exactly what happened behind the scenes, close the window and check the
updates2mqttlogs with the following command:
docker logs -f updates2mqttYou should see a similar output:
[info     ] Execution starting             host=core-mosquitto integration=mqtt payload=b'docker|mqtt|install' topic=updates2mqtt/updates2mqtt/docker
[info     ] Passing install command to docker scanner for mqtt host=core-mosquitto integration=mqtt payload=b'docker|mqtt|install' topic=updates2mqtt/updates2mqtt/docker
[info     ] Executing Command              action=command command=install container=mqtt integration=docker
[info     ] Starting update ...            action=command command=install container=mqtt integration=docker
[info     ] Updating - last at None        action=update container=mqtt integration=docker
[info     ] Pulling                        action=fetch container=mqtt image_ref=eclipse-mosquitto:latest integration=docker platform=linux/amd64
[info     ] Pulled                         action=fetch container=mqtt image_id=sha256:b12701a138153adc6555b864042907b4919c463d0c229aed5631f0a0e6f130ab image_ref=eclipse-mosquitto:latest integration=docker platform=linux/amd64
[info     ] Executing docker compose DockerComposeCommand.UP --detach --yes mosquitto action=restart container=mqtt integration=docker
 Container mqtt Recreate
[warning  ] Disconnect failure from broker host=core-mosquitto integration=mqtt result_code=ReasonCode(Disconnect, 'Unspecified error')
 Container mqtt Recreated
 Container mqtt Starting
 Container mqtt Started
[info     ] DockerComposeCommand.UP via compose successful action=restart container=mqtt integration=docker
[info     ] Updated - recorded at 1769787520.36814 action=update container=mqtt integration=docker
[info     ] Rescanned, updated:True        action=command command=install container=mqtt integration=docker
[info     ] Execution ended                host=core-mosquitto integration=mqtt payload=b'docker|mqtt|install' topic=updates2mqtt/updates2mqtt/docker
As you can see in the log above, updates2mqtt pulled a new image version, recreated the container, and started the updated container.
Additionally, you can configure notifications (push, persistent, etc.) following my article: Universal script for Home Assistant notifications.
Conclusion
You now have a robust, server-grade update system that keeps you informed without taking away your control. By integrating this into Home Assistant, you get real-time alerts about available updates but ensure that nothing happens without your manual intervention. This prevents unpleasant surprises and keeps your home lab stable—especially when you’re away from home.