How it works
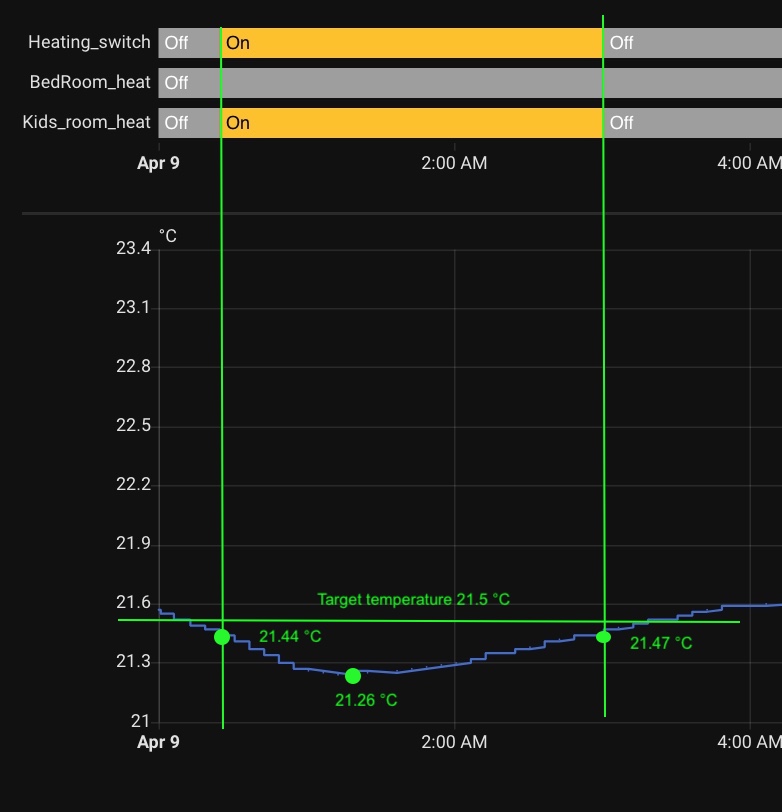
However, as illustrated in the graph above, the minimum temperature dips as low as 21.26 °C. This drop is a result of the inertia of the underfloor heating system—by the time the floor has warmed enough to begin effectively heating the room, the temperature has already fallen further. In essence, the room continues to cool until the delayed thermal response of the system kicks in.
The cooling rate of a room, and consequently the lowest point in the temperature cycle, is influenced by several external factors—primarily outdoor temperature and wind conditions such as speed and direction. These variables introduce a level of unpredictability, making it difficult to maintain a consistently comfortable indoor climate. As a result, the room temperature can occasionally drop below the comfort threshold, leading to periodic discomfort, especially during colder or windier days.
⚠️ Important Notes:
In this setup, two “virtual” heaters are used as “input boolean” HA helpers: “BedRoom_heat”, “Kids_room_heat” and hardware Zigbee switch named “Heating_switch” to make a multi-zone thermostat (please see the article to find more details).
The thermostat configuration is illustrated below to understand the setting.
- platform: generic_thermostat
    name: Kids_Room_Thermostat
    unique_id: kids_Room_Thermostat
    heater: input_boolean.kids_room_heat
    target_sensor: sensor.Aqara_TVOC_KR.Temperature
    target_temp: 21.5
    sleep_temp: 21
    home_temp: 21.5
    cold_tolerance: 0.05
    hot_tolerance: -0.03
    min_temp: 15
    max_temp: 23
    ac_mode: false
    min_cycle_duration:
      minutes: 25
initial_hvac_mode: "heat" 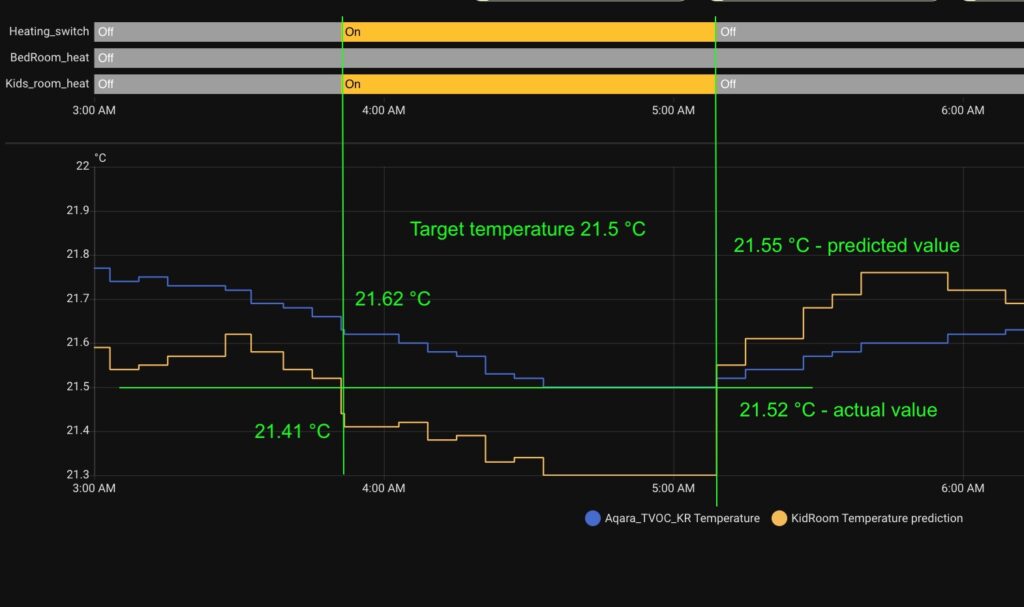
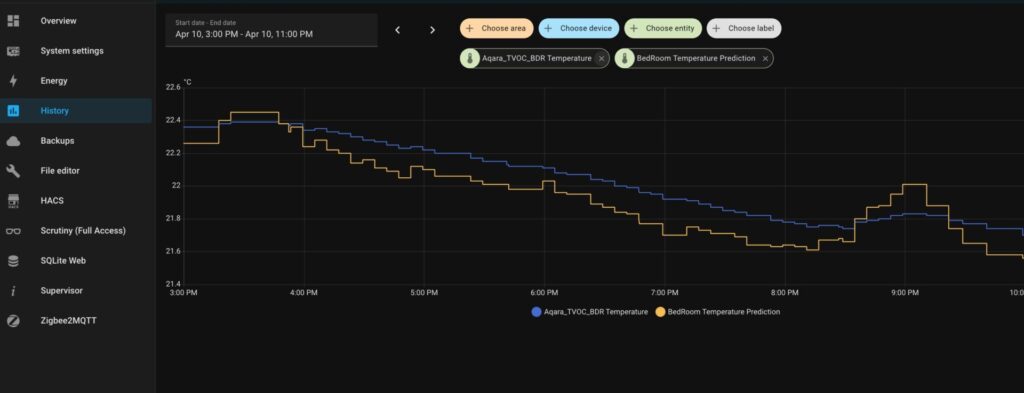
To illustrate the impact of temperature prediction on heating control, I’ve included two graphs in the accompanying image:
🔵 Blue line – Represents the actual room temperature over time.
🟡 Dark-yellow line – Shows the predicted temperature one hour ahead, based on the current rate of temperature change.
In this setup, I used the same generic thermostat configuration as before. However, instead of using a physical temperature sensor, I replaced it with a Home Assistant helper that calculates a future temperature estimate. This allows the system to respond proactively, reducing overshooting and improving comfort by anticipating thermal inertia and room cooling or heating trends.
As illustrated in the chart, the heater was activated when the actual room temperature reached 21.62 °C, even though it was still above the set point. This decision was based on the predicted temperature one hour ahead, which was 21.41 °C—below the target threshold. Conversely, the heater was turned off when the prediction rose to 21.52 °C, ensuring the room wouldn’t overcool.
As a result, the cooling process was halted early, and the actual temperature never dropped below the targeted 21.5 °C. This predictive behavior effectively eliminated the issue of overcooling in my home.
That said, it’s hard to definitively assess whether overheating has been mitigated or if any gas savings have been achieved, as the weather conditions varied before and after implementing the predictive approach.
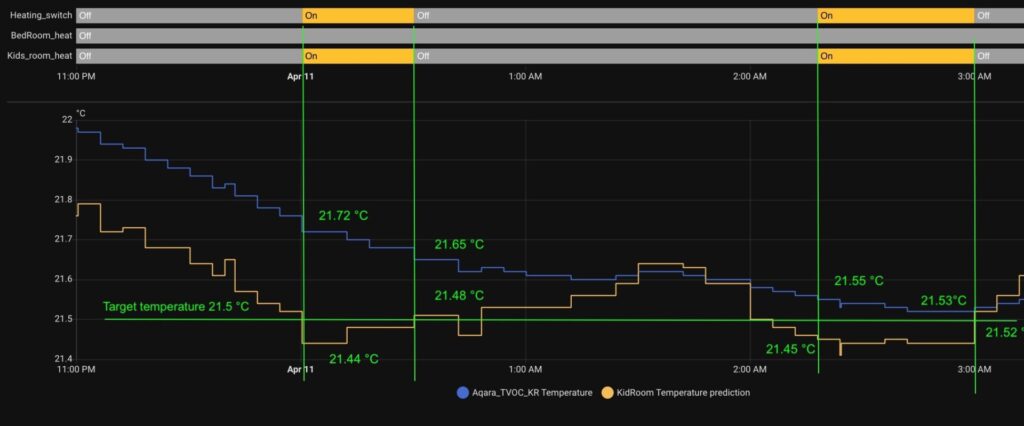
An interesting side effect of using temperature prediction is clearly demonstrated in the first heating cycle shown in the chart above. At that point, the actual room temperature was 21.72 °C—noticeably higher than the target of 21.5 °C. However, due to strong freezing winds, the temperature was dropping rapidly.
The overheating before was posed by sunlight during that day.
Thanks to predictive control, the heater activated in response to the anticipated cooling trend, rather than waiting for the temperature to dip below the threshold. This intervention slowed the rate of cooling, helping to maintain a more comfortable indoor environment. After all, comfort is influenced not just by the absolute temperature, but also by how quickly it changes—and this is where prediction proves especially valuable.
Setting Up Your Predictive Heating System
- A Generic Thermostat: This can be any smart thermostat compatible with Home Assistant, such as a Zigbee or Z-Wave device. Even a basic model will do, as long as it can report temperature data and allow remote control of your heater.
- A Temperature Sensor: Many thermostats have built-in temperature sensors, but you can also add external sensors for more accurate readings across different rooms.
- Home Assistant: Ensure you have Home Assistant installed and running on a device like a Raspberry Pi or a dedicated server. You’ll also need to integrate your thermostat into the platform, which is typically done through a protocol like MQTT, Zigbee, or Z-Wave.
- A Derivative Sensor: This is a virtual sensor you’ll create within Home Assistant to calculate the rate of temperature change.
Personally, I use the following temperature sensor with decimal precision, and I can definitely recommend them:
This description contains affiliate links. As an Amazon Associate, I earn from qualifying purchases.
Without this level of accuracy, you risk experiencing uncomfortable under- or overheating, as the system struggles to respond effectively to gradual temperature changes. This setup aligns perfectly with the predictive heating approach discussed in this article, ensuring both comfort and efficiency in a challenging heating environment. Please also see the article about controlling one heater with several generic thermostats made for each room.
Understanding the Derivative Sensor: The Brain Behind Predictive Heating
How to Create a Derivative Helper
Step 1: Open the Helper Settings
Go to Settings in Home Assistant.
Select Devices & Services.
Click on the Helpers tab.
In the bottom right corner, click + Add Helper.
Step 2: Choose Derivative Helper
In the list of helper types, select Derivative.
This will open a form where you can configure your derivative sensor.
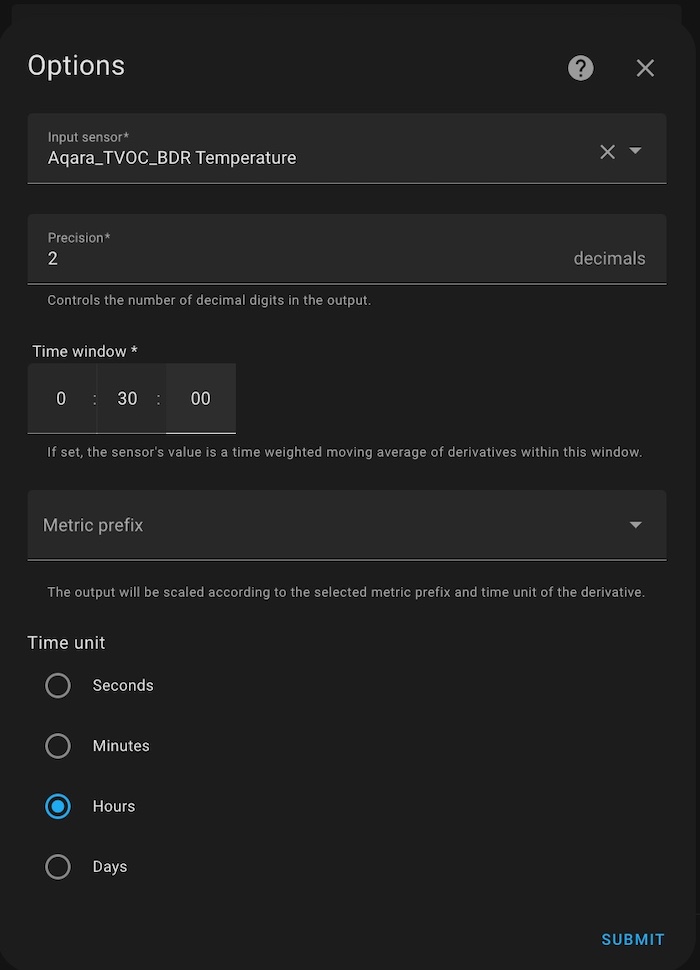
Step 3: Configure the Derivative Helper
Name: Give it a meaningful name, such as
Temperature Change RateorPredicted Temp Drop.Source: Choose the numeric entity you want to monitor — a temperature sensor.
Time Window: Choose the timeframe over which the derivative will be calculated—common values are 1 hour or 30 minutes.
Precision: Set the decimal places for more accurate results (recommended – 2).
Step 4: Save
Once you’ve entered all the details, click Create.
Your new derivative sensor will now appear under Helpers and can be used like any other sensor in Home Assistant.
Please see the example of a Derivative sensor below:
Create a Template Helper for Predicted Temperature
tep 1: Open the Helper Settings
Go to Settings in Home Assistant.
Select Devices & Services.
Click on the Helpers tab.
In the bottom right corner, click + Add Helper.
Step 2: Choose Template Helper
In the list of Template helper types, select Template a sensor.
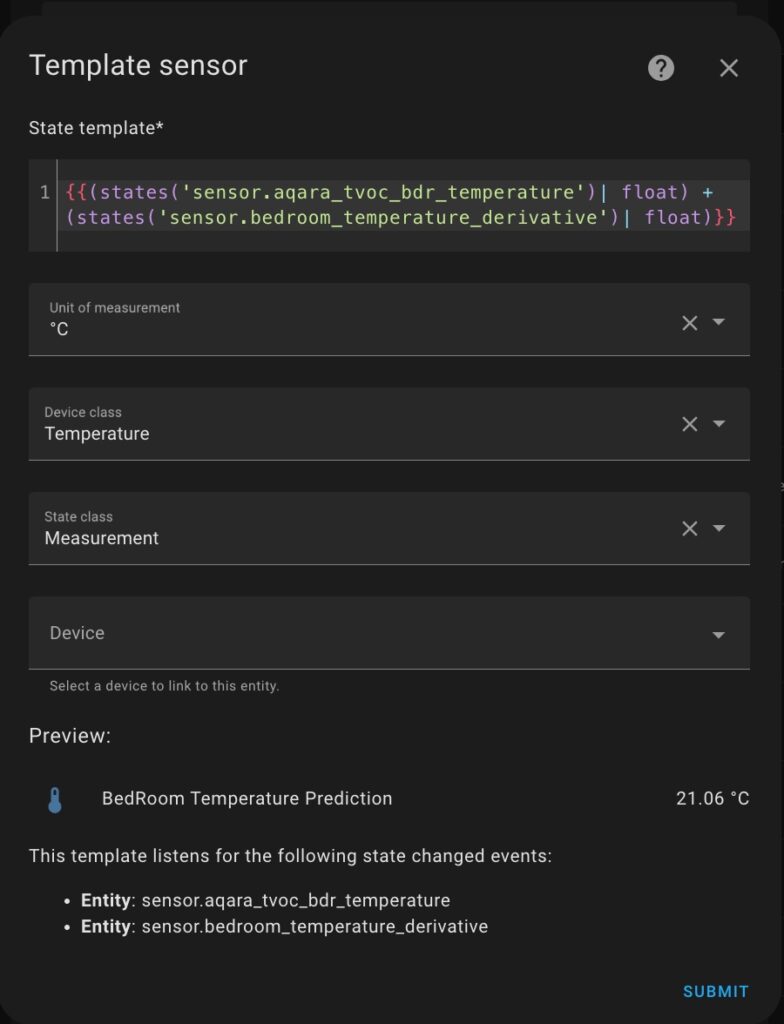
Step 3: Configure the Derivative Helper
Name: Give it a meaningful name, such as Predicted Temperature in 1 Hour.
Source: Choose the numeric entity you want to monitor — a temperature sensor.
{{ states('sensor.room_temperature') | float + (states('sensor.name_of_your_derivative_helper') | float) }}Unit of Measurement:
°C.Device class: Temperature.
- State class: Measurement.
- Device: leave it empty.
Step 4: Save
Once you’ve entered all the details, click SUBMIT.
Your new derivative sensor will now appear under Helpers and can be used like any other sensor in Home Assistant.
Please see the example of a Prediction sensor below:
Take a Break and Observe the Predictions
Before moving forward, I strongly recommend pausing here for a couple of hours to evaluate how well your temperature prediction setup is working.
The best way to do this is by creating a history chart that displays both:
The actual temperature (from your physical sensor)
The predicted temperature (one hour ahead, calculated using your derivative and template helpers)
This visual comparison will help you assess:
How accurate the prediction is over time
Whether the system responds quickly to environmental changes
If your prediction logic needs further tuning
As shown in the example below, plotting both values on the same graph provides valuable insights into how your home environment behaves—and how effective your predictive heating or cooling strategy can be.
Fine-Tuning Your Temperature Predictions
If your predicted temperature values appear inconsistent or deviate significantly from the actual temperature one hour later, it’s time for some calibration. Here are key areas to adjust for more accurate and stable predictions:
Derivative Sensor Adjustments
Time Window: While a 1-hour window might seem intuitive, I found that a 30-minute window produced more stable results. Experiment to see what suits your system best.
Measurement Frequency: If you’re using a Zigbee temperature sensor, consider reducing its Max Reporting Interval. In my setup, lowering it by a factor of 10 significantly improved prediction accuracy.
Remember: Every Home is Unique
Your results will vary depending on several factors, including:
Type of heating system (underfloor, radiators, etc.)
Heater type and control (boiler, heat pump, etc.)
Floor covering (ceramic tiles, wood panels, etc.)
Home insulation and thermal inertia
Parameters Worth Tuning
Here’s what I experimented with to get a comfortable and responsive system:
The target water temperature in the underfloor heating system
The heater’s hysteresis settings for controlling water temperature
Water pump speed and zone flow meters for balancing heat distribution
Derivative sensor units (e.g., °C/min vs. °C/hour)
The derivative time window used to calculate prediction trends
Be Patient
Finding the optimal setup takes time and testing. Create charts, track data, and make small adjustments. With some patience, you’ll create a system that’s not only energy-efficient but also keeps your home consistently comfortable.
Thermostat configuration
Once you’re satisfied with how your predicted temperature behaves, it’s time to integrate it fully into your climate control.
Replace the physical temperature sensor with your predicted temperature helper in the target_sensor field of your Generic Thermostat configuration. This way, your thermostat will respond to the future trend of temperature rather than just the current reading—anticipating temperature drops and preventing uncomfortable fluctuations.
climate:
  - platform: generic_thermostat
    name: Smart Heater
    heater: switch.heater
    target_sensor: sensor.predicted_temperature_1h  # ← your predicted temp helper
    min_temp: 18
    max_temp: 23
    target_temp: 21.5
    cold_tolerance: 0.05
    hot_tolerance: -0.03
    ac_mode: false
    precision: 0.1
With this in place, your heating system will now work proactively—keeping your space cozy while avoiding unnecessary overcorrections.