Home Assistant provides useful standard integration “Generic Thermostat” to create a virtual thermostat using some temperature sensor and switch for turning ON/OFF a heater.
You can find documentation on HA official web-site with the link:
Generic Thermostat.
Unfortunately, “Generic Thermostat” supports only one sensor and only one switch. So, the multizone configuration is a bit tricky.
The main idea of this article is the creation of separated thermostats for each zone with their own virtual switch and automation for switching heater ON/OFF depending on the virtual switches state. Hence, you can find here guidance on how to manage the temperature in two rooms, but the solution can be scaled to any number of rooms or zones.
Configurations
Virtual switches creation
First of all, you have to create virtual switches for two rooms (living and kids for example).
Home Assistant provides “helpers” for such purposes.
So, go to Settings -> Devices & Services -> Helpers, click onto “+ HELPER” button and choose “Togle”.
Name it as “Living_room_heat”, choose an icon “mdi:radiator” for example, and click create button.
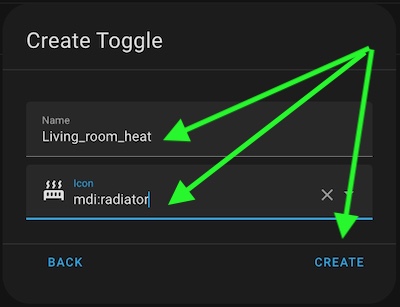
Pay attention to the helper’s name – it will be used in “Generic Thermostat” and automation configuration.
Repeat the last steps and create one more helper “Kids_room_heat”.
As the result, you should have two new helpers:

The virtual switches are ready, so, let’s go ahead.
Generic thermostat configuration
Unfortunately, it can’t be configured from UI. So, you have to place config in /config/configuration.yaml file. The easiest way for editing the file is using “File Editor” add-on.
You can find guidance on how to install it in the “INSTALL “FILE EDITOR” PLUGIN IN HOME ASSISTANT” chapter of the article.
Hence, open /config/configuration.yaml in File Editor:
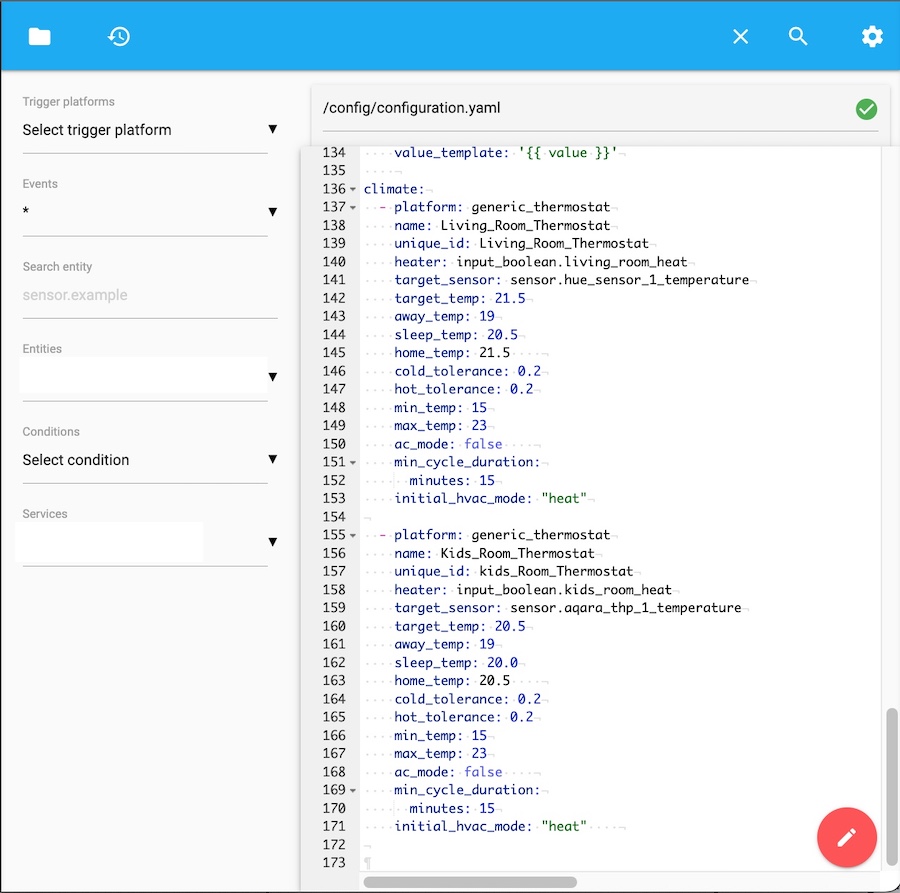
You can see the yaml configuration with comments below.
I used the necessary options only, but you can find documentation on HA official web-site with the link:
Generic Thermostat.
climate:
# the first thermostat
  - platform: generic_thermostat
    name: Living_Room_Thermostat
#unique_id is needed for a possibility to configure the thermostat in UI.
    unique_id: Living_Room_Thermostat
    heater: input_boolean.living_room_heat #virtual switcher
    target_sensor: sensor.hue_sensor_1_temperature #temperature sensor
    target_temp: 21.5 #default temperature
    away_temp: 19 #away mode
    sleep_temp: 20.5 #sleep mode
    home_temp: 21.5 #home mode
    cold_tolerance: 0.2 #switch ON the heater if current temperature lower on 0.2
    hot_tolerance: 0.2  #switch ON the heater if current temperature higher on 0.2
    min_temp: 15
    max_temp: 23
    ac_mode: false # true for cooler climatic system
    min_cycle_duration:
      minutes: 15
    initial_hvac_mode: "heat"
# the second thermostat
  - platform: generic_thermostat
    name: Kids_Room_Thermostat
    unique_id: kids_Room_Thermostat
    heater: input_boolean.kids_room_heat
    target_sensor: sensor.aqara_thp_1_temperature
    target_temp: 20.5
    away_temp: 19
    sleep_temp: 20.0
    home_temp: 20.5
    cold_tolerance: 0.2
    hot_tolerance: 0.2
    min_temp: 15
    max_temp: 23
    ac_mode: false
    min_cycle_duration:
      minutes: 15
    initial_hvac_mode: "heat"
Save the file and restart Home Assistant to apply changes.
Pay attention to presets:
- away_temp: 19
- sleep_temp: 20.5
- home_temp: 21.5
You can choose a proper preset in your automation and set the targeted temperature in a simple way.
For example, I use globally defined “Sleep Mode” to activate a scene and heater mode for the night.
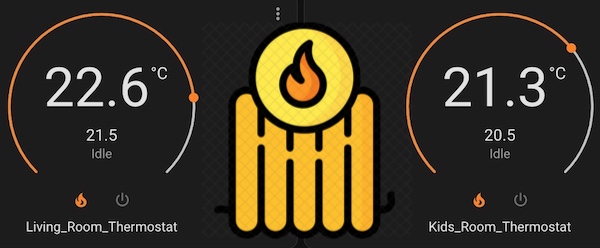
The last step for Thermostats configuration is adding them to your dashboard.
Hence, edit your dashboard and add thermostat cards:
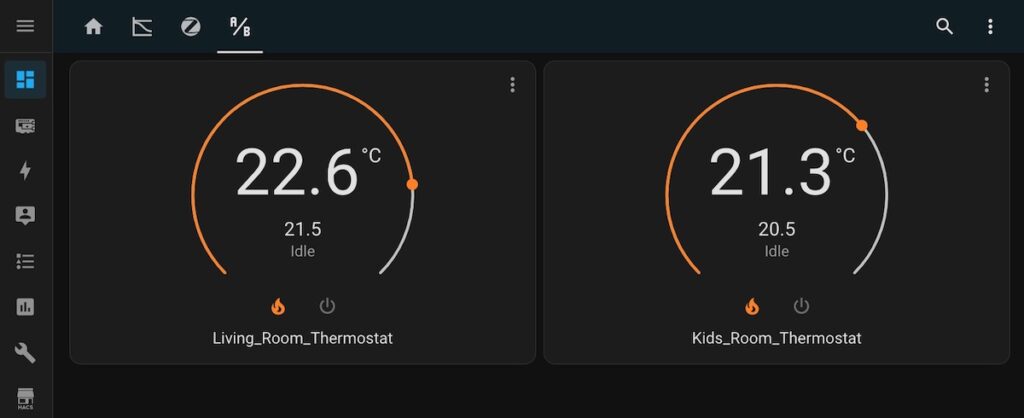
The thermostats are configured now and switch ON/OFF virtual switches.
So, automation is needed to switch ON/OFF your “non-virtual” heater.
automation configuration
The thermostats are configured now and switch ON/OFF virtual switches.
So, automation is needed to switch ON your “non-virtual” heater if heating is needed in at least one zone and switch OFF if no one zone needs heating.
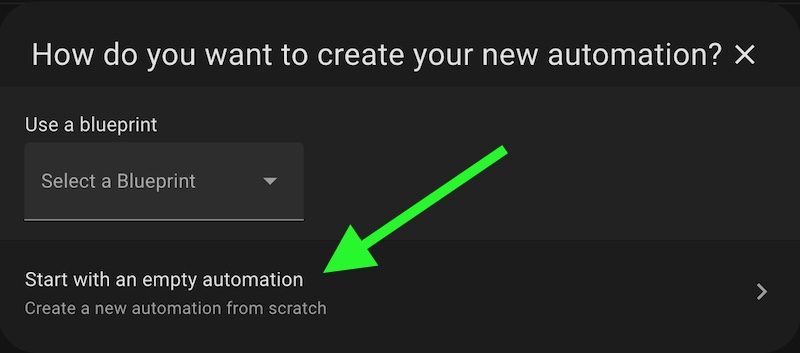
Go to Settings -> Automation & Scenes, click “+ CREATE AUTOMATION”, and choose “Start with empty automation”.
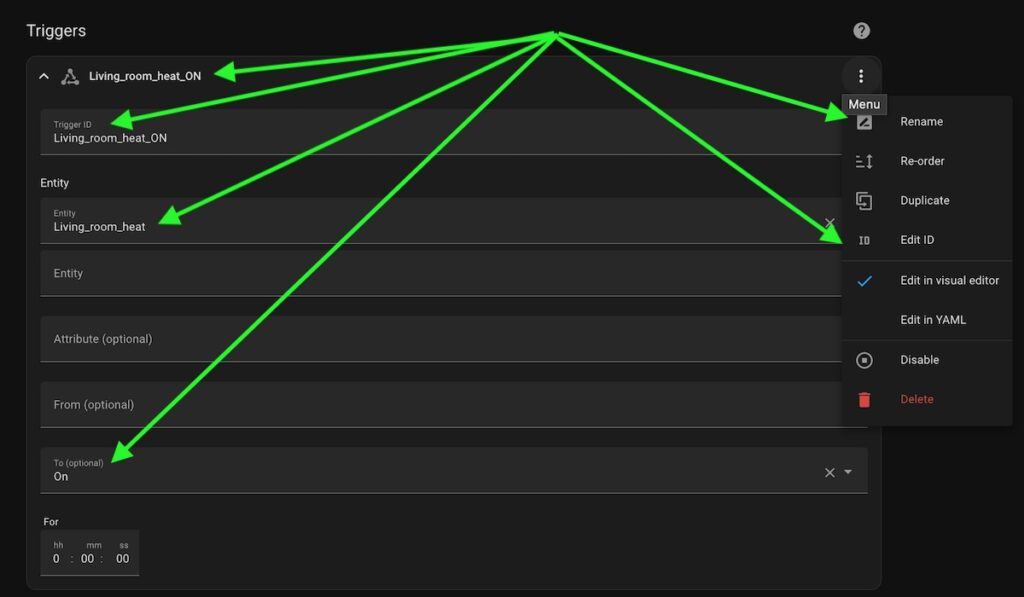
Now you should create triggers for changing the states of your virtual switchers to ON and OFF.
Click “+ ADD TRIGGER” button and choose the “State” type of it.
Don’t forget to set “TriggerID” and the name for each of your triggers to choose the proper action depending on called trigger in the automation.
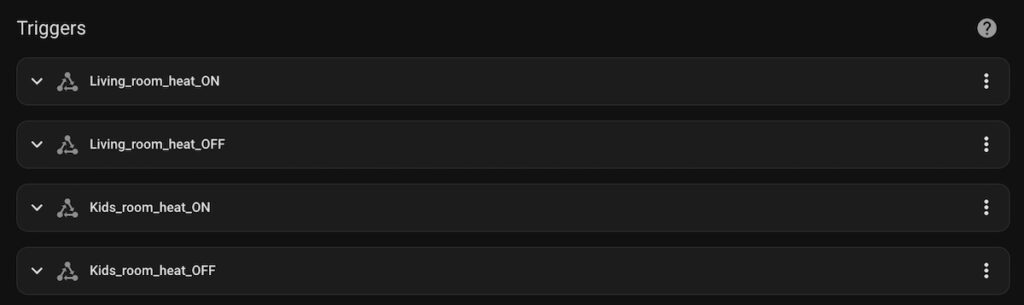
As the result, you should configure four triggers:
You can also check the yaml code of your automation:
The mode of automation isn’t critical if you have a couple of rooms, but you should use “queued” if you have a lot of them to handle simultaneously happened events.
Now you should add an action for each trigger. So, click on “+ ACTION” and select “CHOOSE” type of the action:
alias: Heater_ON_OFF_Thermostat
description: ""
trigger:
  - platform: state
    entity_id:
      - input_boolean.living_room_heat
    to: "on"
    id: Living_room_heat_ON
    alias: Living_room_heat_ON
  - platform: state
    entity_id:
      - input_boolean.living_room_heat
    to: "off"
    alias: Living_room_heat_OFF
    id: Living_room_heat_OFF
  - platform: state
    entity_id:
      - input_boolean.kids_room_heat
    to: "on"
    alias: Kids_room_heat_ON
    id: Kids_room_heat_ON
  - platform: state
    entity_id:
      - input_boolean.kids_room_heat
    to: "off"
    alias: Kids_room_heat_OFF
    id: Kids_room_heat_OFF
condition: []
mode: queued
max: 10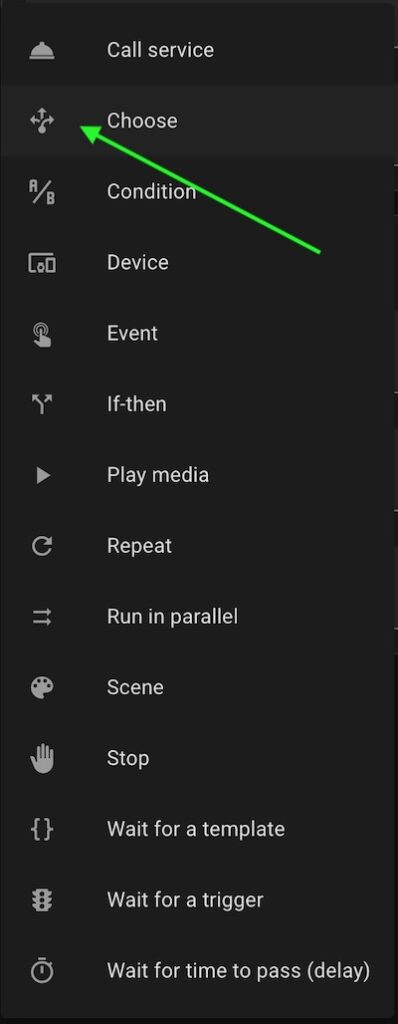
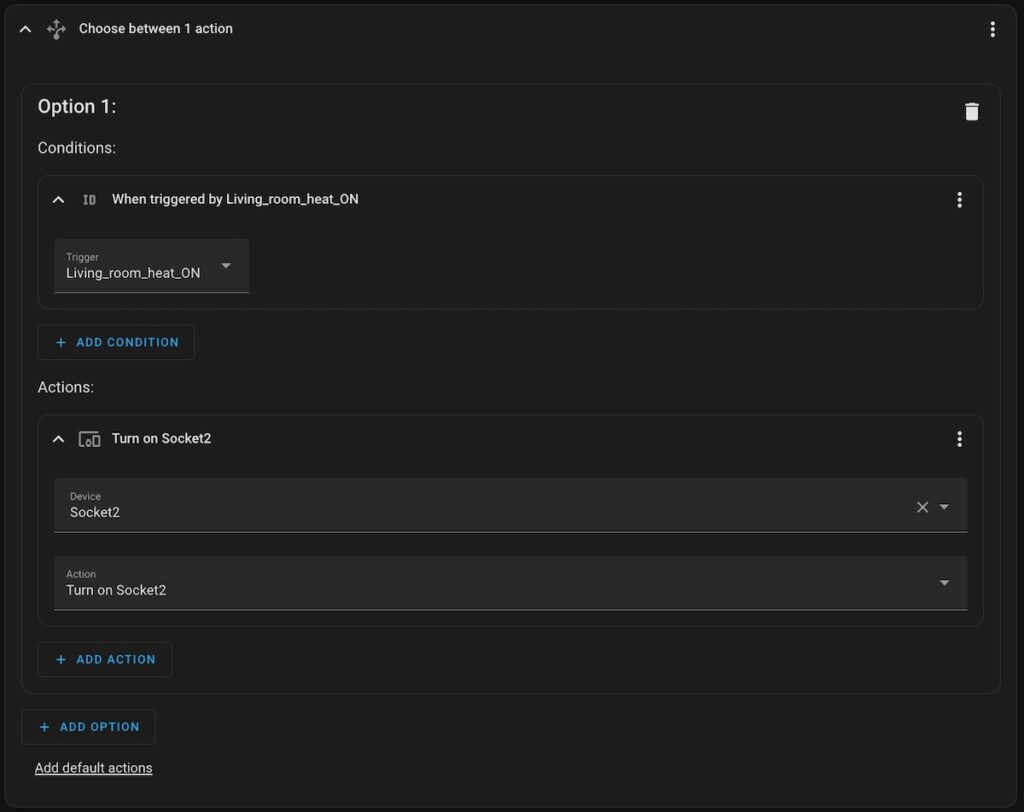
Configure first option of “CHOOSE” action:
- Click “+ ADD CONDITION” button, choose “Triggered by” type, and select “Living_room_heat_ON” from drop-down menu.
- Click “+ ADD ACTION” button, choose “Device”, and select your real switch and action “Turn on your switch”. In my case, it’s a smart plug where my heater is connected.
- Don’t forget to add action to open a proper radiator valve or underfloor actuator valve if you have them.
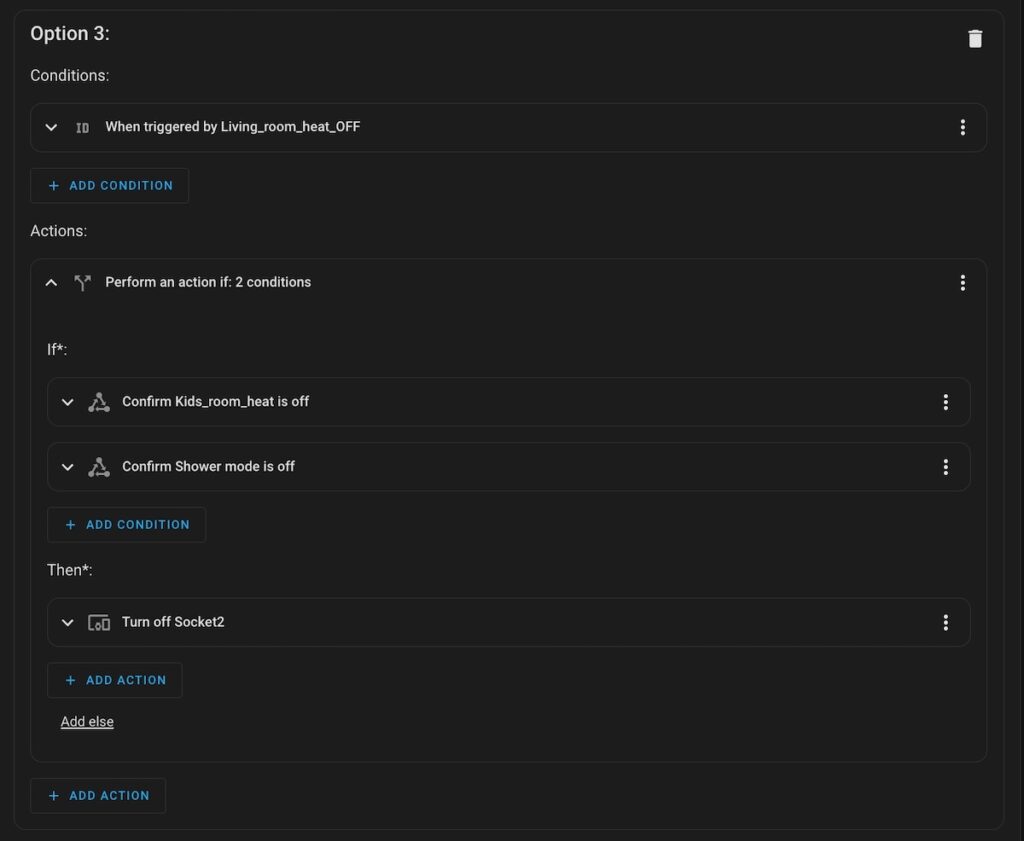
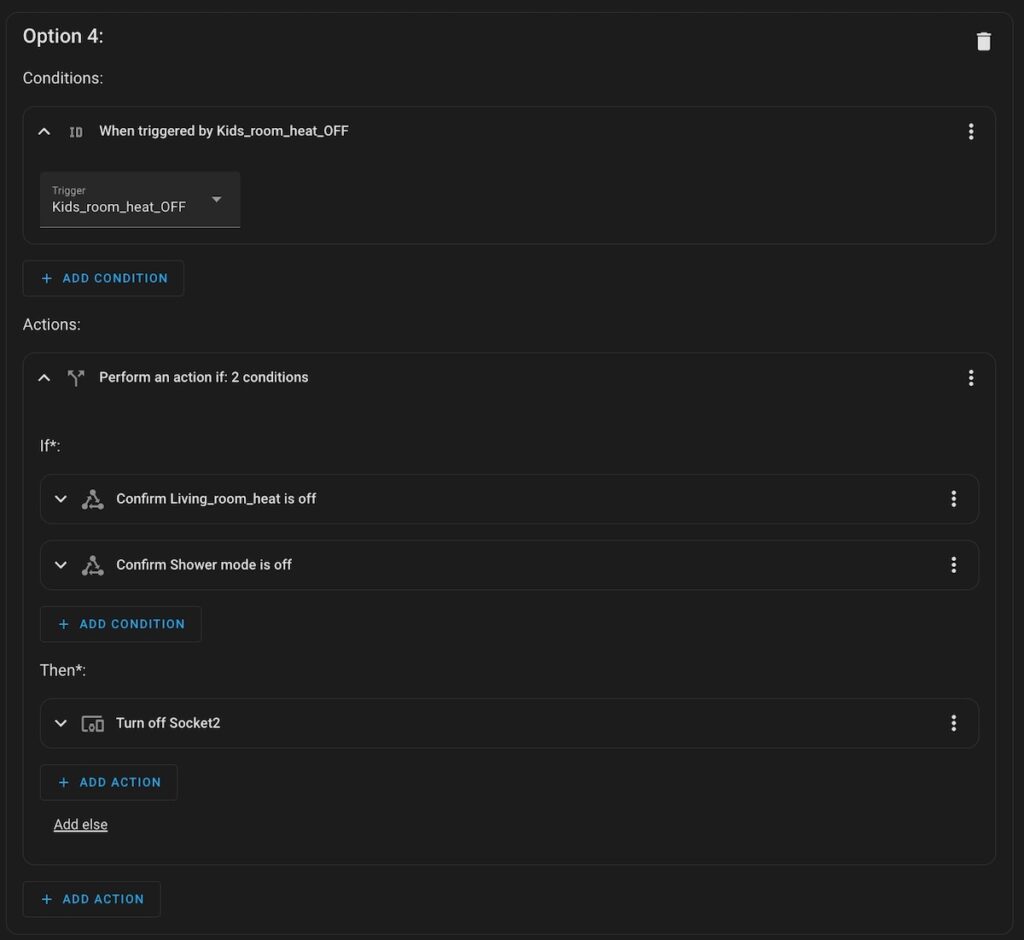
Configure the second “ON” action with “Option 2” creation.
- Click “+ ADD CONDITION” button, choose “Triggered by” type, and select “Living_room_heat_OFF” from drop-down menu.
- Click “+ ADD ACTION” button, and choose “If-then” action.
You can ask “why conditions are needed in the action section instead of condition one?”.
In this case, you can easily use add logic in the “then” section to close a proper radiator valve or underfloor actuator valve if heating isn’t needed for the room but the heater should heat other rooms. - Into “if” section add checking if heating for another room isn’t needed with “State” condition.
- Into “then” section add switching off action for your heater and valves.
alias: Heater_ON_OFF_Thermostat
description: ""
trigger:
  - platform: state
    entity_id:
      - input_boolean.living_room_heat
    to: "on"
    id: Living_room_heat_ON
    alias: Living_room_heat_ON
  - platform: state
    entity_id:
      - input_boolean.living_room_heat
    to: "off"
    alias: Living_room_heat_OFF
    id: Living_room_heat_OFF
  - platform: state
    entity_id:
      - input_boolean.kids_room_heat
    to: "on"
    alias: Kids_room_heat_ON
    id: Kids_room_heat_ON
  - platform: state
    entity_id:
      - input_boolean.kids_room_heat
    to: "off"
    alias: Kids_room_heat_OFF
    id: Kids_room_heat_OFF
condition: []
action:
  - choose:
      - conditions:
          - condition: trigger
            id: Living_room_heat_ON
        sequence:
          - type: turn_on
            device_id: 6448367ff9f851e
            entity_id: switch.socket2
            domain: switch
      - conditions:
          - condition: trigger
            id: Kids_room_heat_ON
        sequence:
          - type: turn_on
            device_id: 6448367ff9f851e
            entity_id: switch.socket2
            domain: switch
      - conditions:
          - condition: trigger
            id: Living_room_heat_OFF
        sequence:
          - if:
              - condition: state
                entity_id: input_boolean.kids_room_heat
                state: "off"
              - condition: state
                entity_id: input_boolean.shower_mode
                state: "off"
            then:
              - type: turn_off
                device_id: 6448367ff9f851e
                entity_id: switch.socket2
                domain: switch
      - conditions:
          - condition: trigger
            id: Kids_room_heat_OFF
        sequence:
          - if:
              - condition: state
                entity_id: input_boolean.living_room_heat
                state: "off"
              - condition: state
                entity_id: input_boolean.shower_mode
                state: "off"
            then:
              - type: turn_off
                device_id: 6448367ff9f851e
                entity_id: switch.socket2
                domain: switch
mode: queued
max: 10