why your router is the best place to run a VPN server
Of course you can run your VPN server on your home server, but please be aware that you can be faced with network issues if docker is installed on it.
Docker adopts a server firewall to handle it own networks. So, a tricky firewall configuration can be needed to bypass your vpn traffic around docker’s firewall rules.
I would to draw your attention to the necessity of static public IP for your router or DDNS with the static domain name.
why Linux instance is best option for preparing
OpenWRT is a great OS for routers and provides a lot of Linux functions at self.
So, OpenVPN can be fully configured on your router without any external systems. But, this way is pretty long due to the necessity of generating a lot of crypto certificates and keys with a weak router CPU. Also, it requires going through each step of preparation manually.
Fortunately, you can use a very simple way to configure OpenVPN server and clients on Linux instance with the script https://github.com/Nyr/openvpn-install.
Script supports different Linux distributions. So, you can choose your preference. I prefer Ubuntu, so the configuration for Ubuntu is presented in the article but you can use another distributive with the same approach.
After that, you have to embed all necessary certificates and key to your server config file and import it to your OpenWRT router.
Prepare temporary openvpn config on your linux instance
First of all make your system updated:
$ sudo -s
#
/home/pi# apt update && apt upgrade -y
Download OpenVPN installation script
mkdir openvpn
cd openvpn
wget https://git.io/vpn -O openvpn-install.sh
Make the script executable:
chmod +x openvpn-install.shThe script must be launched with root permission to make the necessary configurations for OpenVPN and generate certificates and keys.
sudo ./openvpn-install.shThe script will ask you which IP address should be used.
I have a bunch of network interfaces and IP addresses on my Ubuntu instance because of the installed docker.
So, so IP of network adapted should be selected.
Welcome to this OpenVPN road warrior installer!

Which IPv4 address should be used?
     1) 10.0.2.15
     2) 172.17.0.1
     3) 172.30.32.1
IPv4 address [1]: 1
The script will detect the public IP of your router and ask you to confirm it.
In this step, you have to point to the local IP of your instance to test your configuration before implying it to your router.
Pay attention to the network configuration of your virtual box. IP address depends on the type of connection: NAT or bridge.
This server is behind NAT. What is the public IPv4 address or hostname?
Public IPv4 address / hostname [Your public IP]: Your linux instance IP
UDP protocol is preferable. TCP should be used in exceptional cases, but this case is out of the topic for this article.
Also, leave the default port for OpenVPN server.
Which protocol should OpenVPN use?
   1) UDP (recommended)
   2) TCP
Protocol [1]: 1
What port should OpenVPN listen to?
Port [1194]:
You should choose the DNS server for OpenVPN resolving.
I suggest using Google DNS to avoid any surprises with cash and forwarding rules.
Select a DNS server for the clients:
   1) Current system resolvers
   2) Google
   3) 1.1.1.1
   4) OpenDNS
   5) Quad9
   6) AdGuard
DNS server [1]: 2
Define the name of your first OpenVPN client.
Enter a name for the first client:
Name [client]: MyPhone

OpenVPN installation is ready to begin.
Press any key to continue...
Press any key to finalize your configuration.
The script will install all necessary packages and create configurations for the server and client.
Pay attention to placing your client’s configuration into root directory despite of your current directory.
Finished!

The client configuration is available in: /root/MyPhone.ovpn
New clients can be added by running this script again.
Press any key to finalize your configuration.
The script will install all necessary packages and create configurations for the server and client.
The script also configures OpenVPN as a service and runs it in the background.
Please stop the service and disable autostart because of the necessity to prepare our config for OpenWRT and debug it.
sudo systemctl stop openvpn-server@server.service
sudo systemctl disable openvpn-server@server.service
Removed /etc/systemd/system/multi-user.target.wants/openvpn-server@server.service.
check your vpn config
First of all, you need OpenVPN client for your workstation or phone.
Please find the client for your OS on the official cite https://openvpn.net/
Please find “Connect Client” in the “Products” top-menu. Download and install the client.
Now you should get the client config file from your Linux instance. The simplest way is using SCP command. It’s available in MacOS. Please use Putty if you are Windows user.
First of all, you should make client configuration accessible for your Linux user (I use ubuntu user for the article), because root must be prohibited for SSH access.
So, copy client configuration to your home directory and change the owner:
sudo cp /root/MyPhone.ovpn /home/ubuntu/openvpn/
sudo chown ubuntu /home/ubuntu/openvpn/MyPhone.ovpn
ls -la /home/ubuntu/openvpn/MyPhone.ovpn
-rw-r--r-- 1 ubuntu root 4994 Oct  2 08:11 /home/ubuntu/openvpn/MyPhone.ovpn
Now launch the terminal on your MacOS (Windows is out of topic for this article) and go to the directory where you want to place your config.
scp ubuntu@Your_linux_ip:~/openvpn/MyPhone.ovpn ./

The authenticity of host '[Your_linux_ip] ([Your_linux_ip])' can't be established.
ED25519 key fingerprint is SHA256:Wsj/8F6qdYRQ/LSVti+y3OPxFiHBhHBuoS/3o2EURzo.
This key is not known by any other names
Are you sure you want to continue connecting (yes/no/[fingerprint])? yes
Warning: Permanently added '[Your_linux_ip]' (ED25519) to the list of known hosts.
ubuntu@Your_linux_ip's password:

MyPhone.ovpn                    100% 4994     5.6MB/s   00:00
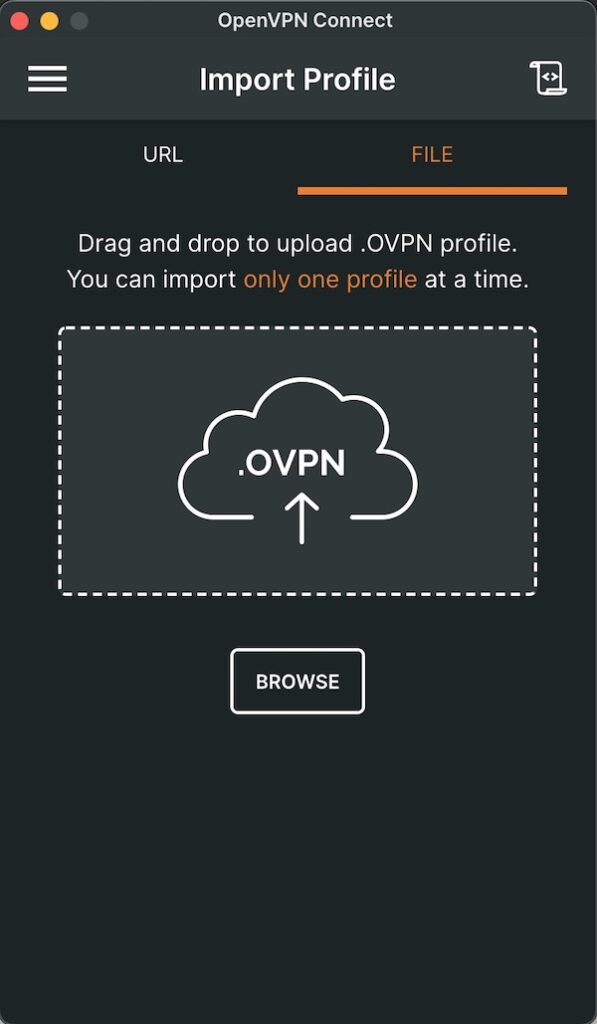
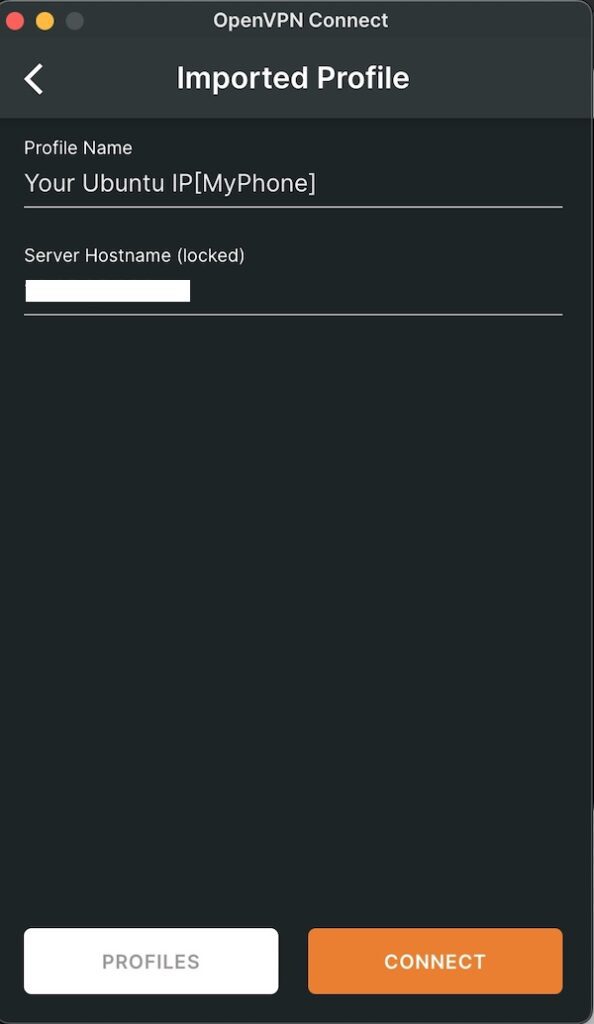
Configure your VPN client by placing the downloaded config file into it.
Now, run your OpenVPN server in foreground mode to see the output.
cd /etc/openvpn/server/
sudo openvpn --config  /etc/openvpn/server/server.conf


DEPRECATED OPTION: --cipher set to 'AES-256-CBC' but missing in --data-ciphers (AES-256-GCM:AES-128-GCM). Future OpenVPN version will ignore --cipher for cipher negotiations. Add 'AES-256-CBC' to --data-ciphers or change --cipher 'AES-256-CBC' to --data-ciphers-fallback 'AES-256-CBC' to silence this warning.
OpenVPN 2.5.5 x86_64-pc-linux-gnu [SSL (OpenSSL)] [LZO] [LZ4] [EPOLL] [PKCS11] [MH/PKTINFO] [AEAD] built on Mar 22 2022
library versions: OpenSSL 3.0.2 15 Mar 2022, LZO 2.10
net_route_v4_best_gw query: dst 0.0.0.0
net_route_v4_best_gw result: via Your_ubuntu_IP dev enp0s3
Diffie-Hellman initialized with 2048 bit key
Outgoing Control Channel Encryption: Cipher 'AES-256-CTR' initialized with 256 bit key
 Outgoing Control Channel Encryption: Using 256 bit message hash 'SHA256' for HMAC authentication
Incoming Control Channel Encryption: Cipher 'AES-256-CTR' initialized with 256 bit key
Incoming Control Channel Encryption: Using 256 bit message hash 'SHA256' for HMAC authentication
TUN/TAP device tun0 opened
net_iface_mtu_set: mtu 1500 for tun0
net_iface_up: set tun0 up
net_addr_v4_add: 10.8.0.1/24 dev tun0
Could not determine IPv4/IPv6 protocol. Using AF_INET
Socket Buffers: R=[212992->212992] S=[212992->212992]
UDPv4 link local (bound): [AF_INET]10.0.2.15:1194
UDPv4 link remote: [AF_UNSPEC]
GID set to nogroup
UID set to nobody
MULTI: multi_init called, r=256 v=256
IFCONFIG POOL IPv4: base=10.8.0.2 size=253
IFCONFIG POOL LIST
Initialization Sequence Completed
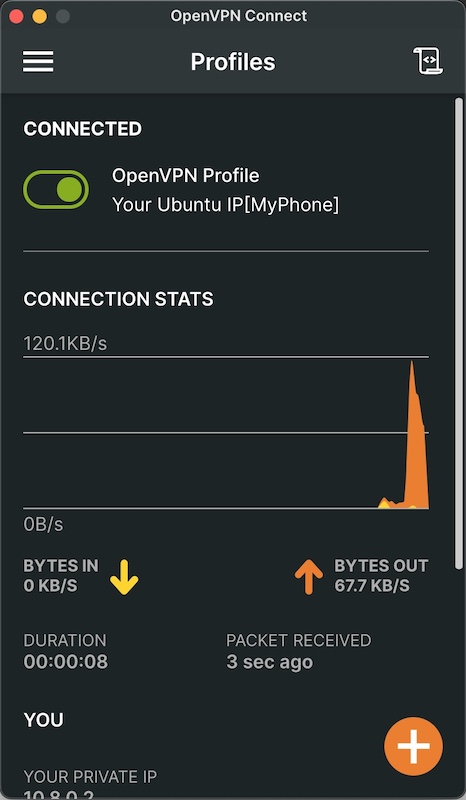
Your server is launched and ready for the client’s connection.
So, try to connect with your client.
Now you’ve got working configurations for the server and client.
Prepare OpenVPN server configuration for your router
Now you’ve got working configurations for the server and client.
Please compare your server and client configurations:
cat /etc/openvpn/server/server.conflocal Your_Server_IP
port 1194
proto udp
dev tun
ca ca.crt
cert server.crt
key server.key
dh dh.pem
auth SHA512
tls-crypt tc.key
topology subnet
server 10.8.0.0 255.255.255.0
push "redirect-gateway def1 bypass-dhcp"
ifconfig-pool-persist ipp.txt
push "dhcp-option DNS 8.8.8.8"
push "dhcp-option DNS 8.8.4.4"
push "block-outside-dns"
keepalive 10 120
cipher AES-256-CBC
user nobody
group nogroup
persist-key
persist-tun
verb 3
crl-verify crl.pem
explicit-exit-notifyThere are certificates that are removed from the client config to shorten it.
cat /root/MyPhone.ovpn client
dev tun
proto udp
remote Your_Server_IP 1194
resolv-retry infinite #remove this string if you don't want to pass all client's trafic through VPN
nobind
persist-key
persist-tun
remote-cert-tls server
auth SHA512
cipher AES-256-CBC
ignore-unknown-option block-outside-dns
verb 3
<ca>
-----BEGIN CERTIFICATE-----
-----END CERTIFICATE-----
</ca>
<cert>
-----BEGIN CERTIFICATE-----
-----END CERTIFICATE-----
</cert>
<key>
-----BEGIN PRIVATE KEY-----
-----END PRIVATE KEY-----
</key>
<tls-crypt>
-----BEGIN OpenVPN Static
-----END OpenVPN Static key V1-----
</tls-crypt>
As can you see server config refers to external certificates and keys files. So, the idea is to embed certificates and keys to the server config for further simple placing the config into your OpenWRT router.
First of all, backup your server config.
sudo cp /etc/openvpn/server/server.conf /etc/openvpn/server/server.conf.1Add your certificates to server.conf file with the following commands:
sudo echo '<dh>' >> /etc/openvpn/server/server.conf
sudo cat /etc/openvpn/server/dh.pem >> /etc/openvpn/server/server.conf
sudo echo '</dh>' >> /etc/openvpn/server/server.conf

sudo echo '<ca>' >> /etc/openvpn/server/server.conf
sudo cat /etc/openvpn/server/ca.crt >> /etc/openvpn/server/server.conf
sudo echo '</ca>' >> /etc/openvpn/server/server.conf

sudo echo '<cert>' >> /etc/openvpn/server/server.conf
sudo cat /etc/openvpn/server/server.crt >> /etc/openvpn/server/server.conf
sudo echo '</cert>' >> /etc/openvpn/server/server.conf

sudo echo '<key>' >> /etc/openvpn/server/server.conf
sudo cat /etc/openvpn/server/server.key >> /etc/openvpn/server/server.conf
sudo echo '</key>' >> /etc/openvpn/server/server.conf

sudo echo '<tls-crypt>' >> /etc/openvpn/server/server.conf
sudo cat /etc/openvpn/server/tc.key >> /etc/openvpn/server/server.conf
sudo echo '</tls-crypt>' >> /etc/openvpn/server/server.conf

sudo echo '<crl-verify>' >> /etc/openvpn/server/server.conf
sudo cat /etc/openvpn/server/crl.pem >> /etc/openvpn/server/server.conf
sudo echo '</crl-verify>' >> /etc/openvpn/server/server.conf
Remove references to external files in your config by deleting following strings:
ca ca.crt
cert server.crt
key server.key
tls-crypt tc.key
dh dh.pem
crl-verify crl.pem
Now your server config is ready for placing into your router.
So, you have to make it accessible for scp from your workstation.
sudo cp /etc/openvpn/server/server.conf /home/ubuntu/openvpn/
sudo chown ubuntu /home/ubuntu/openvpn/server.conf
ls -la /home/ubuntu/openvpn/server.conf

-rw-r--r-- 1 ubuntu root 9703 Oct  2 11:39 /home/ubuntu/openvpn/server.conf
Now launch the terminal on your MacOS (Windows is out of topic for this article) and go to the directory where you want to place your config.
scp ubuntu@Your_linux_ip:~/openvpn/server.conf ./
ubuntu@Your_linux_ip's password:

server.conf                    100% 100% 9703    10.2MB/s   00:00
Rename you config file to ovpn:
cp server.conf server.ovpn
configure openvpn on your router
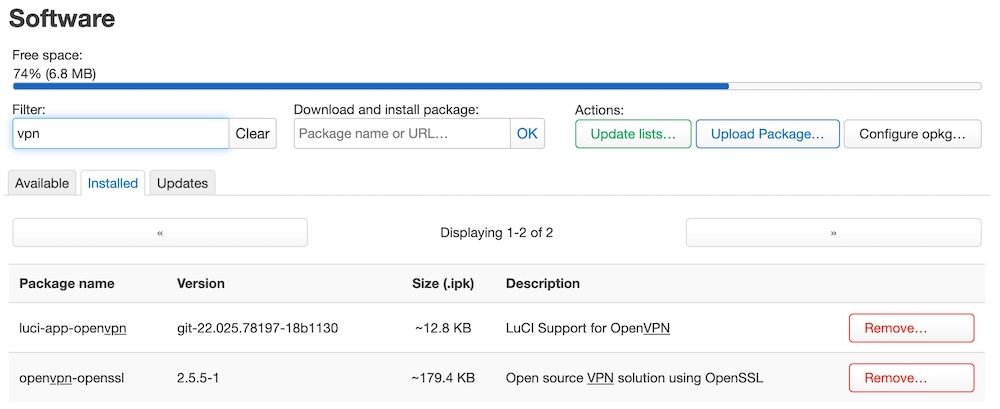
First of all you have to install the necessary packages onto your router.
So, go to “System” -> “Software” screen and click “Update Lists…” button.
You need the following packages:
- luci-app-openvpn
- openvpn-openssl
Packages are already installed on my router. So, “Installed” tab is presented.
You have to log out and log in again to see the new menu “VPN” on your LuCi interface.
Go to “VPN” -> “OpenVPN” menu.
Add your configuration name to the section “OVPN configuration file upload”, shoose your config file and Upload it.
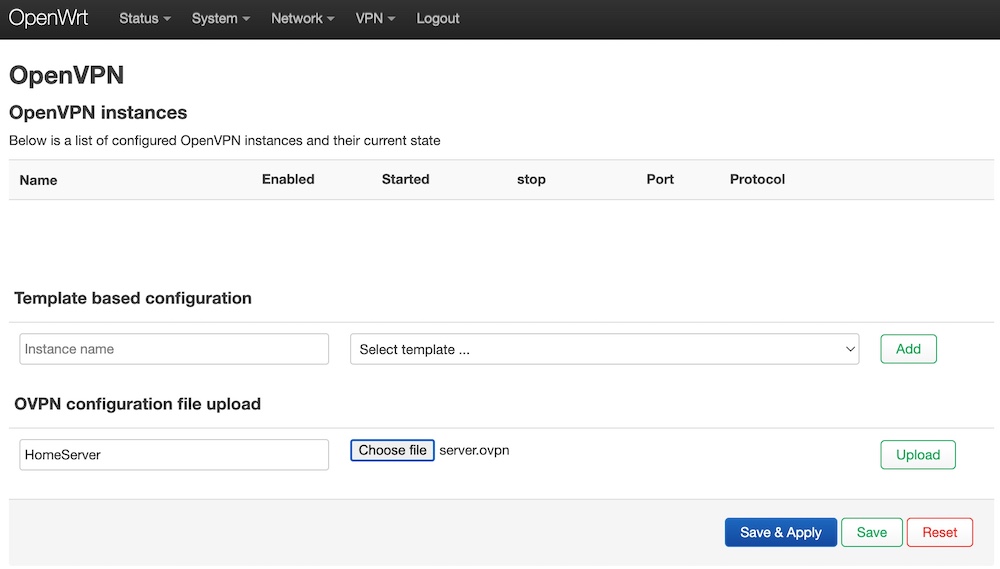
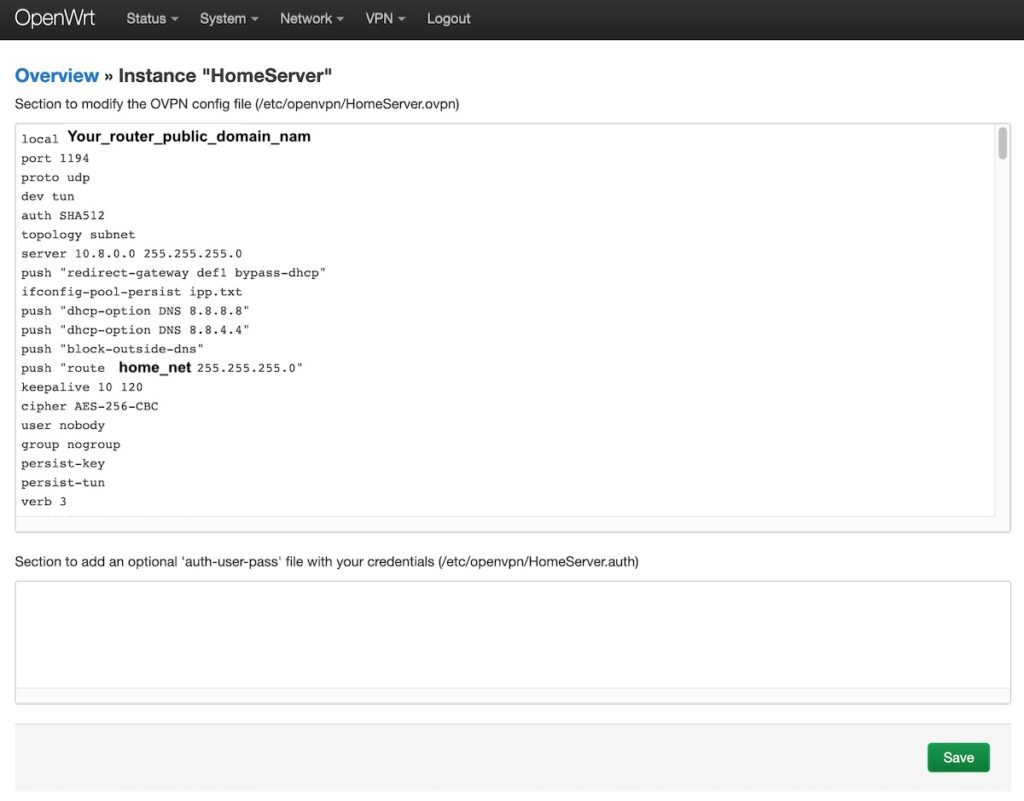
Please remember that there is local IP of your Linux instance. Hence you should edit your config in the router and put your router public IP or public domain in the “local” row.
Also, you should route to your home network which will be pushed to VPN client with the following row:
push “route your_home_net 255.255.255.0”
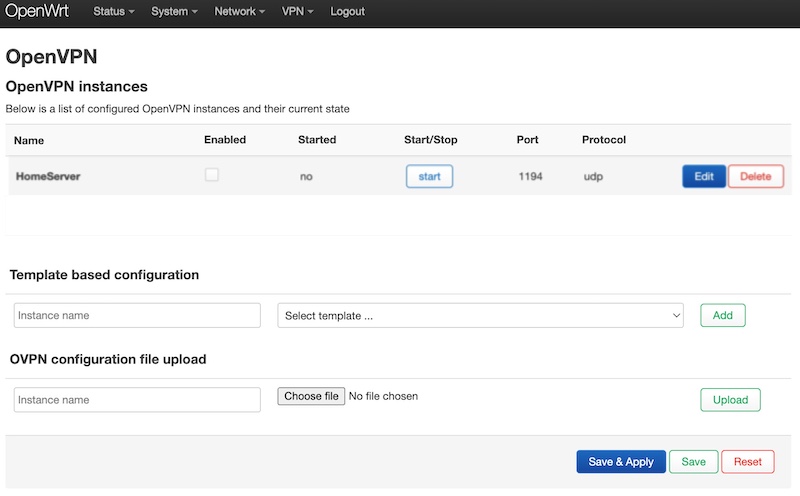
Save your config and back to the overview VPN screen.
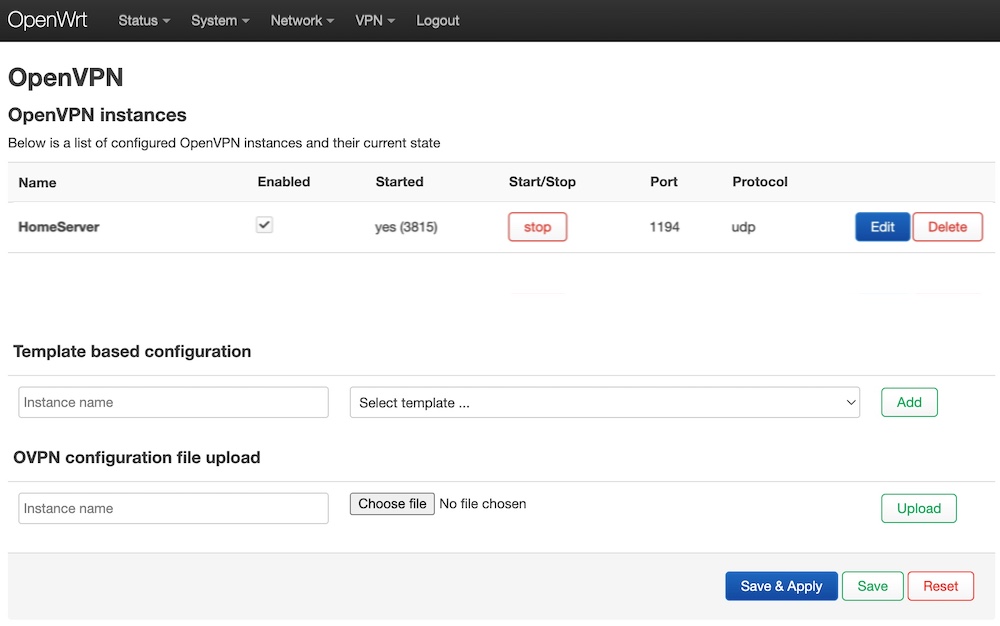
Now, please make your config VPN “Enabled”, click “Save & Apply”, and start it.
configure firewall on your router
Your VPN server is started and ready for connections, but please remember that connections should be from the Internet but not from your home network.
The best way is to install the client onto your mobile phone and try to connect with the switched-off WiFi module on your phone.
Please find the client for your OS on the official site https://openvpn.net/
Installation of the client to a phone and passing the client configuration should be easy for you if you use OpenWRT..:)
So, you would not spend time on this.
Your VPN server and home network will not be accessible without necessary Firewall configuration.
Please go to “Network” -> “Interfaces” menu on your router and click “Add New Interface…”.
Name your interface “Tun0” for example, choose “DHCP client” protocol, and chouse Tun interface from the drop-down menu.
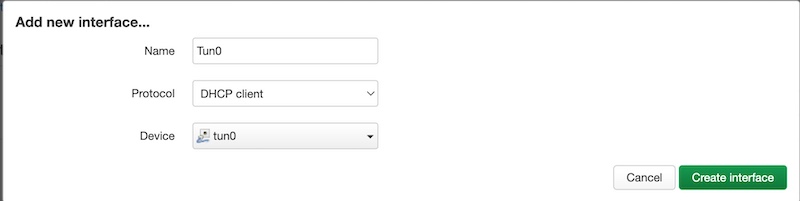
Click “Create interface” and back to “Network” -> “Interfaces” screen.
Now you have to create a new Firewall zone for VPN to exclude it from NAT.
Click “Edit” for your new interface and switch to “Firewall Settings”. Open the drop-down menu “Create / Assign firewall-zone” and name your new zone in the custom field (VPN for exapmple).
There are two TUN interfaces on the screenshot below because my router acts as a VPN client and server simultaneously.

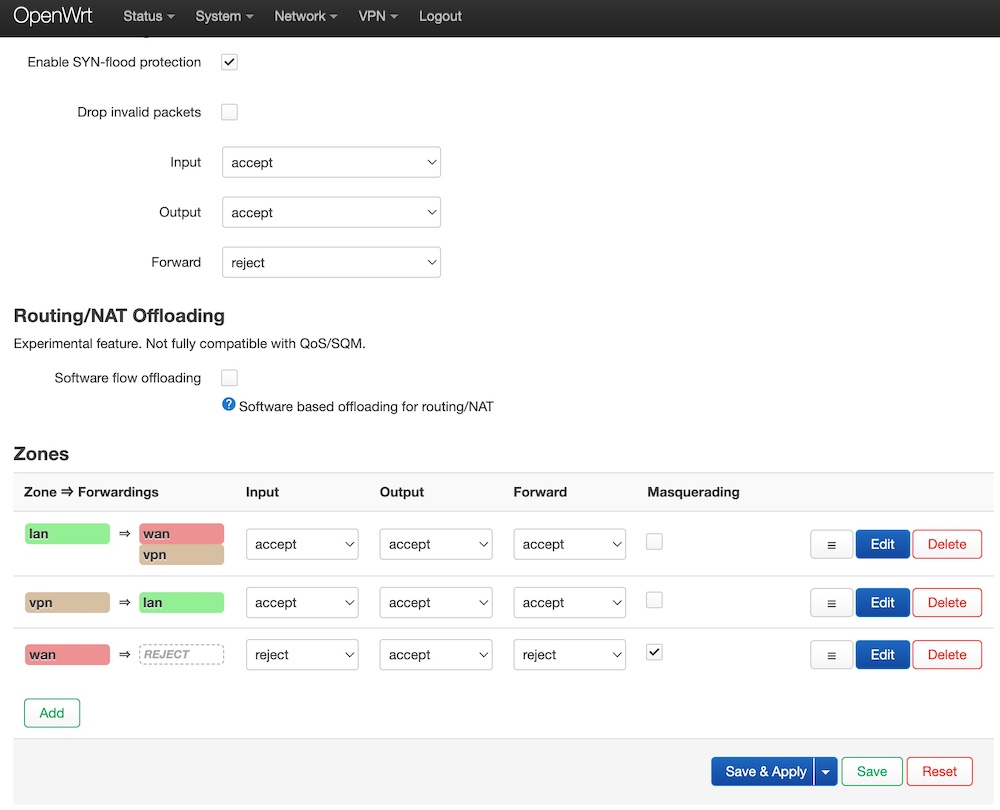
Now please click “Save & Apply” and go to “Network” -> “Firewall” menu and make the same rules as can you below.
As a result, you traffic between VPN and LAN will be routed without NAT but traffic to Internet will be NATed still.
As the final step, you have to allow traffic forwarding between VPN and LAN.
Also, you have to allow connections from the Internet to your VPN server.
Please go to “Network” -> “Firewall” and choose “Traffic Rules”.
First of all, you have to create rules for the incoming connection for VPN-client.
Click “Add” and configure the rule:
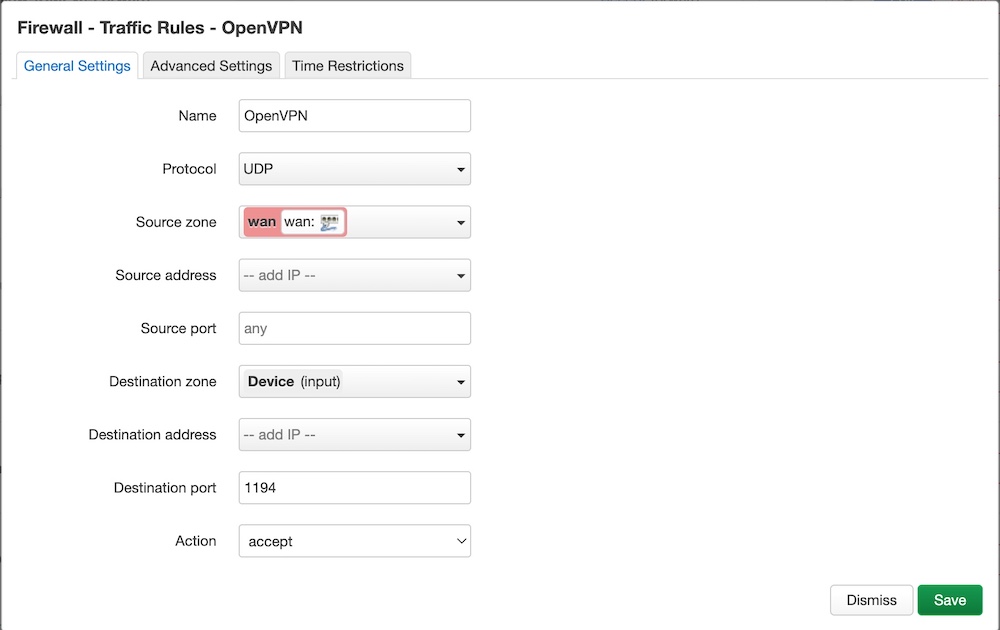
Click “Save” and “Add” a new the rule for forwarding from VPN to LAN:

Click “Save” and “Add” a new the rule for forwarding from LAN to VPN:
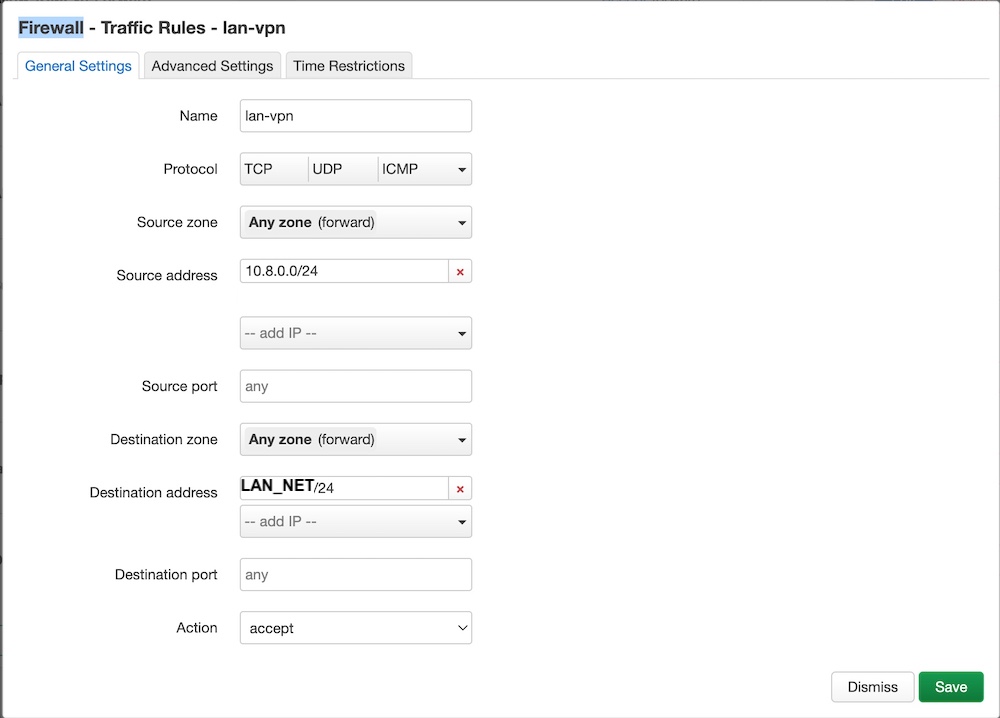
Click “Save” and “Save & Apply”.
As a result you have to see following set of rules:
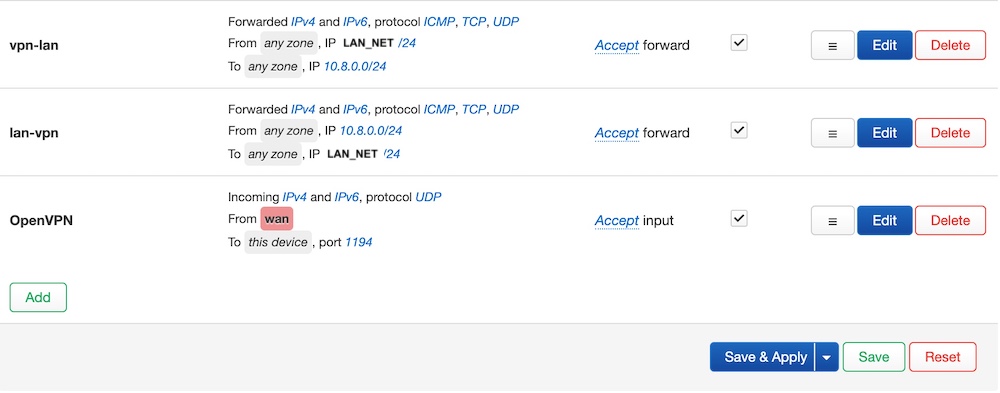
Finally, your router is configured as a VPN server.
Please feel free to ask any questions in the comments.


I got this website from my friend who shared with me on the topic of
this web site and at the moment this time I am browsing this web
page and reading very informative posts at this time.
What exactly is LAN-NET in the description. My router is set to be 192.168.1.1 is that LAN-NET. I can't just write LAN-NET, is believe you mean an ip, right?
LAN is a zone configured in the OpenWRT firewall by default.
In the description you have a phrase called (destination address) LAN-NET/24 for instance. But the is the word "LAN-NET" representing an ip number? You are using it in the 2 last images. I just miss an explanation. Otherwise I think this is the best guide I've seen yet.