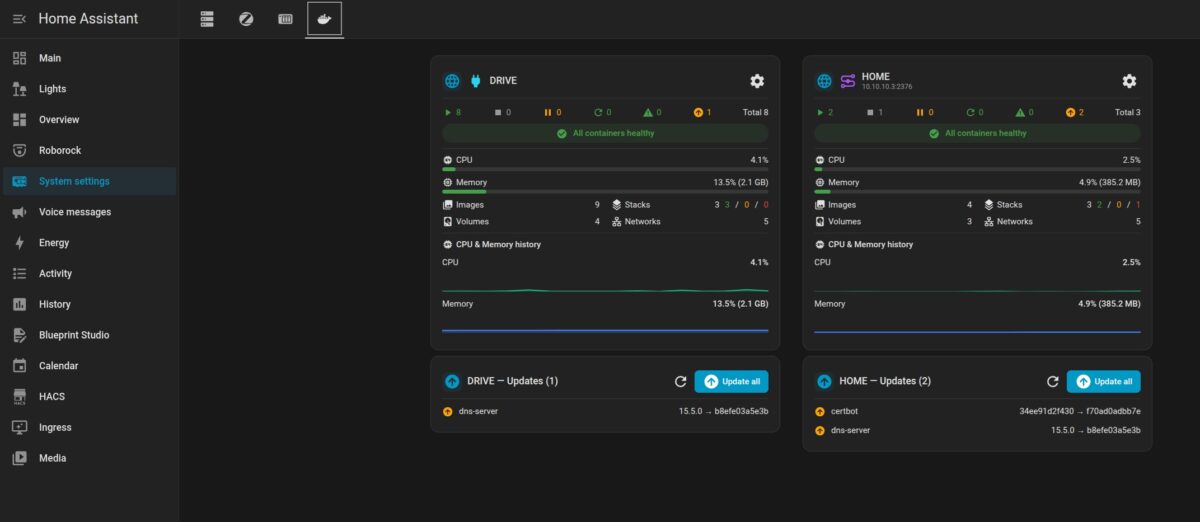
For many years, I used Portainer to manage my Docker containers, but it isn’t very convenient for updating Docker images. Originally, I integrated it into my Home Assistant UI using the Ingress integration from HACS, but recent versions required adjusting my Nginx reverse proxy configuration after every single update. On top of that, I used Updates2MQTT to get update notifications in Home Assistant and to update images directly from there. However, I still had to prune old images from my instance manually.
That’s when I found DockHand, which covers everything I need:
- Smooth Home Assistant integration
- Scheduled checks for available image updates
- Updating images directly from Home Assistant
- Scheduled pruning of unused images
Copmare Portiner and DockHand
| Feature | Portainer CE | Dockhand |
|---|---|---|
| License | Open source (zlib) | BSL 1.1 (free for personal and internal business use) |
| Container management (start, stop, logs, console) | ✅ | ✅ |
| Compose stacks | ✅ | ✅ Visual editor with env variables side-by-side |
| Git deployment with auto-sync | ✅ | ✅ Webhooks and auto-sync |
| Multiple Docker hosts | ✅ Portainer Agent | ✅ Hawser agent |
| Kubernetes support | ✅ | ❌ Docker only |
| Scheduled checks for image updates | ❌ | ✅ |
| Scheduled automatic container updates | ❌ Only for Git-based stacks | ✅ Per container (daily, weekly, monthly) |
| Scheduled pruning of unused images | ❌ | ✅ |
| Vulnerability scanning | ❌ | ✅ |
| SSO (OIDC/OAuth) | ✅ | ✅ |
| Role-based access control | Basic (full RBAC in Business Edition) | Enterprise edition only |
| Home Assistant integration | Core integration (monitoring and basic control) | HACS integrations with update entities and “Update image” buttons |
DockHand Deployment
Dockhand should be deployed as a separate stack outside of its own management, because it can’t manage the stack it runs in. Updating or restarting that stack from Dockhand would stop Dockhand itself mid-operation.
Let’s create necessary folder for it and docker compose file:
sudo mkdir -p /opt/dockhand
sudo mcedit /opt/dockhand/docker-compose.yml
Add the following config:
services:
  dockhand:
    image: fnsys/dockhand:latest
    container_name: dockhand
    restart: unless-stopped
    volumes:
      - /etc/localtime:/etc/localtime:ro
      - /var/run/docker.sock:/var/run/docker.sock
      - /opt/dockhand/dockhand_data:/app/data
      - /opt/HA:/opt/HA
      - /opt/technitium:/opt/technitium
    network_mode: host
image: fnsys/dockhand:latest: the official Dockhand image from Docker Hub. Since Dockhand itself runs in a separate stack, I update it manually from time to time.container_name: dockhand: a fixed container name, which makes it easier to find in logs and CLI commands.restart: unless-stopped: Docker starts Dockhand automatically after a reboot or crash, unless I’ve stopped it on purpose./etc/localtime:/etc/localtime:ro: syncs the container’s time zone with the host, so scheduled update checks and image pruning run at the expected local time. It’s mounted read-only, since Dockhand only needs to read it./var/run/docker.sock:/var/run/docker.sock: gives Dockhand access to the Docker Engine API on the host. This is what allows it to manage containers, pull images and prune unused ones. Keep in mind that access to the Docker socket effectively means root access to the host, so don’t expose Dockhand to the internet without proper authentication./opt/dockhand/dockhand_data:/app/data: persistent storage for Dockhand’s database and settings, so nothing gets lost when the container is recreated./opt/HA:/opt/HAand/opt/technitium:/opt/technitium: the directories with the Compose files of the stacks I manage with Dockhand (Home Assistant and Technitium DNS). They’re mounted under the same paths as on the host, so relative paths in those Compose files resolve correctly when Dockhand deploys or updates the stacks.
⚠️ Adjust paths according to your setup.network_mode: host: the container uses the host’s network stack directly, so the Dockhand UI is available on the host’s IP address without any port mapping (port 3000 by default).
#!/bin/sh

docker compose pull
docker compose up -d --remove-orphans
docker image prune -fa
Now start DockHand and open it with URL http://YOUR_HOST_IP:3000
Deploy Hawser Agent
If you run Docker stacks on several hosts, you can easily manage all of them from a single Dockhand instance using Hawser agents.
First, create the necessary folder and a Docker Compose file for Hawser on your remote host:
sudo mkdir -p /opt/hawser
sudo mcedit /opt/hawser/docker-compose.yml
Add the following config:
services:
  hawser:
    image: ghcr.io/finsys/hawser:latest
    container_name: hawser
    restart: unless-stopped
    volumes:
      - /var/run/docker.sock:/var/run/docker.sock
      - /opt/stacks:/opt/stacks   # your compose files, same path inside and out
    environment:
      - TOKEN=TOP_SECRET   # choose any strong token
      - AGENT_NAME=HOME    # friendly name shown in Dockhand
    network_mode: host
image: ghcr.io/finsys/hawser:latest: the official Hawser agent image from GitHub Container Registry.container_name: hawserandrestart: unless-stopped: a fixed container name, and automatic restart after a reboot or crash unless the agent was stopped on purpose./var/run/docker.sock:/var/run/docker.sock: gives Hawser access to the Docker Engine on the remote host, so Dockhand can manage its containers, images and stacks through the agent./opt/stacks:/opt/stacks: the directory with the Compose files of the stacks on this host. It’s mounted under the same path inside and outside the container, so relative bind mounts in those Compose files resolve correctly.TOKEN: the shared secret Dockhand uses to authenticate to the agent. Use a long random string, for example generated withopenssl rand -base64 32or with Dockhand’s built-in generator.AGENT_NAME: a friendly name shown in Dockhand instead of the hostname.network_mode: host: the agent listens directly on the host’s network on port 2376, without any port mapping.
DockHand Configuration
Unfortunately, unlike Portainer, Dockhand doesn’t add environments automatically, so you have to add them manually:
- Navigate to Settings.
- Open the Environments tab.
- Click Add Environment.
- Choose Unix socket for the local host, or Hawser agent (standard) for a remote one.
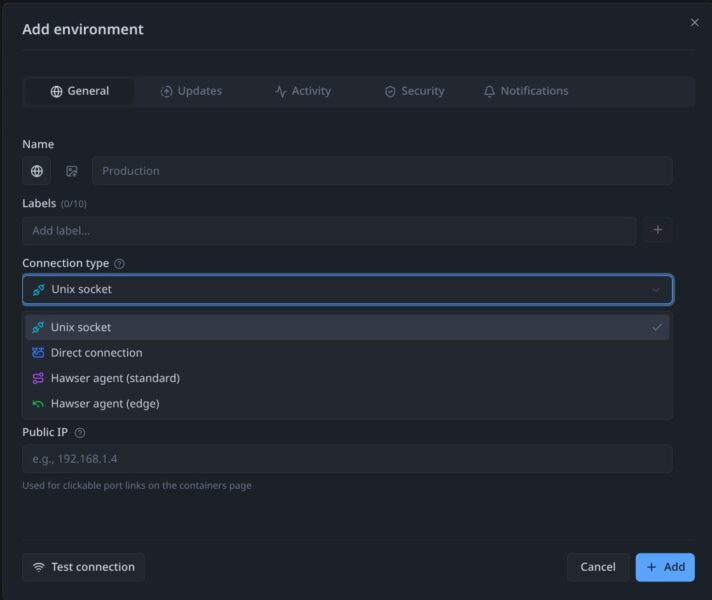
Check your parameters with clicking on Test connection button and switch to Updates tab:
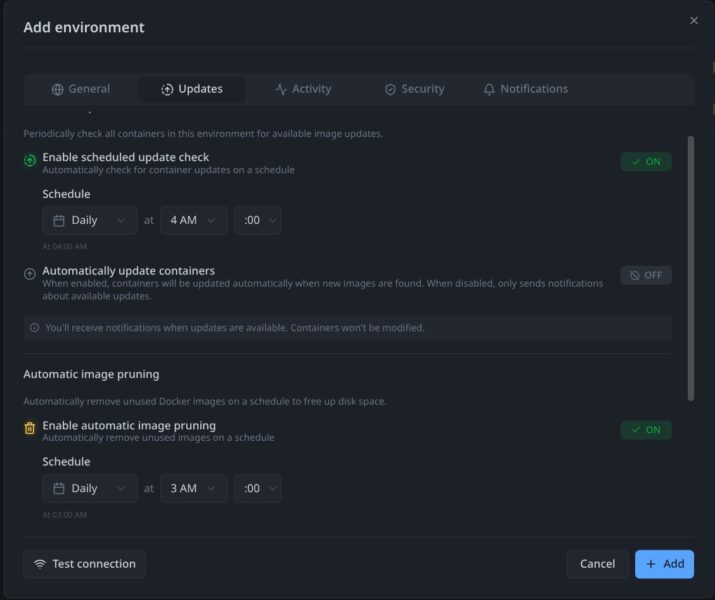
I recommend enabling update checks and automatic image pruning. Automatic updates are available too, but only if you enjoy surprises, like a broken Home Assistant while you’re on vacation.
Now, navigate to Stacks and chose one them:
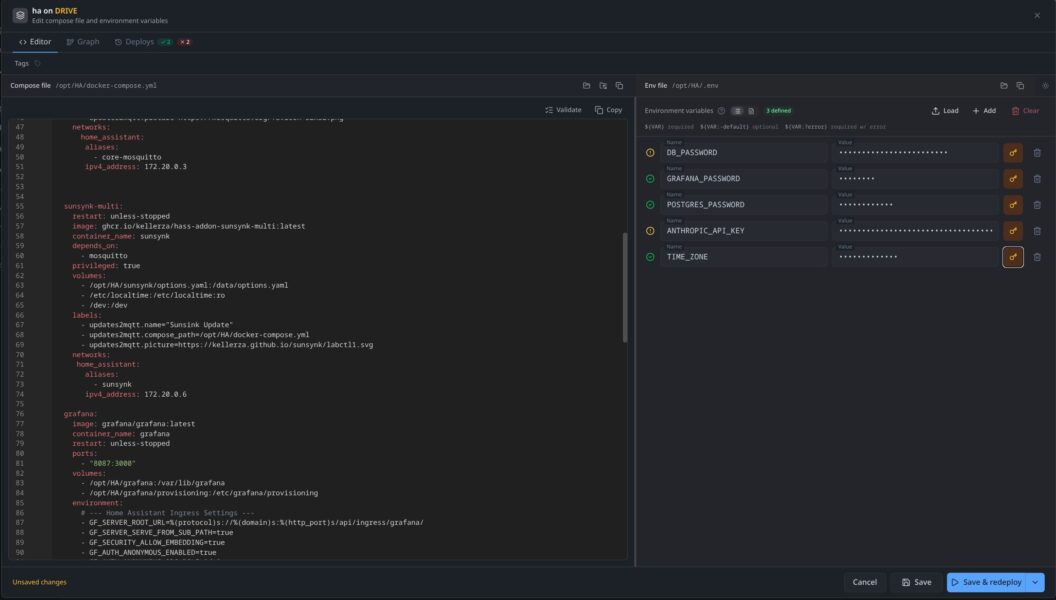
Most likely, you’ll see Browse for compose file button instead of your docker compose file, so you need to click on it and navigate DockeHand to your file.
As can you see, basic setup is pretty simple.
DockHand integration with Home Assistant
This integration is sipmle and streight forward as well. Just install Dockhand integration and Dockhand cars from HACS and configure them.
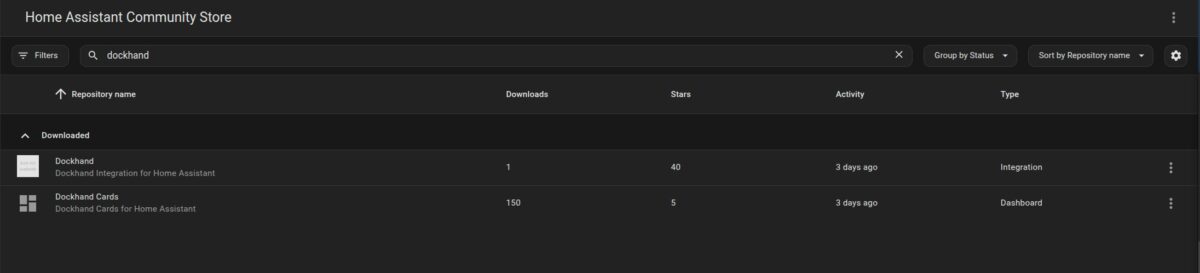
Once the Dockhand integration is configured, just start adding a card to your dashboard, and you’ll find the Dockhand cards there, already preconfigured. At most, a couple of small adjustments may be needed.