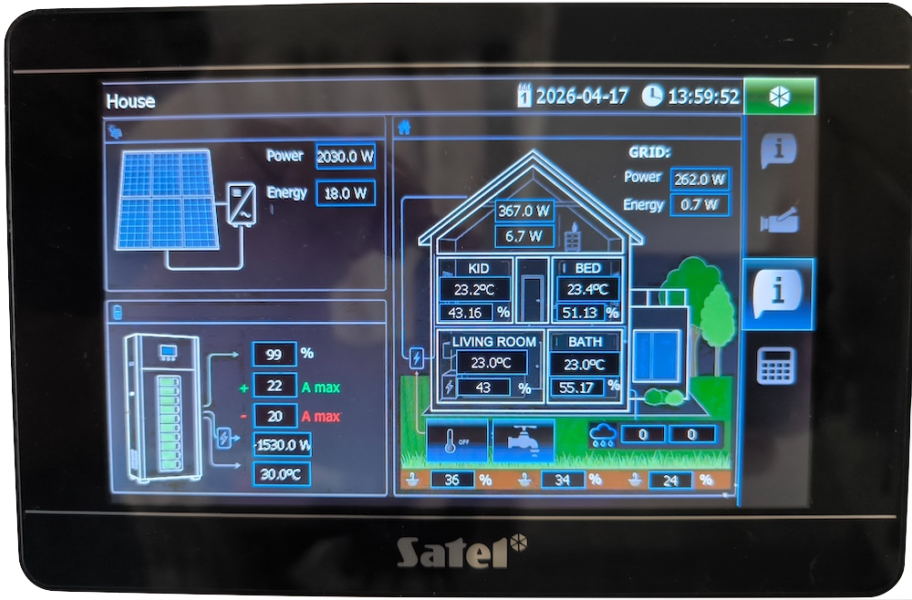
Some time ago, I installed a Satel alarm system featuring a beautiful touchscreen, but I was quickly disappointed by its limited functionality. Fortunately, Satel recently added MQTT support to their panels, finally opening the door to integrate the TSI screen directly with Home Assistant.
How It Works
While there isn’t a direct, native integration for the TSI panel in Home Assistant yet, the panel can communicate via MQTT. In this article, I’ll show you how to configure your Mosquitto broker, Satel panel, and Home Assistant to unite them into a single, seamless ecosystem.
⚠️WARNING⚠️
Before proceeding, please note that you must update your INT-TSI panel firmware to a recent version. This update process involves flashing two specific firmware modules: the INT-TSI OS and the INT-TSI STM.
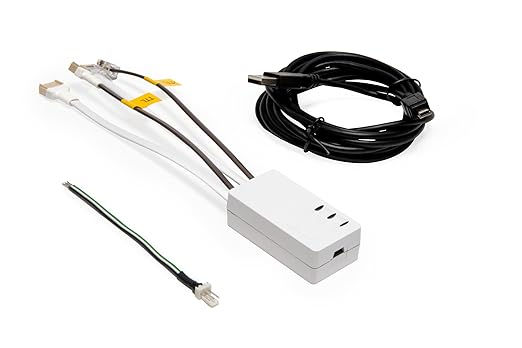
Both modules must be updated using the official Satel USB-RS cable. While it may be tempting to try generic USB-to-RS adapters, I cannot recommend this approach due to the high risk of ‘bricking’ your panel.
Find additional manuals on the Satel website.
Additionally, check if you have any archives with backups on SD-card inside your panel, they could be very helpful for roll-backs.
(This article contains affiliate links. As an Amazon Associate, I earn from qualifying purchases.)
Mosquito Broker Configuration
Before we begin, ensure that the Mosquitto Broker is already running in your environment. (If you haven’t set this up yet, you can follow my Docker guide here to get started.)
When connecting your Satel TSI panel to the MQTT broker, you generally have three options:
Anonymous Connection: Use this if your broker is already configured to allow unauthenticated access.
Shared Credentials: Use the existing Home Assistant username and password already used by the HA-Mosquitto integration.
Dedicated Credentials: Create a specific set of credentials in your Mosquitto configuration specifically for the TSI panel.
We will proceed with the third option, as it is the most secure and organized approach.
First of all, you have to add the password file’s path to your Mosquito configuration and disable anonymous access:
password_file /mosquitto/config/password.txt

log_dest file /mosquitto/data/mosquitto.log

allow_anonymous false

listener 1883
Now, run the following command in your terminal, replacing <container_name> with the name of your Mosquitto container (e.g., mosquitto), <username>, and <password> with your desired credentials:
sudo docker exec -it <container_name> mosquitto_passwd -c /mosquitto/config/passwd <username> <password>Check if your new credentials work:
docker exec -it mqtt mosquitto_pub -u <username> -P <password> -r -t "tsi/shower_mode" -m '{"value": 0}'To simplify the integration process, install and configure MQTT Explore. This utility provides a clear overview of your topic hierarchy and is essential for verifying the data packets sent between the Satel panel and Home Assistant.
Home Assistant Configuration
Add Automation
There’s a bit of a catch with the TSI panel: its MQTT functionality is fairly limited. It strictly requires JSON formatted messages, and it can only ‘see’ the first level of data like this:
{
  "value": "1"
}
So, you can’t read in TSI panel values inside “update” block from the example below.
{
  "air_quality": "excellent",
  "battery": 100,
  "device_temperature": 23,
  "display_unit": null,
  "humidity": 39.67,
  "linkquality": 40,
  "power_outage_count": 35,
  "temperature": 23.29,
  "update": {
    "installed_version": -1,
    "latest_version": -1,
    "state": null
  },
  "voc": 128,
  "voltage": 3120
}
To make things even more challenging, the TSI panel cannot read plain-text topics like that:
SS/ss/grid_ct_power: -17.833Therefore, let’s create an automation that converts your sensors data into a readable format for TSI.
First of all, create a bulk trigger that monitors states changes of sensors of interest:
- Create a new automation.
- Add a “Sate” trigger.
- Switch to YAML mode, and add the following configuration:
trigger: state
entity_id:
  - YOUR_Sensor1
  - YOUR_Sensor2
enabled: true
not_to:
  - unavailable
  - unknown
The block “not_to” is needed to avoid pushing non-informative states during HA, Zigbee2MQTT, etc., restarts.
The next step is creating a new action to publish new topics in “the right” format for Satel’s panel:
- Create a new action in the “MQTT: Publish” action.
- Add the following config:
⚠️ Explanation:
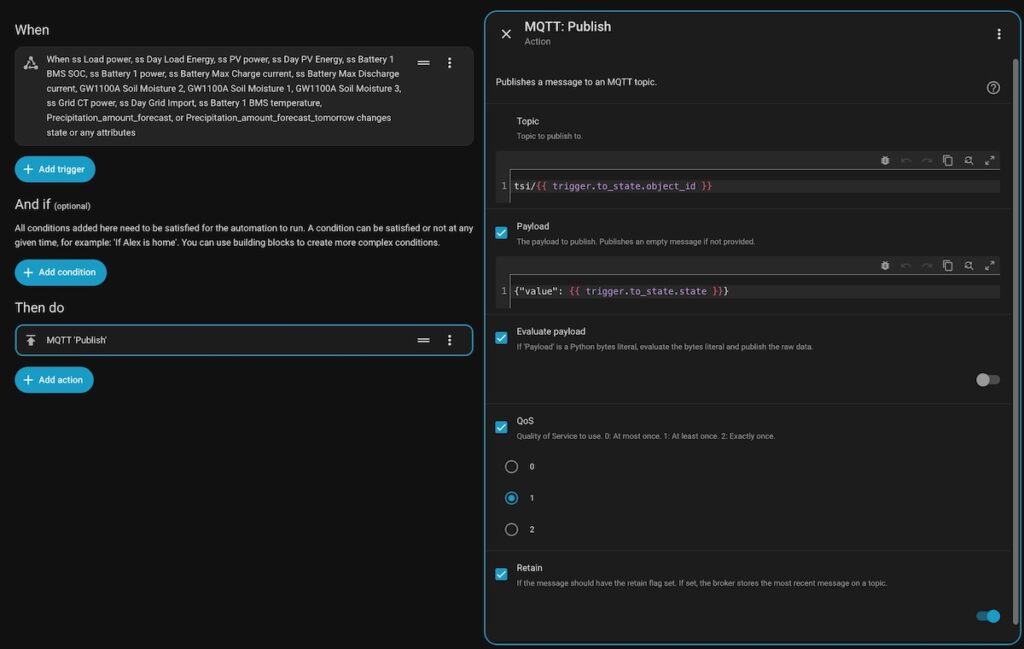
In the Topic field: tsi/{{ trigger.to_state.object_id }}
What this does: It looks at which sensor triggered the automation and grabs its “ID” name (the part after the domain).
Example: If
sensor.ss_pv_powerchanges, the message is automatically published totsi/ss_pv_power.Benefit: You don’t have to hardcode names. If you add a new sensor to the “When” list, it will automatically get its own MQTT topic without you changing the action.
In the Payload field: {"value": "{{ trigger.to_state.state }}"}
What this does: It wraps the new sensor value in a JSON object.
Result: If your sensor state is 2500 (for example), the MQTT message sent will be
{"value": "2500"}.QoS 1 (At least once): This ensures the message is guaranteed to reach the broker. It’s better than QoS 0 for critical home data like battery levels.
Retain: True: This is critical for your TSI panel. It tells the MQTT broker to “remember” the last value. If your TSI panel reboots, it doesn’t have to wait for the next sensor change; it can immediately ask the broker “What was the last value for a sensor?” and get an answer.
Your sensors added to the trigger have to getting appear in MQTT Explorer under configured topic.
⚠️ Explanation:
In the Topic field: tsi/{{ trigger.to_state.object_id }}
What this does: It looks at which sensor triggered the automation and grabs its “ID” name (the part after the domain).
Example: If
sensor.ss_pv_powerchanges, the message is automatically published totsi/ss_pv_power.Benefit: You don’t have to hardcode names. If you add a new sensor to the “When” list, it will automatically get its own MQTT topic without you changing the action.
In the Payload field: {"value": "{{ trigger.to_state.state }}"}
What this does: It wraps the new sensor value in a JSON object.
Result: If your sensor state is 2500 (for example), the MQTT message sent will be
{"value": "2500"}.QoS 1 (At least once): This ensures the message is guaranteed to reach the broker. It’s better than QoS 0 for critical home data like battery levels.
Retain: True: This is critical for your TSI panel. It tells the MQTT broker to “remember” the last value. If your TSI panel reboots, it doesn’t have to wait for the next sensor change; it can immediately ask the broker “What was the last value for a sensor?” and get an answer.
Verifying the Data in MQTT Explorer
Navigate to the topic you configured and look for the payload. Because of the TSI panel’s limitations, the message must look exactly like this:
Topic:
homeassistant/sensor/grid_power(or whatever you chose)Payload:
{"value": -17.833}
TSI Builder Configuration
MQTT Connection Configuration
To begin the visual customization, create a background image for your dashboard. Utilize an AI image generation tool, ensuring you set the output dimensions to precisely 720 × 430. After generating the image, import this file directly into TSI Builder to serve as the wallpaper for your designated tab.
On the left-side panel of TSI Builder, locate the MQTT section. Right-click it and select Properties to open the connection settings.
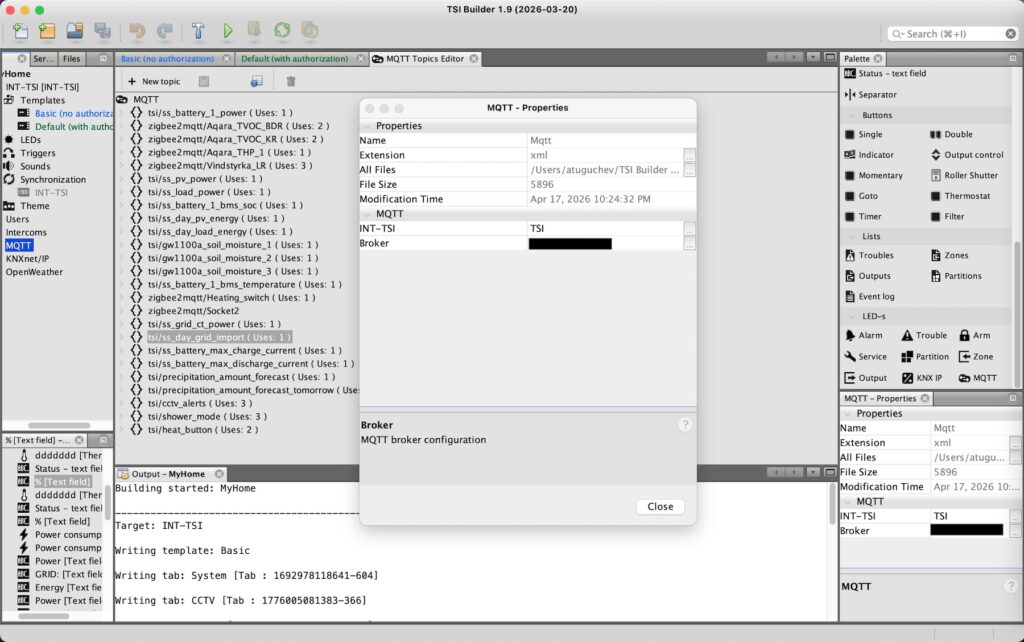
In the properties window, you’ll need to fill in two key sections. Ensure these match your previous Mosquitto setup exactly:
INT-TSI Parameters: Enter the Username and Password you specifically created for the panel in your Mosquitto configuration.
Don’t forget to set keep-alive to 60 000ms.Broker Parameters:
IP Address: Enter the local IP address of the machine running your Mosquitto broker (your HA/Docker host).
Port: Standard MQTT usually runs on
1883.
Add Topics and Values.
Since TSI Builder won’t automatically discover your topics, you’ll need to copy and paste carefully. Follow these steps for every sensor you want to display:
Open the Editor: Double-click MQTT on the left-side panel to open the MQTT Topic Editor Tab.
Add the Topic: Click “+ New topic” and paste the exact topic name you copied from MQTT Explorer (e.g.,
tsi/grid_power).Define the Data Field: Right-click your new topic, select “+ Field” from the context menu, and configure the following:
Name: This must match the key in your JSON payload exactly (e.g., if you send
{"temp": 22}, the field name istemp).Type: Choose Number (for values like power or temperature), String (for text status), or Boolean (for ON/OFF states).
- Please remember that you can also add sensors from other topics e.g. zigbee2mqtt if they have a suitable format.
Add Sensor to TSI Panel
Now that you’ve mapped your data, it’s time for the fun part: adding the actual UI elements to your custom AI-generated dashboard!
Follow these steps to place your data onto the screen:
Select Your Widget: Choose the widget that best fits your data type:
Thermometer: Great for temperature or humidity.
Power Consumption: Perfect for energy monitoring.
Sizing Tip: This widget doesn’t automatically convert Watts to kilowatts. Make sure you stretch the widget wide enough so that your highest possible numbers don’t get cut off!
Status: Best for binary (On/Off) indicators.
Status-Text Field: Use this for plain strings like “Armed” or “Standby.”
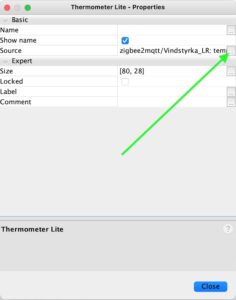
Open Settings: Right-click your placed widget and select the Properties menu.
Link the Data: Look for the Source parameter and click on it.
Select the Topic: From the list, choose the Topic and the specific Field you manually created in the previous step.
⚠️ Because TSI Builder doesn’t have a live preview for MQTT data, the only way to verify your work is to push the project to the hardware.
Compile the Project: Click the Compile icon in the top toolbar. Ensure there are no errors in the output log.
Upload to Panel: Connect to your panel (usually via the SD card or the network, depending on your setup) and deploy the configuration.
The “Moment of Truth”: Once the panel reboots and loads the new interface, it will attempt to connect to your Mosquitto broker.
Add Actionable Buttons to Trigger Evens in Home Assistant from TSI Panel
TSI Builder has several types of buttons, but the most interesting is the Indicator button, which is arguably the most powerful tool in the TSI Builder arsenal because it bridges the gap between a control and a display. Instead of having a separate light switch and a separate status icon, this single widget does it all.
Therefore, you have to configure two separate logics for it:
| Function | Direction | Requirement (TSI Builder) | HA Automation Logic |
| Status Display | Broker → Panel | Configure the Source parameter with your topic and field. | HA publishes a retained JSON message (e.g., {"val": 1}) whenever the sensor/light state changes. |
| Control Action | Panel → Broker | Configure the Command parameter with a “Write” topic. | HA listens for this specific topic and executes a service (e.g., light.toggle) when a message arrives. |
Configuring the Indicator Button
Place the Widget: Select the Indicator button from the widget menu and drag it onto your dashboard.
Open Properties: Right-click the button and select Properties (Preferences).
⚠️ EXPLANATION:
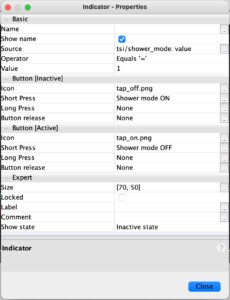
The Source for this button is the same one you configured for your sensors in the previous step. However, to make the button visually respond to changes, you must define its Active state using the Operator and Value fields.
In my setup, I want the button to appear “Active” (highlighted) specifically when the tsi/shower_mode topic field equals 1.
- Define the Active State:
Operator: Set this to Equal.
Value: Depends on the possible states of your entity.
Next, we need to tell the panel what to do when you actually tap the button.
Click on Short press to open the action configuration window.
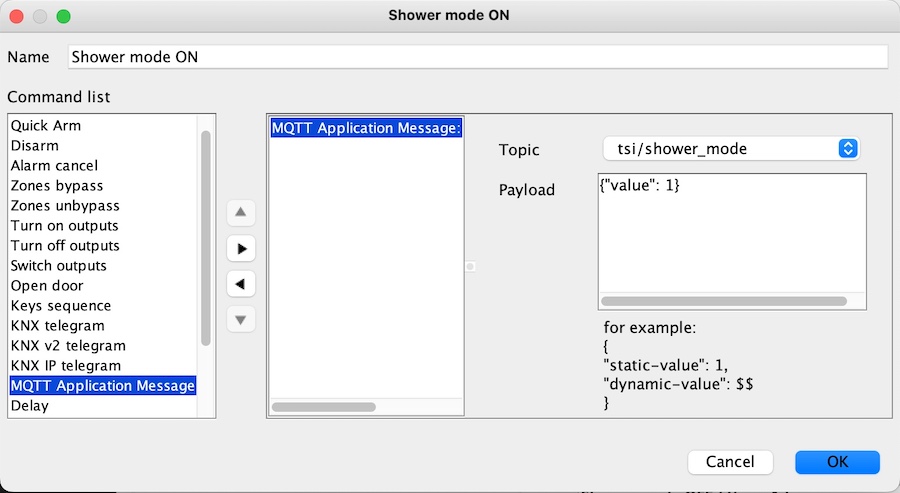
Note: If this is your first time, the window will appear empty. You’ll need to add a new action (usually an MQTT Publish command) to send a signal back to Home Assistant.
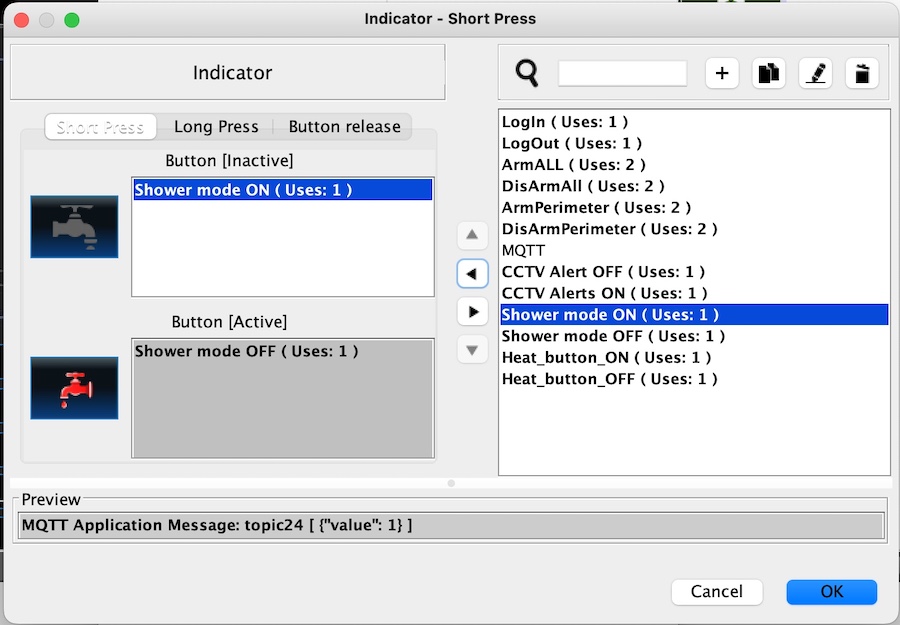
- Click on the “pen” icon in the top-right corner to create a new action:
Testing the Implementation
Once you have saved both your Activate and Deactivate actions, it is time to build your project and deploy it to the INT-TSI panel.
Based on the configuration described in this guide, the button logic follows a simple rule:
The button becomes Active when the value of
tsi/shower_modeis 1.The button becomes Inactive when the value is 0.
To verify that the communication loop is working correctly, we can manually simulate the status changes. Use MQTT Explorer or the command line to send these values to your broker and observe the panel:
The Manual Test:
To Activate: Publish
{"value": 1}to the topictsi/shower_mode. Your button should be activated.
docker exec -it mqtt mosquitto_pub -u YOUR_MQTT_USERNAME -P 'YOUR_MQTT_PASSWORD' -r -t "tsi/shower_mode" -m '{"value": 1}'- To Deactivate: Publish
{"value": 0}to the same topic. The button should return to its default state.
docker exec -it mqtt mosquitto_pub -u YOUR_MQTT_USERNAME -P 'YOUR_MQTT_PASSWORD' -r -t "tsi/shower_mode" -m '{"value": 0}'Verifying the Control Loop
Now, it’s time to verify that the “Control Action” is working as intended. Open MQTT Explorer on your computer and watch your command topic while you interact with the physical panel.
When you press the button on your INT-TSI, you should see the panel publish the following payloads:
{"value": 1}when the button is activated.{"value": 0}when the button is deactivated.
If these messages appear in MQTT Explorer exactly as shown, it confirms that your panel is successfully communicating with the broker. From here, you can easily set up a Home Assistant automation to listen for these specific values and trigger your “Shower Mode” or any other smart home scene!
Home Assistant Automation to Get Actions from TSI Panel
Now we’ve reached the final piece of the puzzle! As you’ve noticed, the TSI panel is just a “messenger”—it sends the command, but it doesn’t actually control your home directly. We need Home Assistant to listen for that message and take action.
Here is how to set up the corresponding automation:
The “Listener” Automation
Create a New Automation in Home Assistant.
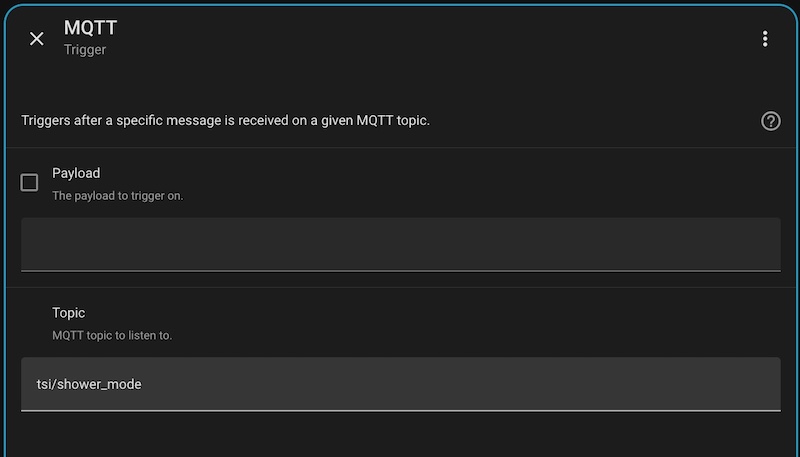
Add a Trigger and select the trigger type: “MQTT”.
In the Topic field, enter the exact topic name your panel is publishing to (e.g.,
tsi/shower_mode).Leave Payload field empty.
Add a new Action and select “Choose” type.
- Add the first Template condition:
{{ trigger.payload_json.value == 1 }}- Add the second Template condition:
{{ trigger.payload_json.value == 0 }}Now that your automation is live, it effectively bridges the gap between your INT-TSI panel and Home Assistant. The automation will now capture every state change from your panel’s buttons—seamlessly switching between Active and Inactive states.
All that’s left is to add your specific actions to the automation and enjoy a fully integrated TSI panel as a powerful command center within your Home Assistant ecosystem.