If you’ve been curious about ESPHome but weren’t sure where to start, the Waveshare ESP32-S3-RLCD-4.2 might be the best entry point available right now. Most beginner-friendly DIY guides ask you to wire up a temperature sensor to a bare ESP32 module, manage jumper cables, breadboards, and resistors — and then stare at raw numbers in a log window. This board skips all of that entirely.
Everything you need to build a genuinely useful Home Assistant widget is soldered on from the factory: a 4.2-inch display, a temperature and humidity sensor, a real-time clock, a battery management circuit, and a USB-C port for flashing. You take it out of the box, connect a USB-C cable, write a few lines of YAML in ESPHome, and you have a working, standalone device reporting data to Home Assistant.
This article contains affiliate links. As an Amazon Associate, I earn from qualifying purchases.
Information Displayed on the Screen
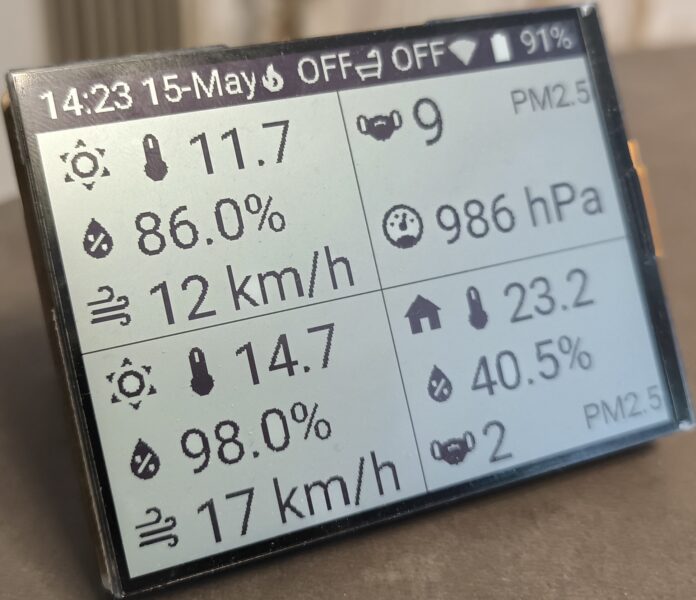
In the picture at the top of that article, you can see the following information:
- Top-bar: current time and date, statuses of home heater and water heater, WiFi connection level icon, and internal battery charge level.
- Top-left quadrant: Current outside temperature, humidity, and speed of the wind.
- Bottom-left quadrant: the same parameters forecasted for tomorrow.
- Top-right quadrant: outside level for PM2.5 and pressure.
- Bottom-right quadrant: temperature and humidity from the device-embedded sensors, and the inside level for PM2.5 from IKEA VINDSTYRKA.
In this article, you’ll find ESPCode example, Home Assistant config, and an explanation. All of them help you with starting your own journey with ESPHome.
What Makes the Display Special
The board’s standout feature is its 4.2-inch Reflective Liquid Crystal Display (RLCD), which uses ambient light instead of a backlight, resulting in an e-paper-like reading experience with very low power consumption and fast refresh times. This makes it particularly attractive for always-on dashboards, electronic calendars, and environments where conventional displays struggle with glare.
This matters for a home automation display in a practical way. A regular LCD needs its backlight on constantly — which means power draw and a bright glow that’s annoying at night. An e-paper display solves the power problem but refreshes so slowly it’s frustrating to watch. The RLCD sits neatly between the two: readable in bright daylight without washing out, no backlight drain, and fast enough to update your sensor readings in real time without that ghosting flicker e-paper is known for.
What's Already Onboard
The ESP32-S3-RLCD-4.2 integrates an audio codec circuit, dual microphones, speaker, SHTC3 high-precision temperature and humidity sensor, TF card slot, RTC header, and lithium battery charging and discharging management circuit. The microcontroller itself is an ESP32-S3 with 240 MHz main frequency, 16 MB Flash and 8 MB PSRAM — far more headroom than a typical ESP8266 or basic ESP32 module, meaning your ESPHome configuration can be feature-rich without running into memory constraints. Waveshare
This matters for a home automation display in a practical way. A regular LCD needs its backlight on constantly — which means power draw and a bright glow that’s annoying at night. An e-paper display solves the power problem but refreshes so slowly it’s frustrating to watch. The RLCD sits neatly between the two: readable in bright daylight without washing out, no backlight drain, and fast enough to update your sensor readings in real time without that ghosting flicker e-paper is known for.
For a beginner, what this means practically is:
- No wiring — the SHTC3 sensor and display are connected internally
- No external programmer — USB-C handles both flashing and power
- No separate power supply project — the 18650 battery holder and charging circuit are built in, so the board can run off a battery independently of a USB cable
- No soldering required to get a working sensor + display combination
Why ESPHome Is the Right Software for This Board
ESPHome natively supports both the SHTC3 temperature/humidity sensor. While the ST7305 driver isn’t in the ESPHome core yet, the community has already built a robust external component for it, making it just as easy to implement as a native driver. That means no custom C++ code, no porting of Arduino libraries — you describe what you want in YAML and ESPHome compiles the firmware for you. For a board this capable, that’s a significant shortcut.
The practical result for a first project: you can have a device displaying live temperature, humidity, and time from your Home Assistant instance, running off a battery, sitting on a desk — in an afternoon, without any electronics experience beyond plugging in a USB cable.
Before You Start — What You Need in Place
This guide focuses on the ESPHome firmware configuration for the Waveshare ESP32-S3-RLCD-4.2. Before diving in, your environment should be ready to receive the device. Two things need to be working:
ESPHome running in your Docker stack and embedded in HA, so you can paste the YAML configuration, compile it, and flash the device directly from the Home Assistant interface. If you haven’t done that yet, the previous article covers the complete setup step by step — including the Docker Compose configuration, the critical ESPHOME_TRUSTED_DOMAINS environment variable, and wiring ESPHome into the HA sidebar through hass_ingress:
→ How to Add ESPHome to Home Assistant Docker and Embed It in the HA UI with HACS Ingress
Optionally — an AI-assisted editor for your YAML. The ESPHome configuration for this board is not long, but if you want to extend it, customise the display layout, or adapt the code to your own needs, having Claude Code running inside your VS Code Ingress panel turns YAML editing into a conversation. You describe what you want and the AI writes or adjusts the code in place:
→ Claude Code Inside Home Assistant: Adding AI to Your VS Code Ingress Panel
With both of those in place, the workflow for this board becomes: connect your Waveshare ESP32-S3-RLCD-4.2 with USB cable to your computer, open ESPHome in the HA sidebar, add a new device, and follow the initiation steps.
After that, you should see some simple code for your device in ESPHome. Most likely, your device won’t even work with that code, but pay attention to the auto-generated following secure keys:
api:
  encryption:
    key: "SOME_KEY"

ota:
  - platform: esphome
    password: "SOME_KEY"
⚠️ Copy those keys and reuse them in the following example, otherwise you will have to generate them manually!!!!!
ESPHome Code
esphome:
  name: ink-panel
  friendly_name: INK_PANEL

esp32:
  board: esp32-s3-devkitc-1
  framework:
    type: esp-idf

# Octal PSRAM is required by the ST7305 driver for the framebuffer.
psram:
  mode: octal
  speed: 80MHz

logger:

api:
  encryption:
    key: "SOME_KEY"

ota:
  - platform: esphome
    password: "SOME_KEY"

wifi:
  ssid: !secret wifi_ssid
  password: !secret wifi_password
  use_address: DEVICE_IP
  ap:
    ssid: "Ink-Panel Fallback Hotspot"
    password: "SOME_PASSWORD"

captive_portal:

# ST7305 reflective LCD driver lives outside core ESPHome.
external_components:
  - source: github://kylehase/ESPHome-ST7305-RLCD
    components: [st7305_rlcd]

time:
  - platform: homeassistant
    id: ha_time

font:
  - file: "gfonts://Roboto"
    id: font_s
    size: 24
    glyphs: "!\"%()+=,-_.:°/0123456789ABCDEFGHIJKLMNOPQRSTUVWXYZabcdefghijklmnopqrstuvwxyz "
  - file: "gfonts://Roboto"
    id: font_m
    size: 38
    glyphs: "!\"%()+=,-_.:°/0123456789ABCDEFGHIJKLMNOPQRSTUVWXYZabcdefghijklmnopqrstuvwxyz "
  - file: "gfonts://Roboto"
    id: font_l
    size: 46
    glyphs: "!\"%()+=,-_.:°/0123456789ABCDEFGHIJKLMNOPQRSTUVWXYZabcdefghijklmnopqrstuvwxyz "

# Material Design icons rasterised to monochrome bitmaps for the RLCD.
image:
  - { id: ic_fire,    file: "mdi:fire",            resize: 24x24, type: BINARY }
  - { id: ic_shower,  file: "mdi:shower",          resize: 24x24, type: BINARY }
  - { id: ic_wifi_1,  file: "mdi:wifi-strength-1", resize: 24x24, type: BINARY }
  - { id: ic_wifi_2,  file: "mdi:wifi-strength-2", resize: 24x24, type: BINARY }
  - { id: ic_wifi_3,  file: "mdi:wifi-strength-3", resize: 24x24, type: BINARY }
  - { id: ic_wifi_4,  file: "mdi:wifi-strength-4", resize: 24x24, type: BINARY }
  - { id: ic_batt_sm, file: "mdi:battery",         resize: 24x24, type: BINARY }
  - { id: ic_sun,     file: "mdi:weather-sunny",   resize: 80x80, type: BINARY }
  - { id: ic_sun_sm,  file: "mdi:weather-sunny",   resize: 40x40, type: BINARY }
  - { id: ic_wind,    file: "mdi:weather-windy",   resize: 36x36, type: BINARY }
  - { id: ic_wind_sm, file: "mdi:weather-windy",   resize: 32x32, type: BINARY }
  - { id: ic_home,    file: "mdi:home",            resize: 36x36, type: BINARY }
  - { id: ic_thermo,  file: "mdi:thermometer",     resize: 36x36, type: BINARY }
  - { id: ic_drop,    file: "mdi:water-percent",   resize: 36x36, type: BINARY }
  - { id: ic_mask,    file: "mdi:face-mask",       resize: 36x36, type: BINARY }
  - { id: ic_gauge,   file: "mdi:gauge",           resize: 36x36, type: BINARY }

# I2C bus for the on-board SHTC3 temperature/humidity sensor.
i2c:
  sda: GPIO13
  scl: GPIO14
  id: bus_a

# SPI bus for the RLCD panel.
spi:
  clk_pin: GPIO11
  mosi_pin: GPIO12

display:
  - platform: st7305_rlcd
    id: epaper
    model: WAVESHARE_400X300
    width: 400
    height: 300
    cs_pin: GPIO40
    dc_pin: GPIO5
    reset_pin: GPIO41
    data_rate: 1MHz
    update_interval: 1s
    lambda: |-
      // ========== Status bar (inverted: dark fill, light text/icons) ==========
      // Text lifted by font_s/4 ≈ 6 px above prior y=4, so y=-2 (icons stay at y=2).
      // ST7305 driver maps Color::WHITE → pixel ON (dark), Color::BLACK → pixel OFF (light).
      it.filled_rectangle(0, 0, 400, 28, Color::WHITE);

      if (id(ha_time).now().is_valid()) {
        it.strftime(5, -2, id(font_s), Color::BLACK, "%H:%M %d-%b", id(ha_time).now());
      }

      it.image(145, 2, id(ic_fire), Color::BLACK, Color::WHITE);
      it.printf(175, -2, id(font_s), Color::BLACK, "%s", id(ha_heater).state ? "ON" : "OFF");

      it.image(215, 2, id(ic_shower), Color::BLACK, Color::WHITE);
      it.printf(245, -2, id(font_s), Color::BLACK, "%s", id(ha_shower).state ? "ON" : "OFF");

      // WiFi signal strength: 4=excellent, 1=poor; falls back to 1 bar if no reading.
      {
        float rssi = id(wifi_rssi).state;
        if      (isnan(rssi))    it.image(290, 2, id(ic_wifi_1), Color::BLACK, Color::WHITE);
        else if (rssi >= -60)    it.image(290, 2, id(ic_wifi_4), Color::BLACK, Color::WHITE);
        else if (rssi >= -70)    it.image(290, 2, id(ic_wifi_3), Color::BLACK, Color::WHITE);
        else if (rssi >= -80)    it.image(290, 2, id(ic_wifi_2), Color::BLACK, Color::WHITE);
        else                     it.image(290, 2, id(ic_wifi_1), Color::BLACK, Color::WHITE);
      }

      it.image(320, 2, id(ic_batt_sm), Color::BLACK, Color::WHITE);
      if (!isnan(id(bat_level).state)) {
        it.printf(350, -2, id(font_s), Color::BLACK, "%.0f%%", id(bat_level).state);
      }

      // ========== Frame lines ==========
      it.line(0, 28, 400, 28);
      it.line(0, 164, 400, 164);
      it.line(200, 28, 200, 300);

      // ========== TL: Outdoor TODAY — same shape as BL, font_m ==========
      it.image(5, 32, id(ic_sun_sm));

      it.image(50, 36, id(ic_thermo));
      if (!isnan(id(ha_outdoor_temp).state)) {
        it.printf(90, 34, id(font_m), "%.1f", id(ha_outdoor_temp).state);
      }

      it.image(5, 80, id(ic_drop));
      if (!isnan(id(ha_outdoor_hum).state)) {
        it.printf(45, 78, id(font_m), "%.1f%%", id(ha_outdoor_hum).state);
      }

      it.image(5, 124, id(ic_wind_sm));
      if (!isnan(id(ha_outdoor_wind).state)) {
        it.printf(45, 122, id(font_m), "%.0f km/h", id(ha_outdoor_wind).state);
      }

      // ========== TR: PM2.5 + Pressure ==========
      it.image(208, 38, id(ic_mask));
      if (!isnan(id(ha_outdoor_pm25).state)) {
        it.printf(250, 32, id(font_l), "%.0f", id(ha_outdoor_pm25).state);
      }
      it.printf(330, 40, id(font_s), "PM2.5");

      it.image(208, 108, id(ic_gauge));
      if (!isnan(id(ha_indoor_pressure).state)) {
        it.printf(250, 108, id(font_m), "%.0f hPa", id(ha_indoor_pressure).state);
      }

      // ========== BL: Outdoor TOMORROW — order: temp, hum, wind ==========
      it.image(5, 168, id(ic_sun_sm));

      it.image(50, 172, id(ic_thermo));
      if (!isnan(id(ha_outdoor_temp_tom).state)) {
        it.printf(90, 170, id(font_m), "%.1f", id(ha_outdoor_temp_tom).state);
      }

      it.image(5, 216, id(ic_drop));
      if (!isnan(id(ha_outdoor_hum_tom).state)) {
        it.printf(45, 214, id(font_m), "%.1f%%", id(ha_outdoor_hum_tom).state);
      }

      it.image(5, 260, id(ic_wind_sm));
      if (!isnan(id(ha_outdoor_wind_tom).state)) {
        it.printf(45, 258, id(font_m), "%.0f km/h", id(ha_outdoor_wind_tom).state);
      }

      // ========== BR: Indoor — order: temp, hum, air quality (PM2.5) ==========
      it.image(208, 168, id(ic_home));

      it.image(248, 172, id(ic_thermo));
      if (!isnan(id(shtc3_temp).state)) {
        it.printf(288, 170, id(font_m), "%.1f", id(shtc3_temp).state);
      }

      it.image(208, 216, id(ic_drop));
      if (!isnan(id(shtc3_hum).state)) {
        it.printf(248, 214, id(font_m), "%.1f%%", id(shtc3_hum).state);
      }

      it.image(208, 260, id(ic_mask));
      if (!isnan(id(ha_indoor_pm25).state)) {
        it.printf(248, 258, id(font_m), "%.0f", id(ha_indoor_pm25).state);
      }
      it.printf(330, 268, id(font_s), "PM2.5");

sensor:
  # On-board Sensirion SHTC3 over I2C
  - platform: shtcx
    i2c_id: bus_a
    address: 0x70
    update_interval: 60s
    temperature:
      name: "Temperature"
      id: shtc3_temp
      accuracy_decimals: 2
      filters:
        - offset: -2.0
    humidity:
      name: "Humidity"
      id: shtc3_hum
      accuracy_decimals: 1

  # 18650 battery voltage via 3x divider on GPIO4
  - platform: adc
    id: bat_voltage
    name: "Battery Voltage"
    pin: GPIO4
    attenuation: 12db
    update_interval: 60s
    filters:
      - multiply: 3.0

  - platform: copy
    source_id: bat_voltage
    id: bat_level
    name: "Battery Level"
    unit_of_measurement: "%"
    filters:
      - calibrate_linear:
          - 2.5 -> 0.0
          - 4.2 -> 100.0
      - clamp:
          min_value: 0
          max_value: 100

  - platform: internal_temperature
    name: "Internal Temperature"
    id: internal_temp
    update_interval: 60s

  - platform: wifi_signal
    name: "WiFi Signal"
    id: wifi_rssi
    update_interval: 60s

  - platform: uptime
    name: "Uptime"
    id: uptime_s

  # ---- Pulled from Home Assistant ----
  - platform: homeassistant
    id: ha_outdoor_temp
    entity_id: input_number.ink_outdoor_temp
  - platform: homeassistant
    id: ha_outdoor_hum
    entity_id: input_number.ink_outdoor_hunidity
  - platform: homeassistant
    id: ha_outdoor_wind
    entity_id: input_number.ink_outdoor_wind
  - platform: homeassistant
    id: ha_outdoor_pm25
    entity_id: input_number.ink_outdoor_air_quality
  - platform: homeassistant
    id: ha_outdoor_temp_tom
    entity_id: input_number.ink_outdoor_temp_tomorrow
  - platform: homeassistant
    id: ha_outdoor_hum_tom
    entity_id: input_number.ink_outdoor_hunidity_tomorrow
  - platform: homeassistant
    id: ha_outdoor_wind_tom
    entity_id: input_number.ink_outdoor_wind_tomorrow
  - platform: homeassistant
    id: ha_indoor_pressure
    entity_id: input_number.ink_indoor_presure
  - platform: homeassistant
    id: ha_indoor_pm25
    entity_id: input_number.ink_indoor_air_quality

text_sensor:
  - platform: wifi_info
    ip_address:
      name: "IP Address"
      id: ip_addr
    ssid:
      name: "Connected SSID"
      id: ssid_name

binary_sensor:
  - platform: gpio
    name: "Boot Button"
    pin:
      number: GPIO0
      inverted: true
      mode: INPUT
  - platform: gpio
    name: "Key Button"
    pin:
      number: GPIO18
      inverted: true
      mode: INPUT

  # ---- Pulled from Home Assistant ----
  - platform: homeassistant
    id: ha_heater
    entity_id: input_boolean.ink_heater
  - platform: homeassistant
    id: ha_shower
    entity_id: input_boolean.ink_water_heater

# Speaker amplifier enable (kept ON; toggle from HA if you want to mute)
switch:
  - platform: gpio
    name: "Speaker Enable"
    pin: GPIO46
    restore_mode: RESTORE_DEFAULT_ON

# I2S bus shared with the ES8311 codec on the board
i2s_audio:
  - id: i2s_shared
    i2s_lrclk_pin: GPIO45
    i2s_bclk_pin: GPIO9
    i2s_mclk_pin: GPIO16

audio_dac:
  - platform: es8311
    id: es8311_dac
    bits_per_sample: 16bit
    sample_rate: 16000

speaker:
  - platform: i2s_audio
    id: rlcd_speaker
    i2s_audio_id: i2s_shared
    i2s_dout_pin: GPIO8
    dac_type: external
    audio_dac: es8311_dac
    channel: left
    sample_rate: 16000
    bits_per_sample: 16bit
    buffer_duration: 100ms
    timeout: never

media_player:
  - platform: speaker
    id: rlcd_media_player
    name: "Ink-Panel Speaker"
    announcement_pipeline:
      speaker: rlcd_speaker
      format: FLAC
      sample_rate: 48000
      num_channels: 1
EXPLANATIONS
For better understanding, let’s review the logic behind each block of the code.
ESP32-S3 & PSRAM
esp32:
  board: esp32-s3-devkitc-1
  framework:
    type: esp-idf

psram:
  mode: octal
speed: 80MHz- This identifies your device in the ESPHome dashboard. We use the ESP-IDF framework instead of the default Arduino. This is a “pro” move—it provides better support for the ESP32-S3’s advanced features, especially its memory and audio capabilities.
- The ESP32-S3 has extra “Pseudo-RAM” (PSRAM) outside the main chip. Because driving a high-resolution display requires a large “framebuffer” (a map of every pixel), we enable Octal PSRAM. This provides the high-speed data throughput needed to render the screen without the ESP32 crashing from memory exhaustion.
Security & Remote Management
logger:

api:
  encryption:
    key: "SOME_KEY"

ota:
  - platform: esphome
    password: "SOME_KEY"
API Encryption Key
The api: encryption: key is a Base64-encoded 32-byte string.
Auto-Generation: When you click “New Device” in the dashboard, ESPHome generates a random string.
The Purpose: It encrypts the “Native API” traffic between Home Assistant and your ESP32. Without this key, Home Assistant won’t be allowed to talk to the panel.
Pro-Tip: If you lose this key and it’s already flashed to the device, you’ll have to re-flash the chip via USB to get back in, as Home Assistant will be “locked out” of the encrypted communication.
OTA Password
The ota: password is a standard plaintext string used for Over-The-Air updates.
Auto-Generation: Much like the API key, the dashboard usually throws a random string in here during the initial setup.
The Purpose: It prevents someone else on your WiFi network from hijacking your device and flashing their own malicious firmware onto it.
Manual Choice: You can change this to any password you like (e.g.,
"MySuperSecret123"), but the auto-generated ones are usually more secure because they are high-entropy gibberish.
Network & Connectivity
wifi:
  ssid: !secret wifi_ssid
  password: !secret wifi_password
  use_address: DEVICE_IP
  ap:
    ssid: "Ink-Panel Fallback Hotspot"
    password: "SOME_PASSWORD"

captive_portal:
Static IP: We use a fixed address (DEVICE_IP) to ensure Home Assistant always knows exactly where to find the panel.
⚠️ Don’t forget to make that address static in your home DHCP server config, or use an address from a range excluded from your DCHP server config.
AP & Captive Portal: If your home WiFi dies, the panel will start its own WiFi network. When you connect to it with your phone, a setup page (Captive Portal) will automatically pop up to help you fix the connection.
Custom Display Drivers
external_components:
  - source: github://kylehase/ESPHome-ST7305-RLCD
    components: [st7305_rlcd]
The ST7305 driver for Reflective LCDs isn’t built into ESPHome yet. This block tells ESPHome to “reach out” to GitHub, download the custom driver code, and compile it into your firmware.
Time & Typography
time:
  - platform: homeassistant
    id: ha_time

font:
  - file: "gfonts://Roboto"
    id: font_s
    size: 24
    glyphs: "..."
Time: Pulls the current time from Home Assistant to drive the status bar clock.
Font: Downloads the “Roboto” font. Because ESP chips have limited storage, we use
glyphsto tell ESPHome only to save the specific characters we need (numbers, letters, degree symbols), rather than the entire alphabet in every language.
Visual Assets (Icons)
image:
  - { id: ic_fire,    file: "mdi:fire",            resize: 24x24, type: BINARY }
  ...
This block pulls Material Design Icons (MDI) and bakes them into the firmware. We use type: BINARY because the e-paper display only has two states: pixel ON or pixel OFF. We also pre-resize them here so the ESP32 doesn’t have to waste processing power scaling them during runtime.
Hardware Communication Buses
i2c:
  sda: GPIO13
  scl: GPIO14
  id: bus_a

spi:
  clk_pin: GPIO11
  mosi_pin: GPIO12
These are the “nervous system” of the board.
I2C: Used for the temperature/humidity sensor.
SPI: High-speed data bus used specifically to push the image data to the RLCD panel.
The UI Engine (Display Lambda)
display:
  - platform: st7305_rlcd
    ...
    lambda: |-
      it.filled_rectangle(0, 0, 400, 28, Color::WHITE);
      if (id(ha_time).now().is_valid()) {
        it.strftime(5, -2, id(font_s), Color::BLACK, "%H:%M %d-%b", id(ha_time).now());
      }
      ...
This is where the actual drawing happens. Every second, this C++ code runs to refresh the screen.
Color Inversion: In this driver,
Color::WHITEcreates a dark pixel. We draw a “white” rectangle to create a dark status bar at the top.Status Indicators: It checks if the heater and shower are “ON” in HA and prints that text.
Dynamic WiFi: It looks at the
rssi(signal strength) and picks the correct icon (1–4 bars) to show your connection quality.
Local Environmental Sensors
sensor:
  - platform: shtcx
    i2c_id: bus_a
    address: 0x70
    update_interval: 60s
    temperature:
      id: shtc3_temp
      filters:
        - offset: -2.0
This reads the physical SHTC3 sensor on your board. We use an offset: -2.0 because the ESP32 chip generates a little bit of heat inside the case; this subtraction gives us the “true” room temperature.
Battery & System Health
- platform: adc
    pin: GPIO4
    filters:
      - multiply: 3.0

  - platform: copy
    source_id: bat_voltage
    id: bat_level
    filters:
      - calibrate_linear:
          - 2.5 -> 0.0
- 4.2 -> 100.0- ADC: Reads the voltage of your 18650 battery. Since the battery voltage is higher than what the ESP32 can handle, a hardware “voltage divider” is used. We
multiply: 3.0to get back to the original battery voltage. - Battery Level: This “Copy” sensor takes the voltage (e.g., 3.7V) and mathematically maps it to a percentage (0–100%) so it’s easy to read on the screen.
Home Assistant Data “Pull”
- platform: homeassistant
    id: ha_outdoor_temp
    entity_id: input_number.ink_outdoor_temp
These blocks tell the panel to “listen” to Home Assistant. Home Assistant “pushes” that new value to the panel over the API. It’s a very common point of confusion when you first start with ESPHome because of double ID usage:
id: The “Internal” Name
It is a reference name used only inside your YAML code.
Scope: Only exists on the ESP32 chip.
Purpose: It allows other parts of your code (like the
displayorlambdablocks) to find and use that sensor’s data.Usage: You see this used in your display logic as
id(ha_outdoor_temp).state.
If you didn’t give it an id, you wouldn’t be able to tell the LCD screen to print that specific value.
entity_id: The “External” Source
The entity_id is the name of the sensor as it exists inside Home Assistant.
Scope: Exists on your Home Assistant server.
Purpose: It tells ESPHome exactly which “bin” of data to reach into and pull information from.
Usage: You find this in Home Assistant under Settings > Entities. It usually starts with a domain like
sensor.orinput_number..
Interactive Buttons
binary_sensor:
  - platform: gpio
    name: "Key Button"
    pin:
      number: GPIO18
      inverted: true
      mode: INPUT
These monitor the physical buttons on the side of your panel. inverted: true is used because these buttons pull the signal to “Ground” when pressed. You can use these buttons in HA to trigger automations, like cycling through different display screens.
⚠️ The device has 3 buttons on the top of its screen, but only two (left and right) are available for programming; the middle button is locked for the device’s power-off/on function.
The Audio Stack (Speaker & Media)
i2s_audio:
  - id: i2s_shared
    i2s_lrclk_pin: GPIO45
    i2s_bclk_pin: GPIO9
    i2s_mclk_pin: GPIO16

audio_dac:
  - platform: es8311
    id: es8311_dac

media_player:
  - platform: speaker
    id: rlcd_media_player
This turns your display into a smart speaker.
I2S & DAC: This sets up the high-quality digital audio highway and the ES8311 chip that converts digital bits into sound waves.
Media Player: This allows the panel to show up in Home Assistant as a
media_playerentity. You can now use the TTS (Text-to-Speech) feature in HA to make your panel say things like “Intruder detected” or “Laundry is finished!”
As you can see, you have a lot of places for further experiments with this small device.
Home Assistant Integration Trick
Adding ESPHome devices to Home Assistant is pretty straightforward with its ESPHome integration in Devices & Services section, but linking Home Assistant entities to an ESPHome display has two options.
Option 1 —just pasting the direct entity_id (like sensor.living_room_temperature_zigbee) into your ESPHome YAML—is incredibly tempting. It’s fast, it’s easy, and it works immediately.
Option 2 — Adding an additional layer with helpers between HA and ESPHome devices.
So, if you look closely at the Ink-Panel code we just reviewed, you’ll notice Option 2 was used: creating “Helpers” (like input_number.ink_outdoor_temp) and using HA automations to update them.
Why go through this extra effort? Because in a mature, evolving smart home, Option 2 is the ultimate “Pro-Move.” Here is the deep dive into why adding that helper layer will save you hours of headaches down the road.
The “Bulletproof” Abstraction Layer (Future-Proofing)
Imagine it’s the middle of winter, and the cheap Zigbee temperature sensor on your patio dies. You buy a new Wi-Fi sensor to replace it.
If you used Option 1 (Direct Link): The new sensor has a new
entity_id(e.g.,sensor.patio_temp_wifi). To fix your wall panel, you have to open ESPHome, edit the YAML, wait 5 minutes for it to recompile the firmware, and flash it over the air (hoping the connection doesn’t drop).If you used Option 2 (Helpers): Your panel is only looking at
input_number.ink_outdoor_temp. You don’t have to touch ESPHome at all. You simply go into Home Assistant, update your automation to say “feed the new Wi-Fi sensor data into this helper,” and you’re done in 15 seconds.
Helpers act as a permanent, stable “bridge.” The hardware behind the scenes can change a hundred times, but your ESPHome panel never needs to know.
Data Grooming and “Sanitization”
ESPHome screens (especially e-paper displays using C++ lambdas) can be incredibly fragile when fed unexpected data.
What happens if your real outdoor sensor briefly disconnects and reports its state as unavailable or unknown? If that string of text gets pushed directly to an ESPHome widget expecting a number, it can break your UI layout, cause a visual glitch, or even crash the display loop.
By using an automation to feed a Helper, Home Assistant acts as a data filter:
You can tell the automation: “If the real sensor goes offline, don’t update the Helper. Just keep showing the last known temperature.”
You can round numbers (e.g., turning
21.456°Cinto a clean21.5°C) before it ever reaches the panel.
The Power of “Aggregated” Data
Often, the data you want on your dashboard isn’t from just one sensor.
Let’s say you have three temperature sensors in your living room. Instead of picking just one to display on your panel, you can use a Min/Max Helper in Home Assistant to calculate the average temperature of the room. You then feed that single “Average” helper to ESPHome.
You’ve suddenly upgraded your panel from displaying a single point of data to displaying rich, calculated environmental metrics.
Keeping the Brains in the Right Place
There is a golden rule in DIY smart home architecture: Keep the logic in the server, and let the displays just be displays.
Home Assistant is designed for complex logic. It has a beautiful UI for automations, instant reloading, and powerful Jinja2 templating. ESPHome, on the other hand, requires writing C++ inside YAML and recompiling the entire operating system every time you want to make a tiny logical tweak.
By using Helpers, you offload all the heavy lifting to Home Assistant.
[!TIP] The Quick Setup Guide:
Go to HA -> Settings -> Devices & Services -> Helpers.
Create an Input Number (for temps/humidity) or Input Boolean (for switches).
Create a simple HA Automation:
Trigger: State change on your “Real” sensor.
Action: Call Service
input_number.set_valueand push that state to your new Helper.Point ESPHome strictly at the Helper.
Conclusion
Now you have a good starting point for ESPHome journey, and can enhance the provided example with your preferred AI.
Using the following solution, you can easily ask Claude to write ESPHome YAML code, check logs and fix bugs.
Claude Code Inside Home Assistant: Adding AI to Your VS Code Ingress Panel