Most home network guides stop at “install Pi-hole or AdGuard Home on your Raspberry Pi and point your router at it” — and for a basic single-LAN setup, that’s genuinely good advice. The problems start when your network grows: a second router segment, IoT devices that need stable local hostname resolution, or simply the realisation that a single DNS instance is a single point of failure. Pi-hole and AdGuard Home both hit a hard ceiling here. Neither was designed to run as a true primary/secondary pair — you can spin up two instances, but they don’t replicate zones between them, so you end up manually keeping two configs in sync. Neither can automatically pick up hostnames from an external DHCP server like MikroTik, so your nas.lan or homeassistant.lan records only exist if you added them by hand. And neither has a built-in recursive resolver, meaning if your upstream DNS goes down, local resolution goes with it.
Why Technitium DNS
Technitium DNS Server is built differently — it’s a full authoritative and recursive DNS server first, with ad blocking added on top, rather than a DNS blocker gradually growing into a real DNS server. That distinction matters when you need two instances that stay in sync automatically via zone transfers, a recursive resolver that keeps working even when your ISP has a bad morning, and a REST API solid enough to wire into MikroTik’s DHCP lease scripts — so every device that picks up an IP address automatically gets a resolvable hostname in your local zone, with no manual records to maintain. The same REST API connects cleanly to Home Assistant, turning query rates, blocked request counts, and server health into HA sensors you can alert on just like any other device in your home.
This article walks through the complete setup: two Technitium instances running in Docker, zone replication configured between them, MikroTik DHCP lease scripts that register and remove hostnames automatically, and the Home Assistant HASC integration that surfaces both servers as monitored entities. By the end you’ll have a resilient local DNS setup where homeassistant.lan, printer.lan, and every other DHCP-assigned device resolves consistently across your whole network — and Home Assistant will tell you if either DNS server stops doing its job.
The table below compares Technitium, AdGuardHome, and Pi-Hole features:
| AdGuard Homego · single binary | Pi-holephp/c · classic | Technitiumc# / .net · full DNS | |
|---|---|---|---|
| Core purpose | |||
| Primary role | Ad/tracker blocker | Ad/tracker blocker | Full DNS server + blocker |
| Open source | ✓ AGPLv3 | ✓ EUPL | ✓ GPLv3 |
| Ease of setup | ✓✓✓single binary, guided wizard | ✓✓✓one-line install script | ✓✓needs .NET runtime |
| Resource usage | low | low | moderate |
| Platform support | Linux, Windows, macOS, FreeBSD, Docker | Linux (Debian/Ubuntu/Fedora), Docker | Linux, Windows, macOS, Docker |
| DNS server features | |||
| Recursive resolver (built-in) | ✗uses upstream | ~via Unbound addon | ✓fully recursive, no upstream needed |
| Authoritative DNS zones | ✗ | ✗ | ✓full zone management |
| DNSSEC validation | ✓via upstream | ✓via upstream | ✓built-in, signing too |
| DNS rewrites / custom records | ✓ | ✓local DNS entries | ✓full record types |
| Encrypted DNS — serve to clients | |||
| Serve DNS-over-HTTPS (DoH) | ✓built-in | ✗ | ✓ |
| Serve DNS-over-TLS (DoT) | ✓ | ✗ | ✓ |
| Serve DNS-over-QUIC (DoQ) | ✓ | ✗ | ✓ |
| Use encrypted upstream | ✓DoH/DoT/DoQ/DNSCrypt | ~via cloudflared/stubby | ✓DoH/DoT/DoQ |
| Blocking & filtering | |||
| Ad/tracker blocking | ✓ | ✓ | ✓ |
| Blocklist management | ✓built-in subscriptions | ✓Gravity, excellent | ✓app-store lists |
| Per-client rules | ✓excellent granularity | ✓groups | ~limited |
| Parental controls / SafeSearch | ✓built-in SafeSearch, adult filter | ~via blocklists only | ~via blocklists only |
| Regex-based blocking | ✓ | ✓ | ✓ |
| Network & management | |||
| DHCP server | ✓ | ✓ | ✓ |
| Query logs & statistics | ✓good dashboards | ✓excellent FTL database | ✓ |
| REST API | ✓ | ✓ | ✓ |
| Web UI quality | Modern, polished | Mature, feature-rich | Functional, utilitarian |
| Docker support | ✓ | ✓ | ✓ |
| Best suited for | |||
| Ideal use case | Home network, Raspberry Pi, need encrypted DNS server | Home network, strong stats, large community | Homelab / split-horizon DNS, internal zones, full control |
Architecture Diagram
Your router — whether that’s MikroTik or OpenWrt — sits between the internet and everything else, handling both the WAN connection and the DHCP server role for the LAN. Everything inside the dashed rectangle is on your local network: the two Technitium instances, Home Assistant, and your client devices never touch the internet directly — all external traffic routes through the router as a gateway.
Two DNS servers, always in sync
The two Technitium instances (primary and secondary) run as Docker containers inside the LAN. The blue double-headed arrow between them is the most important relationship in the whole setup — that’s the zone transfer, which keeps both servers in sync automatically. When a new DNS record appears on the primary, the secondary picks it up without any manual intervention. Both servers are always authoritative for your local zone, and either one can answer queries correctly even if the other goes down.
Automatic hostname registration via DHCP lease script
The teal arrow from the router into Technitium primary represents the DHCP lease script. Every time a device connects to your network and receives an IP address, the router fires a small script that calls Technitium’s REST API and registers that device’s hostname as a DNS record. No static entries, no manual updates — devices are resolvable by name within seconds of connecting.
Home Assistant integration
Home Assistant connects to both Technitium instances separately via the same REST API, pulling query statistics and server health as sensors. This lets you build automations or dashboard cards that alert you if either DNS server stops responding — treating your DNS infrastructure the same way you’d treat any other monitored device in your home.
Client failover
The router’s DHCP server hands out both Technitium IPs to every client on the network — a one-line change in your DHCP pool configuration. If the primary is unreachable, clients automatically fall back to the secondary with no manual steps and no noticeable interruption.
Primary DNS Configuration
Docker Compose Config
Let’s start from necessary folders creation:
sudo mkdir -p /opt/technitium/config
sudo mkdir -p /opt/technitium/logs/
Next, create your docker-compose.yml file:
services:
  dns-server:
    container_name: dns-server
    hostname: dns-server
    image: docker.io/technitium/dns-server:latest
    ports:
      - "5380:5380/tcp"    # web console + REST API
      - "53443:53443/tcp"  # clustering (node-to-node TLS)
      - "53:53/udp"        # DNS
      - "53:53/tcp"        # DNS
      # - "853:853/udp"    # DNS-over-QUIC  — uncomment for encrypted DNS to clients
      # - "853:853/tcp"    # DNS-over-TLS   — uncomment for encrypted DNS to clients
    environment:
      - DNS_SERVER_DOMAIN=dns-server
      - DNS_SERVER_ADMIN_PASSWORD=change-me
      - DNS_SERVER_RECURSION=AllowOnlyForPrivateNetworks
      - DNS_SERVER_ENABLE_BLOCKING=true
      - DNS_SERVER_LOG_USING_LOCAL_TIME=true
      - DNS_SERVER_LOG_FOLDER_PATH=/var/log/technitium/dns
      # - DNS_SERVER_BLOCK_LIST_URLS=https://raw.githubusercontent.com/StevenBlack/hosts/master/hosts
      # - DNS_SERVER_STATS_MAX_STAT_FILE_DAYS=90
    volumes:
      - /opt/technitium/config:/etc/dns
      - /opt/technitium/logs:/var/log/technitium/dns
    restart: unless-stopped
    sysctls:
      - net.ipv4.ip_local_port_range=1024 65535
⚠️Don’t forget to change your admin password, stop you existing DNS server, and run your Technitium DNS:
docker compose up -dInitial config
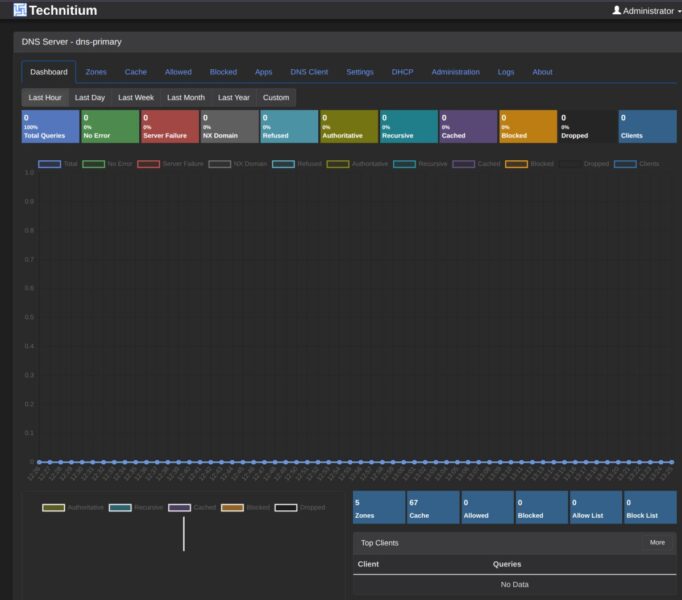
After login, you’ll see the empty dashboard:
First, let’s add your home zone — lan, home, or any other name you prefer, just not local. It’s not forbidden, but most modern client operating systems implement RFC 6762 and treat .local queries differently at the OS level: instead of sending a normal unicast DNS query to your server, they try mDNS first (multicast to 224.0.0.251), wait for a response, and only fall back to unicast DNS after a timeout — typically 2–5 seconds. On a network with no mDNS responder, that timeout always fires, making every .local lookup noticeably slow.
Navigate to the Zones tab and add your static hosts.
If you switch to the Logs tab and try to query your logs, you’ll see an error like the one below — the query logging plugin isn’t installed yet:
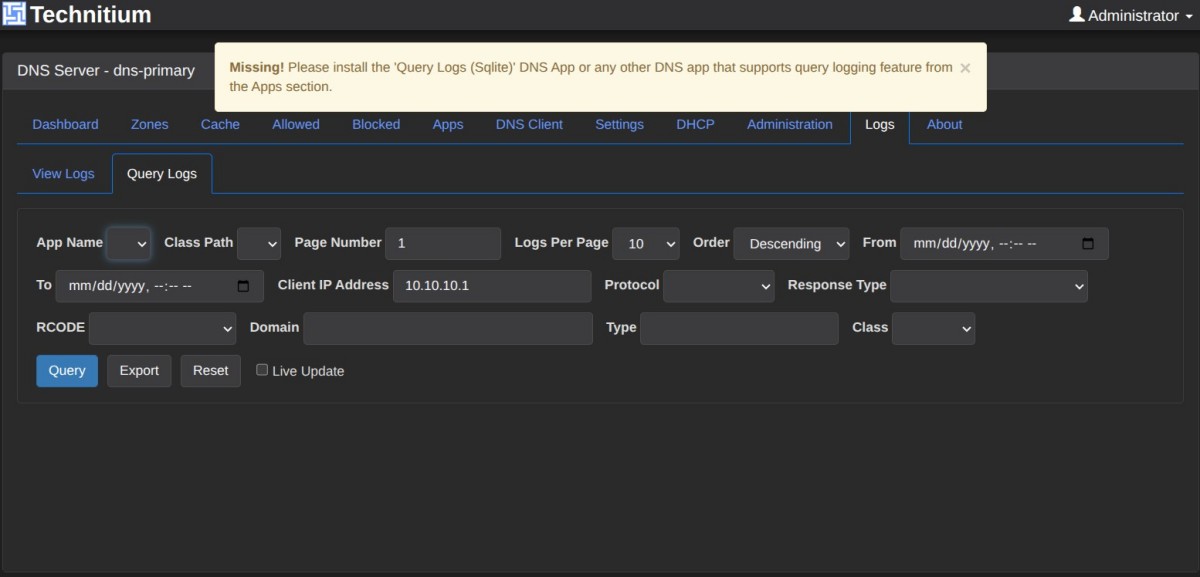
To fix this, go to the Apps tab, click App Store, scroll through the list in the panel that opens, and install Query Logs (SQLite).
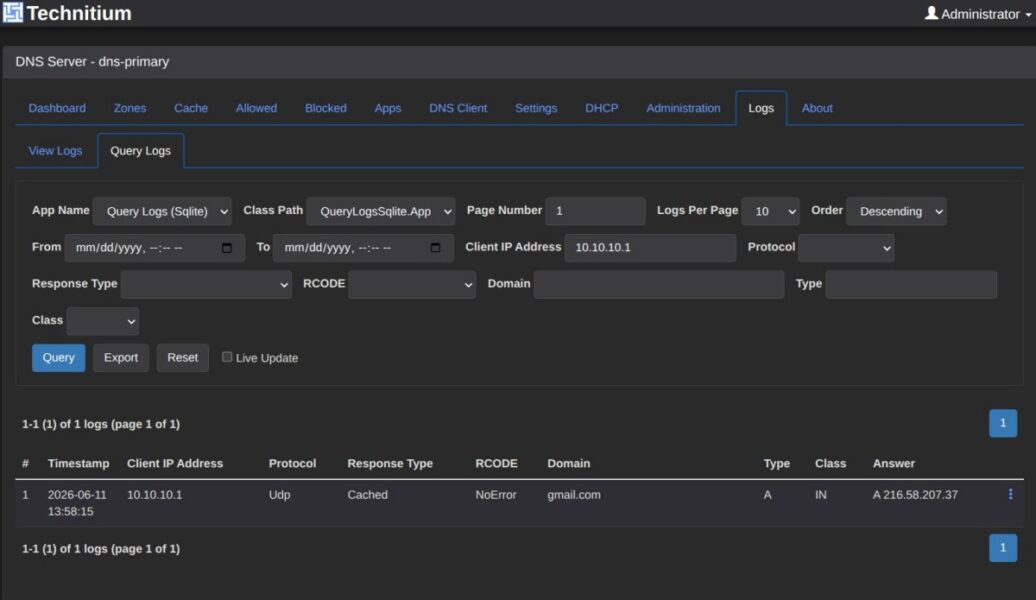
Once installed, head back to the Logs tab and run your query again — you should see something like this:
Blocking is already enabled via DNS_SERVER_ENABLE_BLOCKING=true in the compose file — all that’s left is adding the actual lists. Navigate to Settings → Blocking and scroll down to the Allow / Block List URLs field.
The easiest way to add lists is through the Quick Add dropdown, which gives you a pre-built selection of well-known blocklists by name rather than requiring you to hunt down URLs manually. Pick one from the dropdown and click Save — and here’s where the interface behaves unexpectedly: you can only add one list per save. After saving, scroll back down, open Quick Add again, select the next list, and save again. It takes a few extra clicks but there’s no way around it — attempting to add multiple URLs before saving will overwrite your previous selection rather than append to it.
While you’re here, check the Blocking Type — NX Domain is the recommended option and should already be selected. It returns a clean non-existent domain response for blocked names rather than a fake IP, which avoids browser HTTPS warnings on blocked domains.
Once all your lists are saved, Technitium downloads and processes them immediately. The Blocked tab in the main navigation is separate — that’s for manually blocking individual domains on the spot, not for managing subscribed lists.
Secondary DNS Configuration
Exactly Repeat docker config steps from Primary DNS configuration to start the Secondary one.
⚠️ NO OTHER config is needed because of further cluster configuration.
Cluster Configuration
Primary Node Config
Head back to your primary DNS web-interface and navigate to “Administration” -> “Cluster”, click “Initialize”, and choose “New Cluster”.
Now, configure your Primary Cluster Node and click “Initialize”.
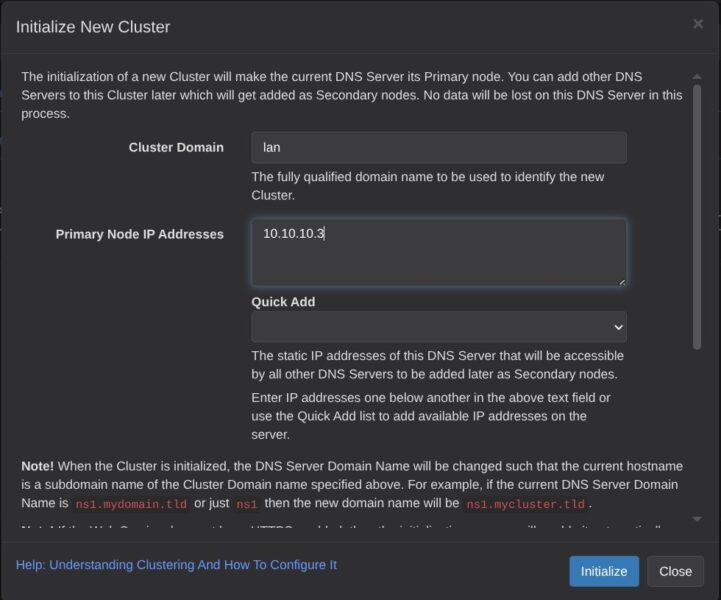
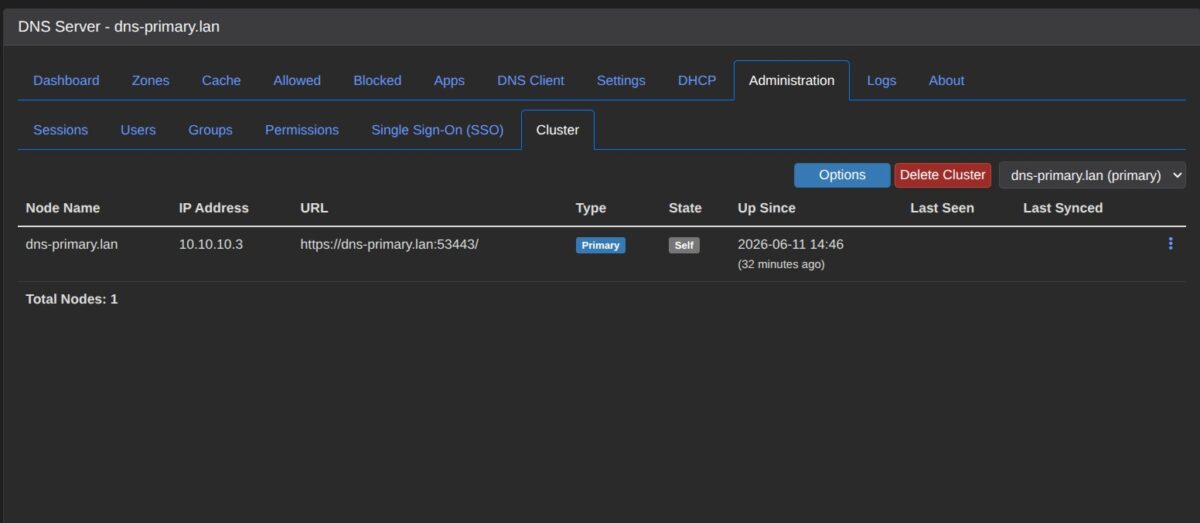
As a result, you should see the following Primary Cluster parameters. Please pay your attention to URL, it will be needed for the secondary node config:
Secondary Node Config
Head back you your secondary DNS web-interface and navigate to “Administration” -> “Cluster”, click “Initialize”, and choose “Join Cluster”.
Now, configure your Secondary Cluster Node and click “Join”.
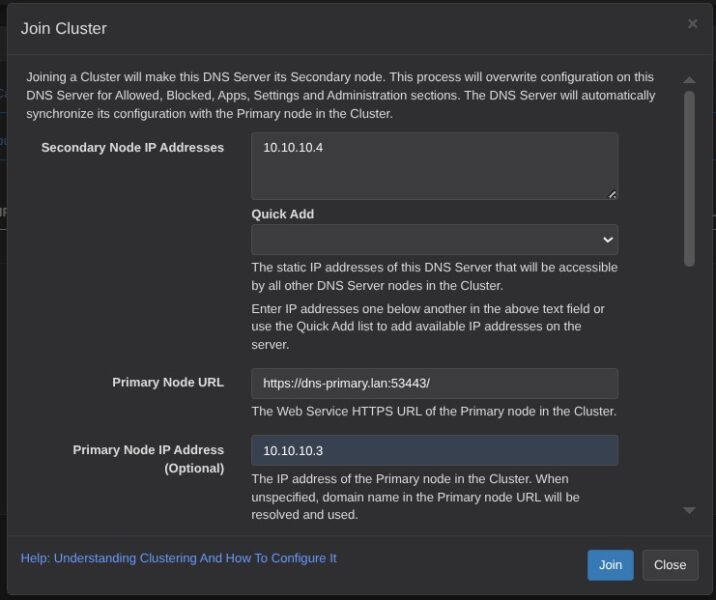
⚠️ URL and IP of you Primary node is needed because your Secondary node isn’t configured and can’t resolve that URL.
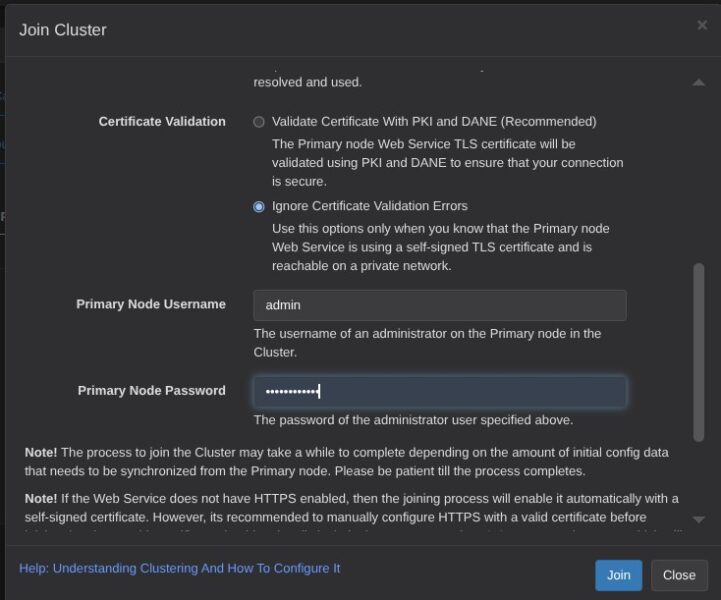
Ignore Certificate Validation Errors is the right option, because Technitium generates a self-signed certificate for the connection between nodes.
As the result you should see the following window:
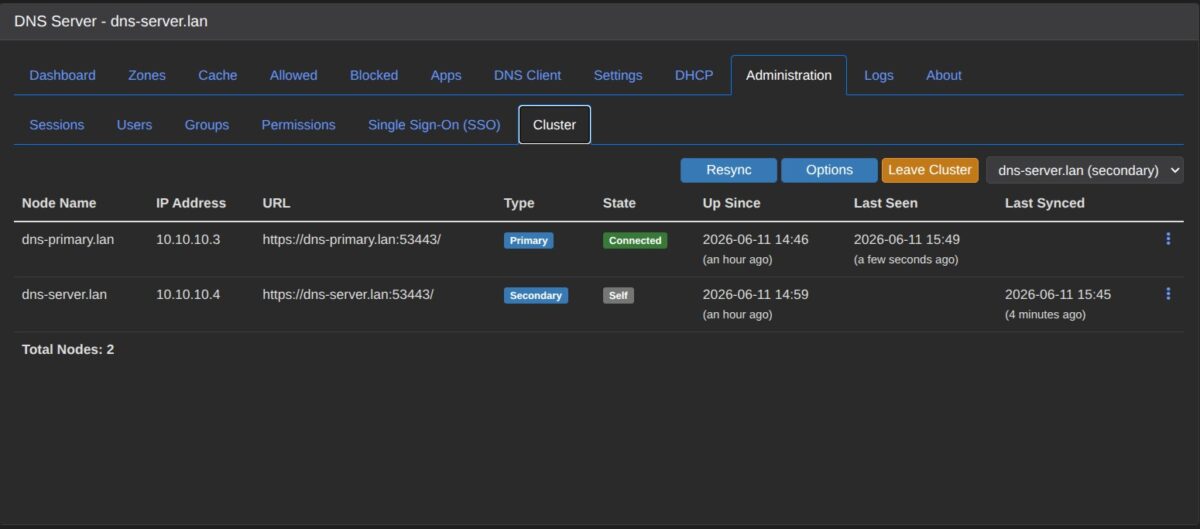
Now you can check that all settings are duplicated from the Primary node to the Secondary one.
MikroTik Router Configuration to update DNS with DHCP records
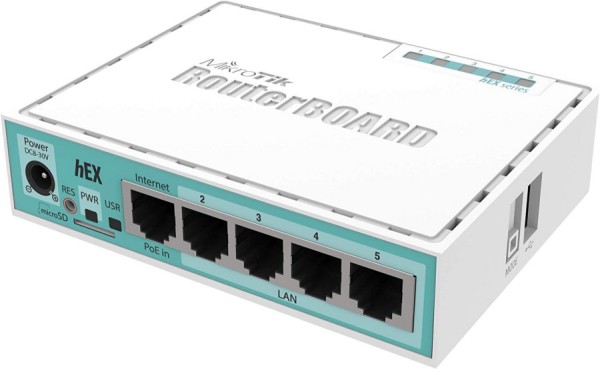
I would recommend Mikrotik hEX router for home network because of it’s reach functionality and very attractive price.
This article contains affiliate links. As an Amazon Associate, I earn from qualifying purchases.
Before writing the script, you need an API token in Technitium — go to Administration → Sessions → Create Token, give it a name like mikrotik-dhcp, and copy the token. Using a token is safer than putting your admin password in a router script.
Open Winbox and navigate to IP → DHCP Server. Double-click your DHCP server entry to open its full settings, then scroll to the bottom where you’ll find the Script section with the Lease Script field.
Paste the script below into that field, replacing YOUR-API-TOKEN-HERE with the token you just created and adjusting DNS_SERVER_IP to match your primary Technitium server’s IP:
:local dnsServer "DNS_SERVER_IP"
:local dnsPort "5380"
:local dnsToken "YOUR-API-TOKEN-HERE"
:local dnsDomain "lan"
:local ttl "300"

:local clientIP $leaseActIP
:local clientMAC $leaseActMAC

# Look up comment by MAC — reliable in both assign and deassign contexts
:local leaseComment ""
:do {
    :set leaseComment [/ip dhcp-server lease get [find where mac-address=$clientMAC] comment]
} on-error={}

# Priority: lease comment > device-sent hostname > skip
:local clientHostname ""
:if ([:len $leaseComment] > 0) do={
    :set clientHostname $leaseComment
} else={
    :if ([:typeof $"lease-hostname"] = "str") do={
        :set clientHostname $"lease-hostname"
    }
}

:if ([:len $clientHostname] > 0) do={
    :local fqdn ($clientHostname . "." . $dnsDomain)
    :local apiBase ("http://" . $dnsServer . ":" . $dnsPort . "/api/zones/records/")

    # Build reverse PTR domain from IP octets
    :local dot1 [:find $clientIP "."]
    :local oct1 [:pick $clientIP 0 $dot1]
    :local r1 [:pick $clientIP ($dot1 + 1) [:len $clientIP]]
    :local dot2 [:find $r1 "."]
    :local oct2 [:pick $r1 0 $dot2]
    :local r2 [:pick $r1 ($dot2 + 1) [:len $r1]]
    :local dot3 [:find $r2 "."]
    :local oct3 [:pick $r2 0 $dot3]
    :local oct4 [:pick $r2 ($dot3 + 1) [:len $r2]]
    :local ptrDomain ($oct4 . "." . $oct3 . "." . $oct2 . "." . $oct1 . ".in-addr.arpa")

    :if ($leaseBound = 1) do={
        :do {
            /tool fetch url=($apiBase . "add?token=" . $dnsToken . "&domain=" . $fqdn . "&type=A&ipAddress=" . $clientIP . "&ttl=" . $ttl . "&overwrite=true") output=none
            :log info ("DHCP DNS: registered " . $fqdn . " -> " . $clientIP)
        } on-error={
            :log error ("DHCP DNS: failed to register " . $fqdn . " -> " . $clientIP)
        }
        :do {
            /tool fetch url=($apiBase . "add?token=" . $dnsToken . "&domain=" . $ptrDomain . "&type=PTR&ptrName=" . $fqdn . "&ttl=" . $ttl . "&overwrite=true") output=none
            :log info ("DHCP DNS: registered PTR " . $ptrDomain . " -> " . $fqdn)
        } on-error={
            :log error ("DHCP DNS: failed to register PTR " . $ptrDomain . " -> " . $fqdn)
        }
    } else={
        :do {
            /tool fetch url=($apiBase . "delete?token=" . $dnsToken . "&domain=" . $fqdn . "&type=A&ipAddress=" . $clientIP) output=none
            :log info ("DHCP DNS: removed " . $fqdn . " (" . $clientIP . ")")
        } on-error={
            :log error ("DHCP DNS: failed to remove " . $fqdn . " (" . $clientIP . ")")
        }
        :do {
            /tool fetch url=($apiBase . "delete?token=" . $dnsToken . "&domain=" . $ptrDomain . "&type=PTR&ptrName=" . $fqdn) output=none
            :log info ("DHCP DNS: removed PTR " . $ptrDomain)
        } on-error={
            :log error ("DHCP DNS: failed to remove PTR " . $ptrDomain)
        }
    }
} else={
    :log info ("DHCP DNS: no hostname from " . $clientMAC . " (" . $clientIP . "), skipping")
}
Home Assistant Integration
Rather than manually wiring up REST sensors in configuration.yaml, there’s a community HACS integration that handles everything cleanly — statistics sensors, an ad-blocking toggle, and device tracking, all configured through the UI.
Prepare a dedicated API token
Before touching Home Assistant, create a separate Technitium user for it — don’t reuse the admin account. Go to Administration → Users, add a new user and grant it access to Statistics and Blocking. Then sign in as that user, open the user menu in the top right, and create a non-expiring API token. The token inherits the user’s permissions, so keeping it scoped to read stats and toggle blocking is enough — no reason to hand Home Assistant full admin access to your DNS infrastructure.
Install the integration
Open HACS, go to Integrations, search for TechnitiumDNS, and install it. Restart Home Assistant.
Add both instances
Go to Settings → Integrations → Add Integration, search for TechnitiumDNS and fill in the primary server’s address, port 5380, and the API token you created. When prompted for Statistics duration, LastHour is the most useful for a live dashboard — it shows what your network is doing right now rather than averaged over days.
Repeat the process for the secondary server — adding both instances separately means Home Assistant monitors each node independently, which is the whole point.
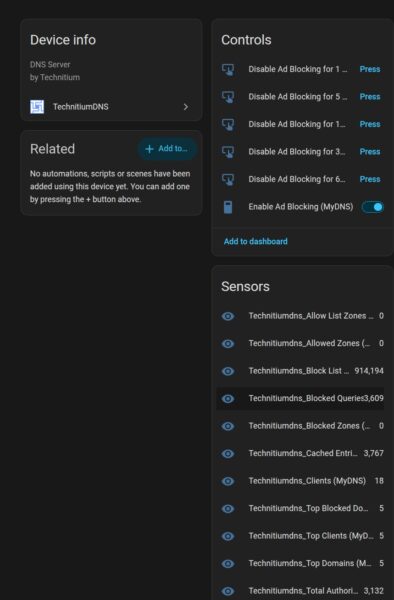
What you get
Each instance appears as a separate device in HA with sensors for total queries, blocked queries, and cache hits, plus an Enable Blocking switch that accurately reflects the current state — including when blocking is temporarily disabled, at which point it flips off automatically and back on when the timer expires.
The most immediately useful automation is alerting when the secondary starts handling more queries than the primary — the earliest reliable sign that the primary is struggling before anything else breaks. Both query count sensors are now in HA, so it’s a straightforward numeric comparison trigger that takes about five minutes to set up.